Introduction
PixaScheduler – Create, Design & Schedule – All Your Posts in One Place!
PixaScheduler is a powerful and user-friendly Social Media Scheduling and Content Creation platform built using modern web technologies. It provides both Admin and User dashboards, ensuring a smooth, efficient, and intuitive experience for managing social media content.
With PixaScheduler, you can easily create, design, and schedule posts across multiple social media platforms including Facebook, Instagram, YouTube, LinkedIn, Pinterest, and Reddit — all from a single centralized dashboard. The built-in content calendar and bulk scheduling features make planning and organizing posts fast and effortless.
The Admin Dashboard offers complete control over users, templates, assets, and platform settings. The built-in visual editor allows you to craft engaging posts using advanced tools such as text editing, image customization, freehand drawing, filters, and unlimited shapes. This flexibility ensures visually stunning and high-performing content.
Alongside the Admin Dashboard, PixaScheduler also provides a feature-rich User Dashboard where users can create and manage posts, save drafts, schedule content, view calendar timelines, and effortlessly connect and manage their social media accounts.
Unlock your social media potential with PixaScheduler — Plan Smarter, Create Better, and Publish Faster!
Demo Login Details
Admin Login Details
- URL : https://pixascheduler.pixelnx.com/
- Email :demoadmin@pixascheduler.com
- Password :demo@123#
User Login Details
- URL : https://pixascheduler.pixelnx.com/
- Email :demouser@pixascheduler.com
- Password :demo@123#
Script Created Date:
Please check Live Preview:
Creative Author Portfolio:
Features
There are more than enough features squeezed in this script like
Features of the admin
- Dashboard
- User manage and listing
- User Listing
- Templates Management
- Create and customize post
- Create Assets
- Create Assets Category
- Create Frames
- Manage Plans
- PayPal, Stripe, and RazorPay Payment Methods
- SMTP details
- View Transaction List
- Add image or video in the post
- Image Masking (Beta Version)
- Element Grouping
- Post Analytics
Features of the User Dashboard
- Dashboard
- Create Post
- Social Media Account integration
- Schedule Post
- Post Calendar
- Image Masking (Beta Version)
- Add image or video in the post
- View failed post notification in the calender
- View social media compatibility indicator for posts
- Element Grouping
- Image Creator
Features of the Script
- User Friendly
- Responsive
- Browser Compatible
- Lightweight

MongoDB Setup
This section explains how to create a MongoDB database and get the MongoDB connection URL required to run PixaScheduler.
Step 1: Go to MongoDB Atlas and Sign Up. If you already have an account, Log In.
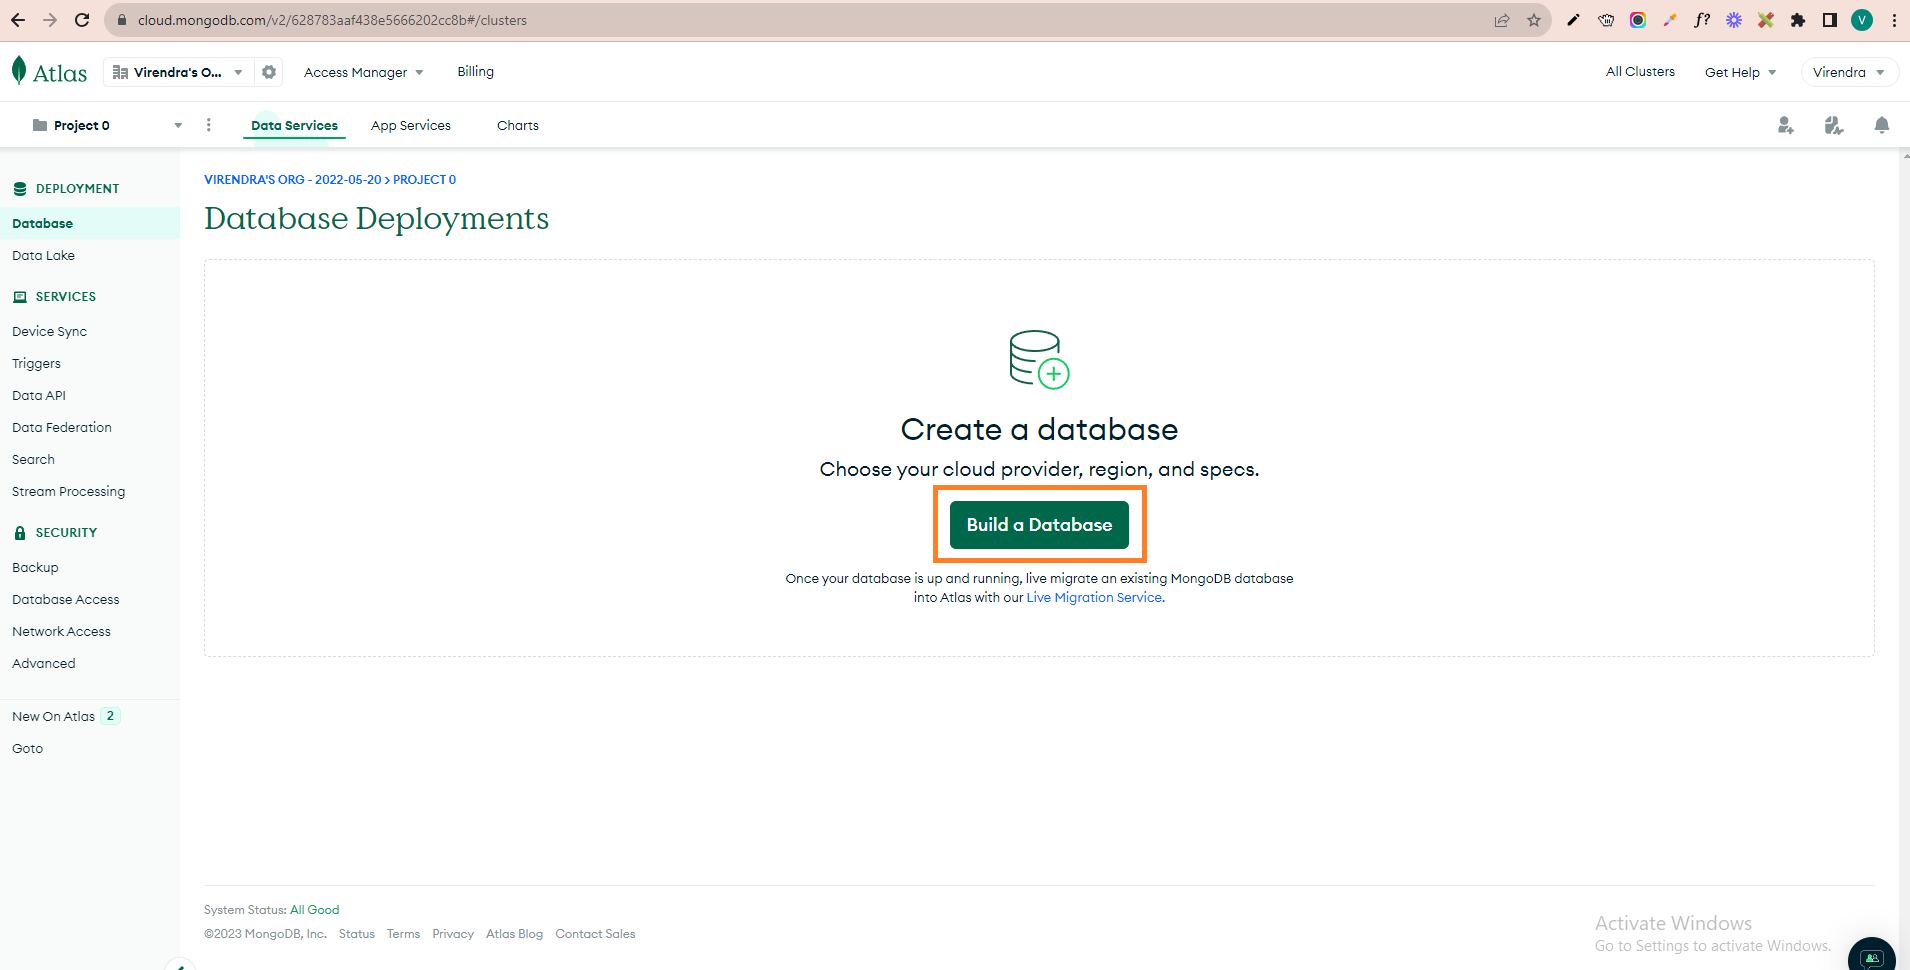
Step 2: After logging in, you will see the MongoDB Atlas dashboard. Click on "Build a Database" to create a new cluster.
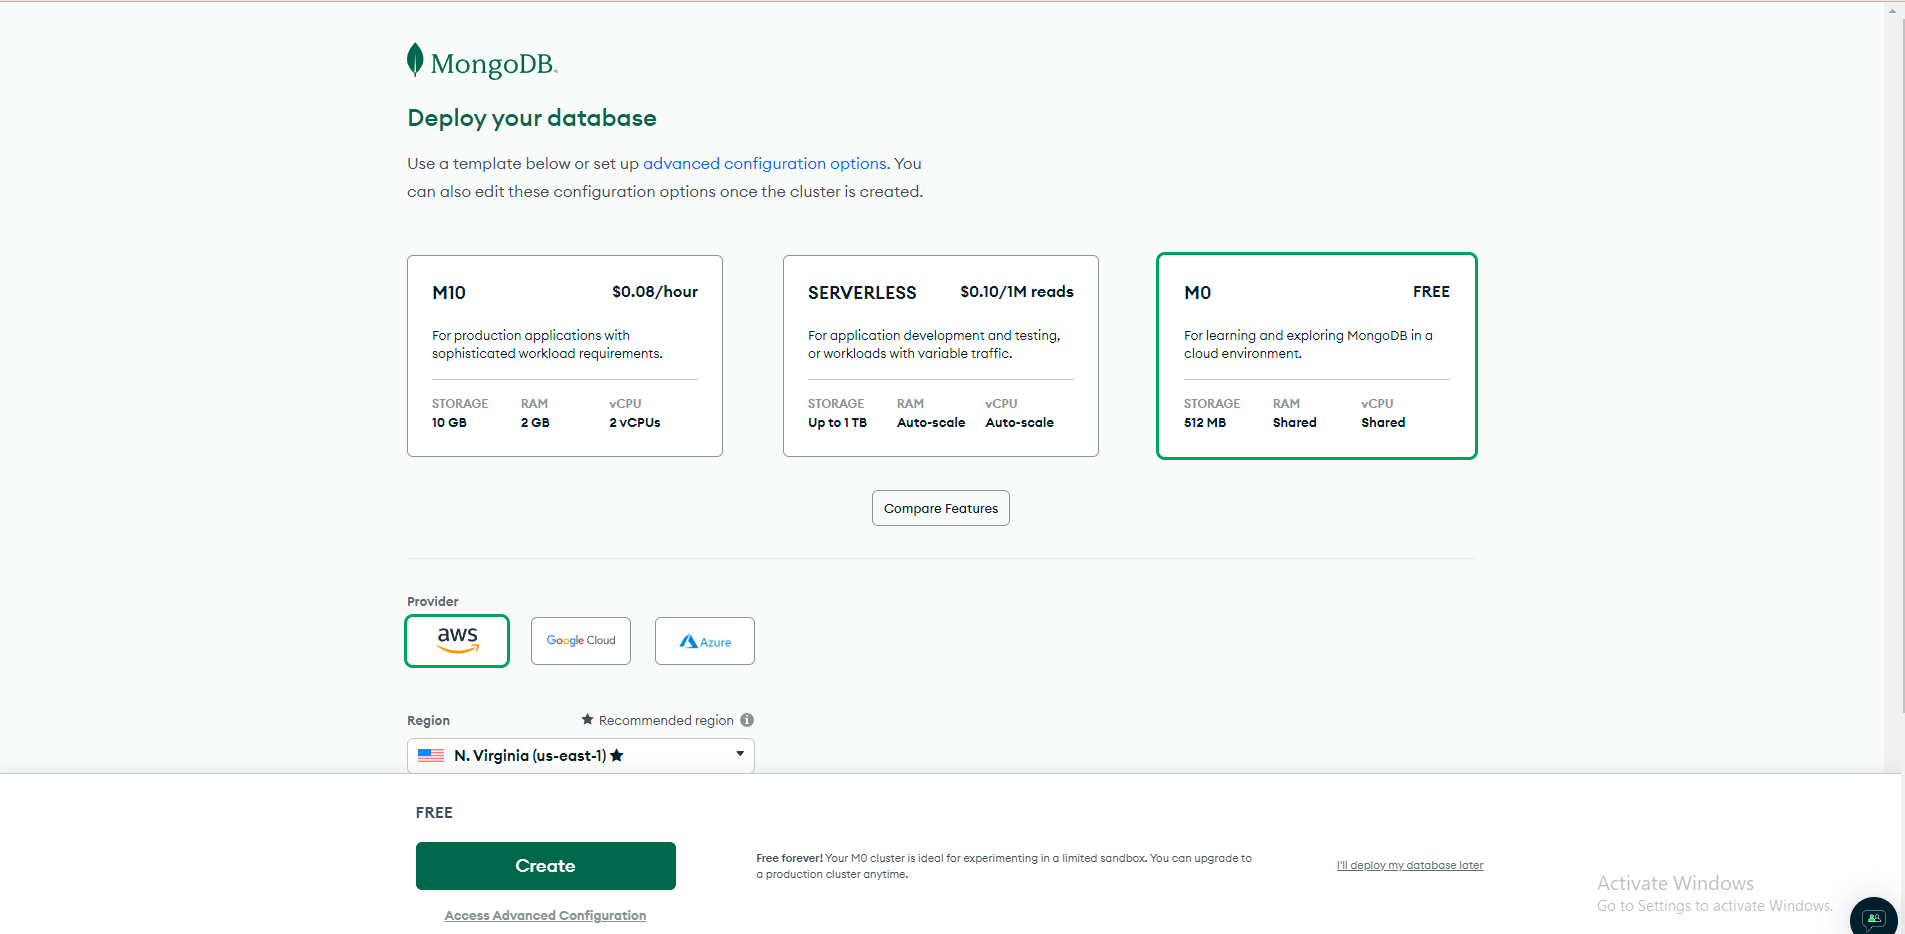
Step 3: Select the Free (Shared) plan and click on the Create button. This plan is sufficient for development and small production setups.
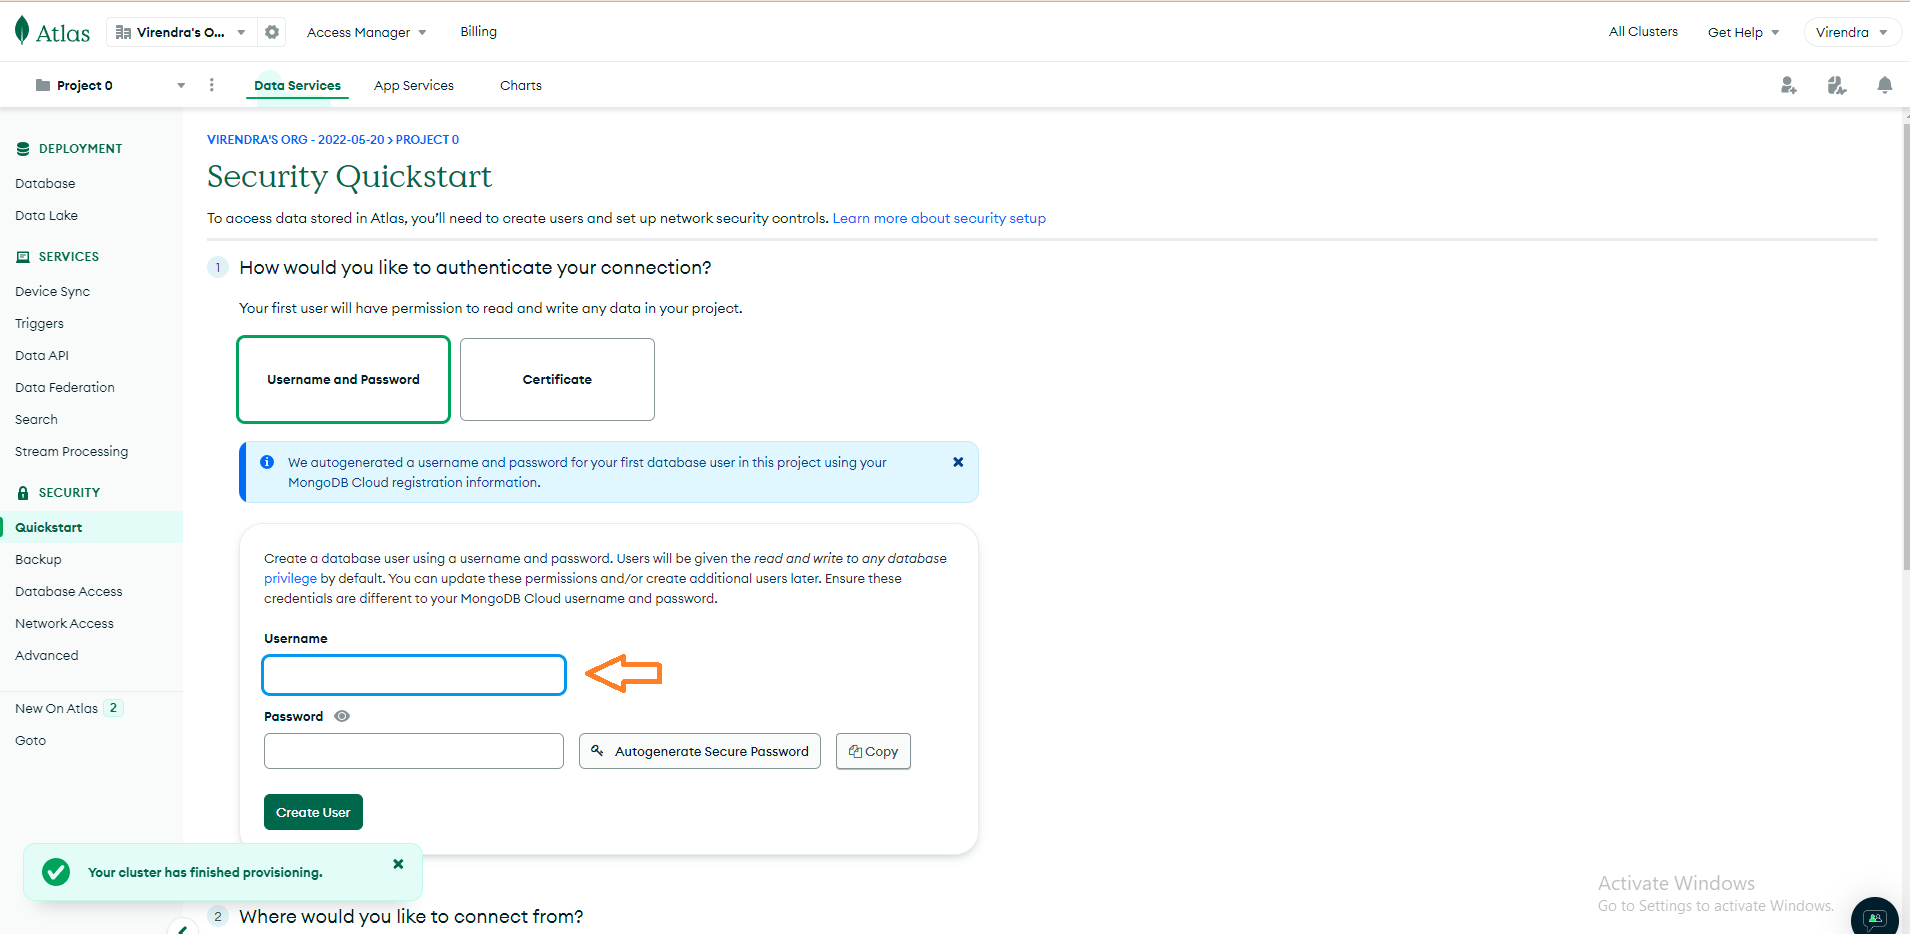
Step 4: Create a database user by providing a Username and Password. Make sure to save these credentials securely.
Step 5: Once the user is created, allow network access. You can either add your server IP address or select Allow Access From Anywhere for testing.
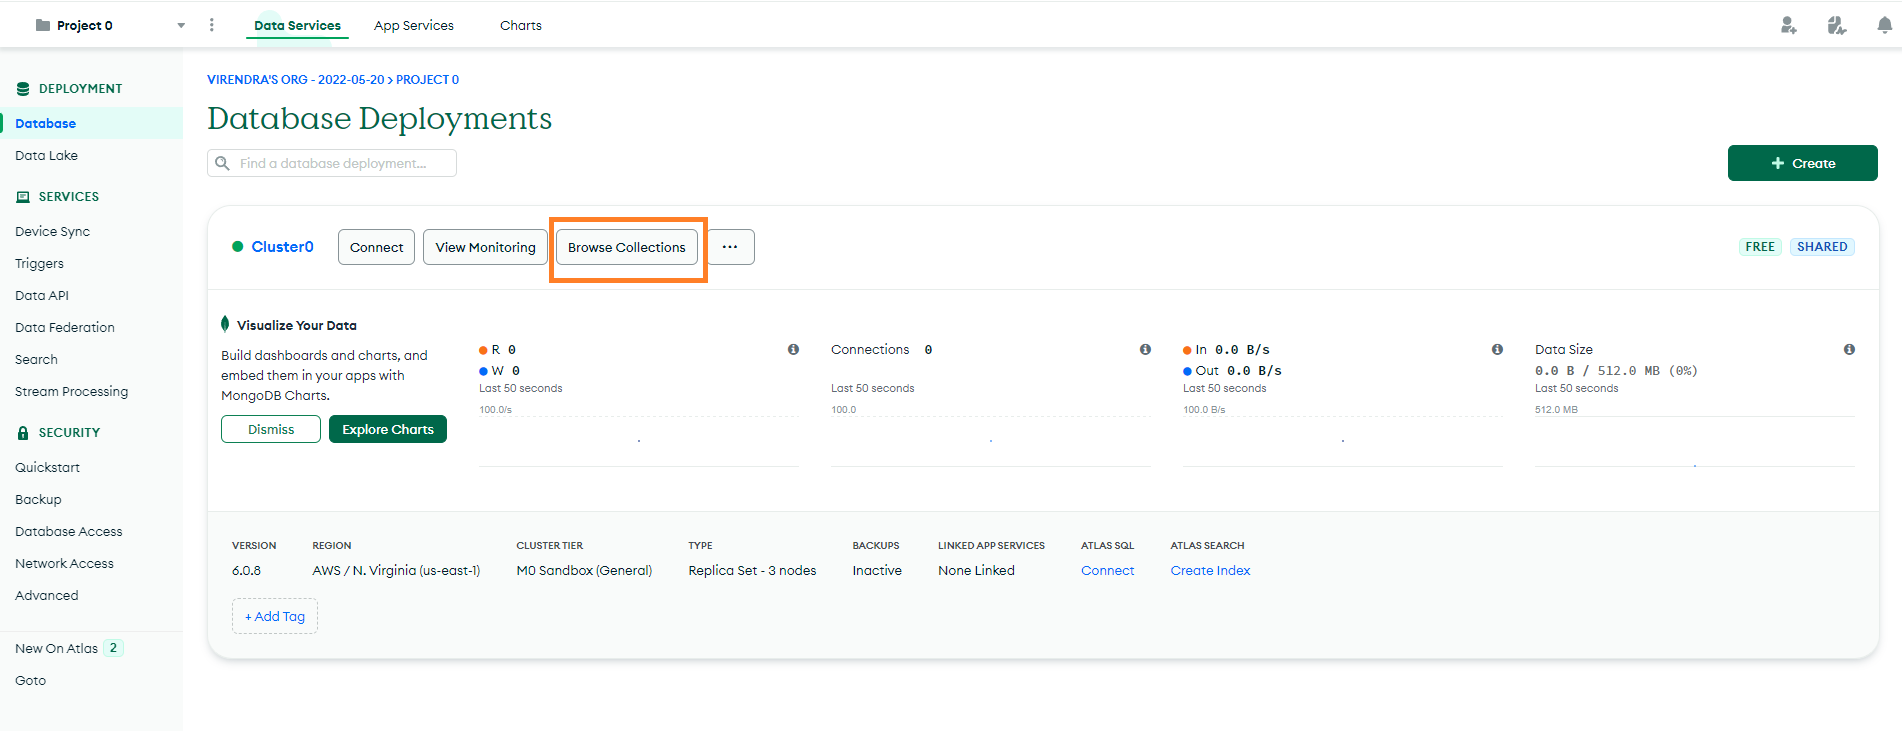
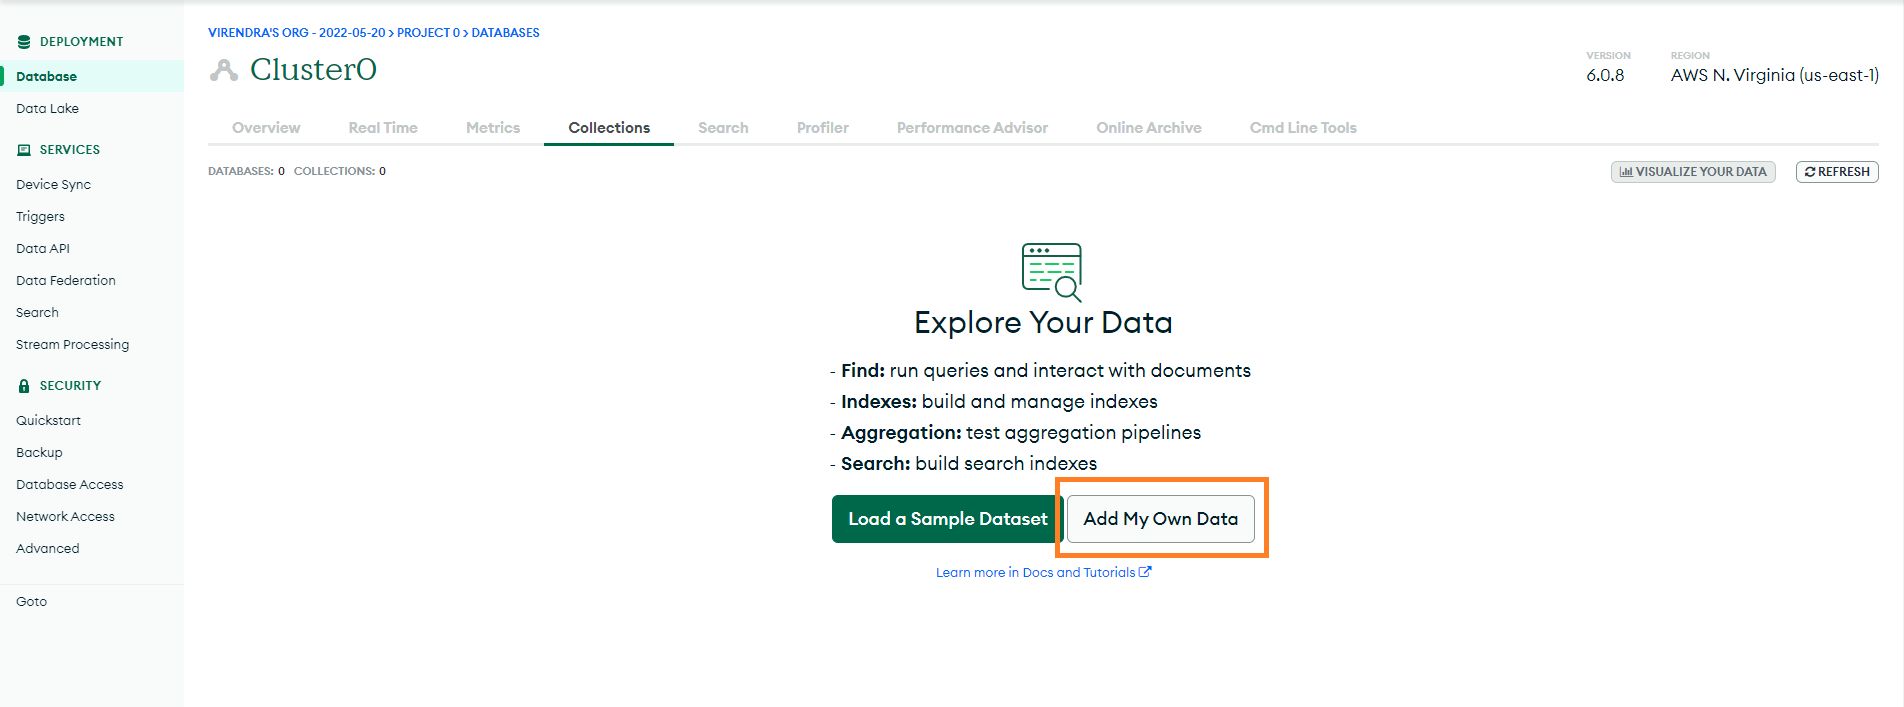
Step 6: After completing the setup, click on your created cluster and go to "Browse Collections".
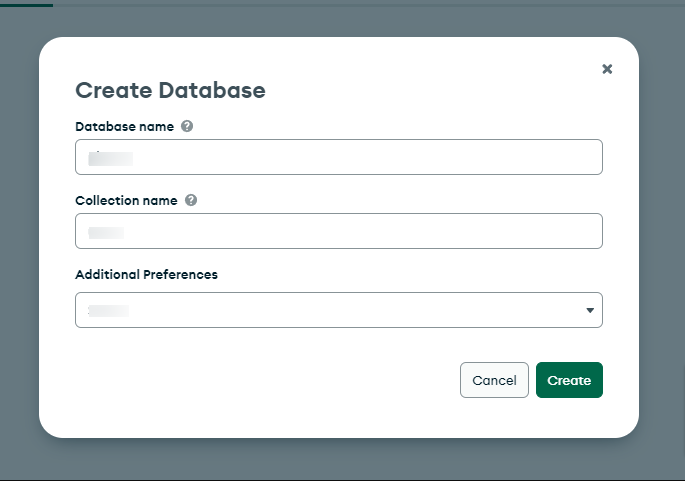
Step 7: Click on "Add My Own Data" and create a database.
Step 8: Enter the database name (for example: pixascheduler) and create the first collection.
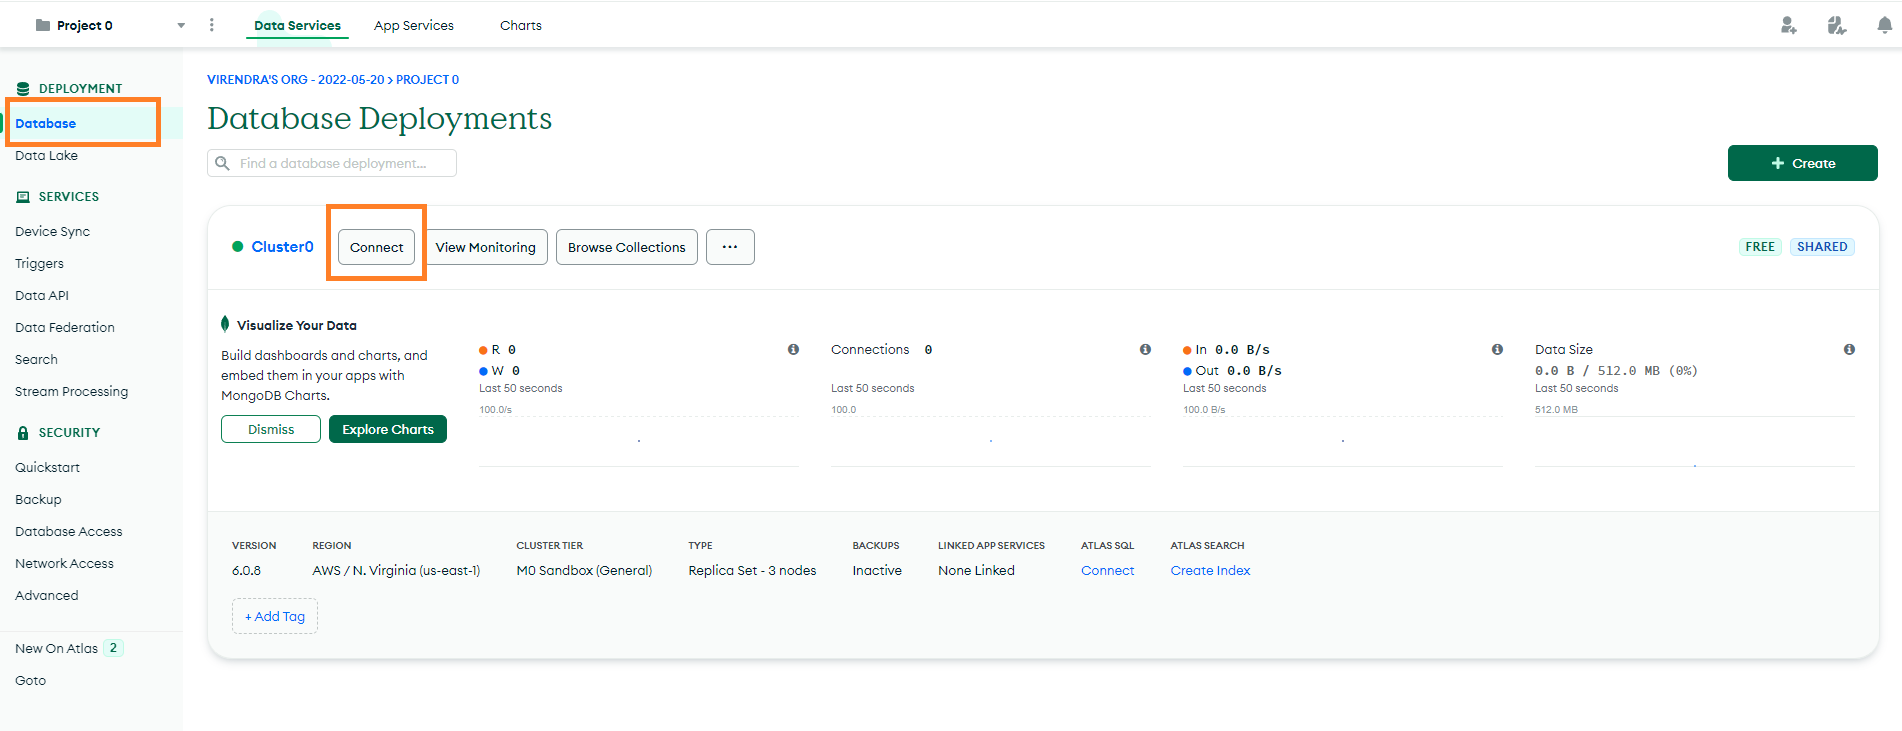
Step 9: Now click on the Connect button of your cluster.
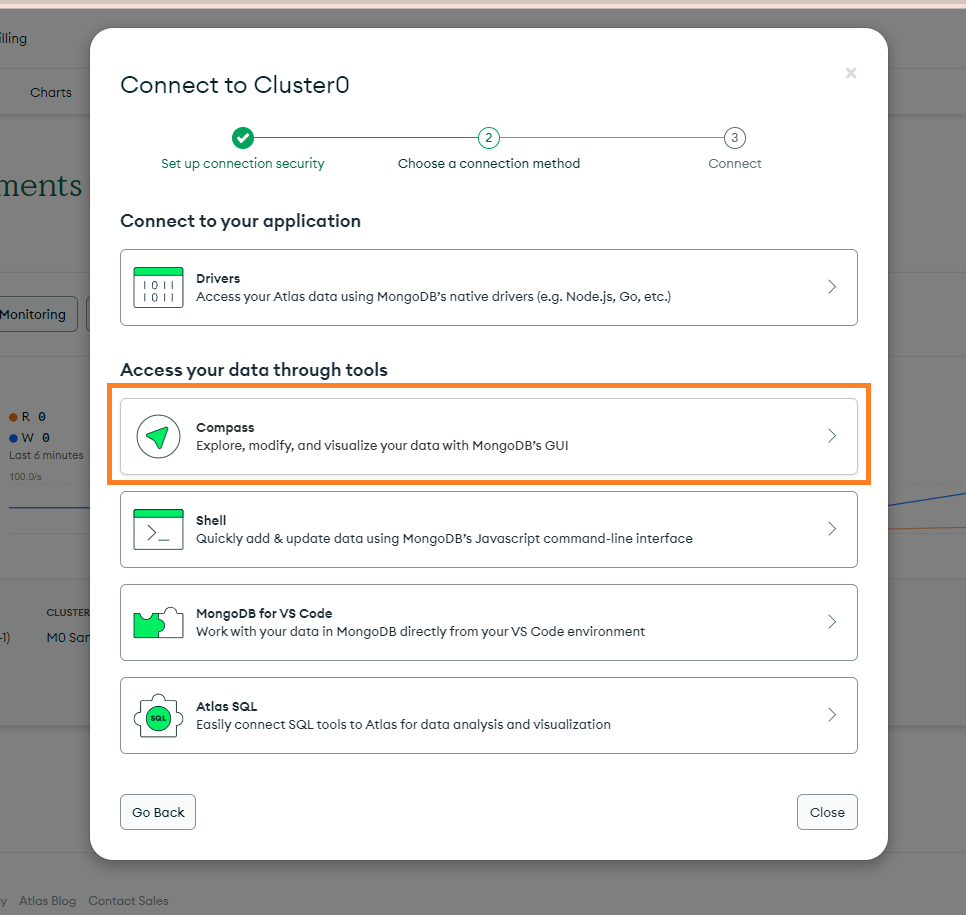
Step 10: Choose "MongoDB Compass" as the connection method.
Step 11: Copy the MongoDB connection string provided by MongoDB Atlas.
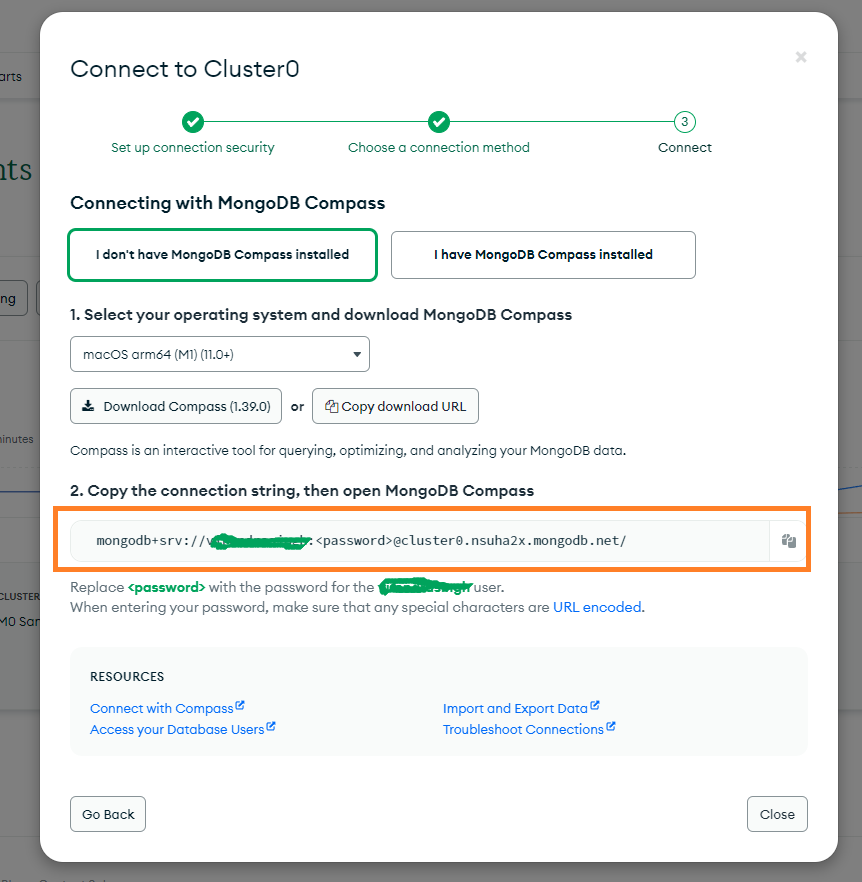
Step 12: Your MongoDB connection URL will look like this:
| mongodb+srv://<username>:<password>@cluster0.mongodb.net/ |
Replace the placeholders with your actual MongoDB credentials.
Example:
Username: pixascheduler
Password: yourpassword
Database Name: pixascheduler
Final Example Connection URL:
| mongodb+srv://pixascheduler:yourpassword@cluster0.mongodb.net/pixascheduler?retryWrites=true&w=majority |
Add this MongoDB connection URL to your environment file (.env) or configuration file as mentioned in the next steps of this documentation.
Demo Data Import
This section explains how to import the demo data into MongoDB for PixaScheduler.
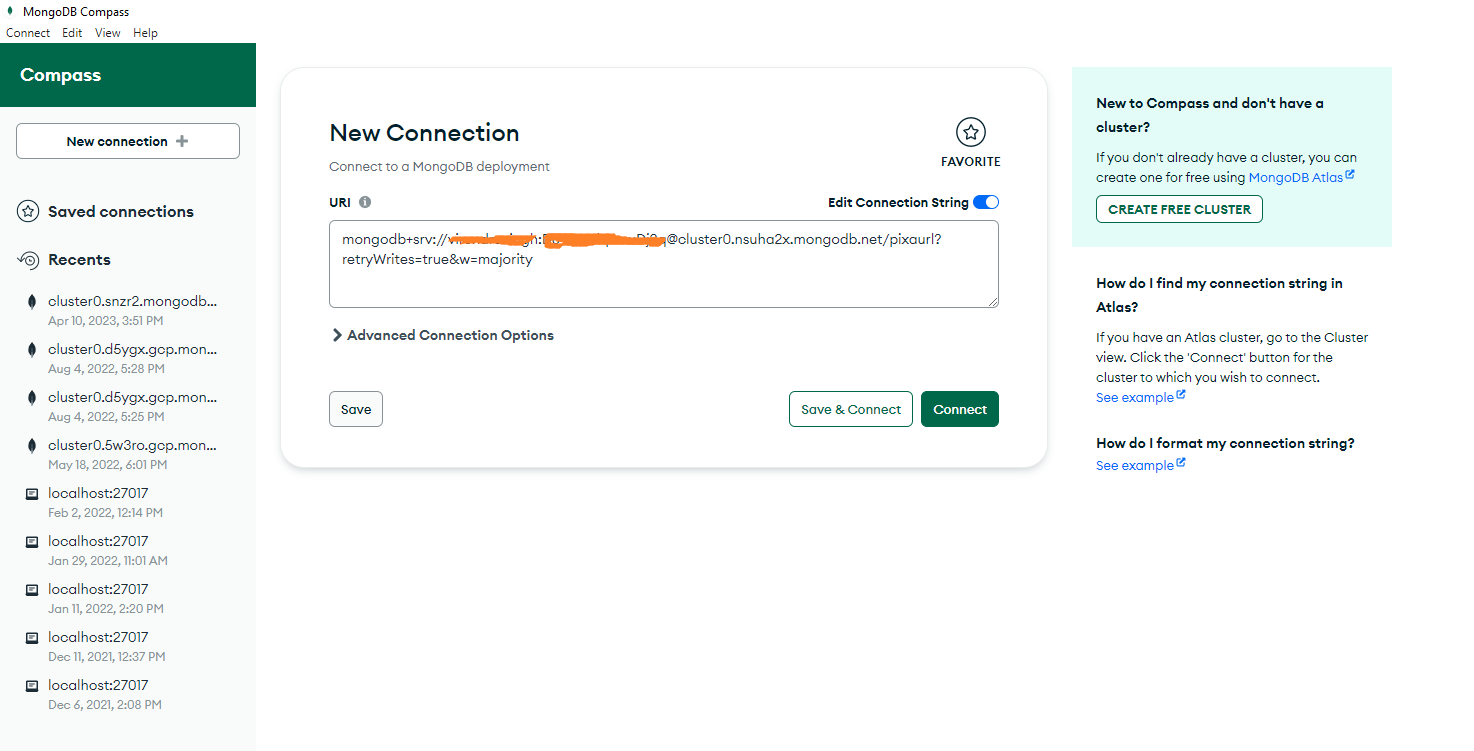
Step 1: Open MongoDB Compass, paste your MongoDB Connection URL, and click Connect.
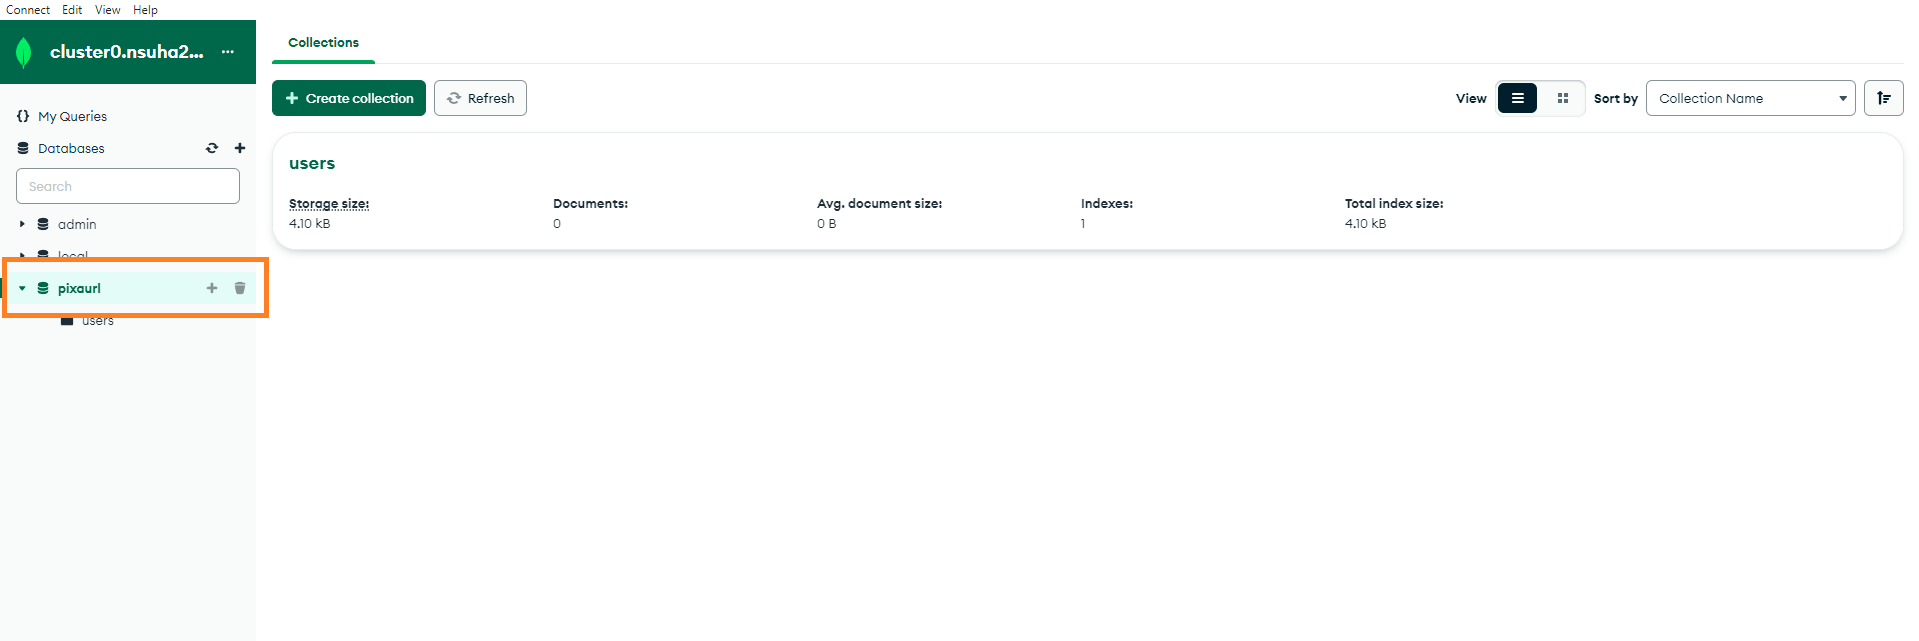
Step 2: Click your database name (example: pixascheduler).
Initially, you will see the following collections:
- 1. users
Important: Do not use any prefix for these collection names.
Import Demo Users
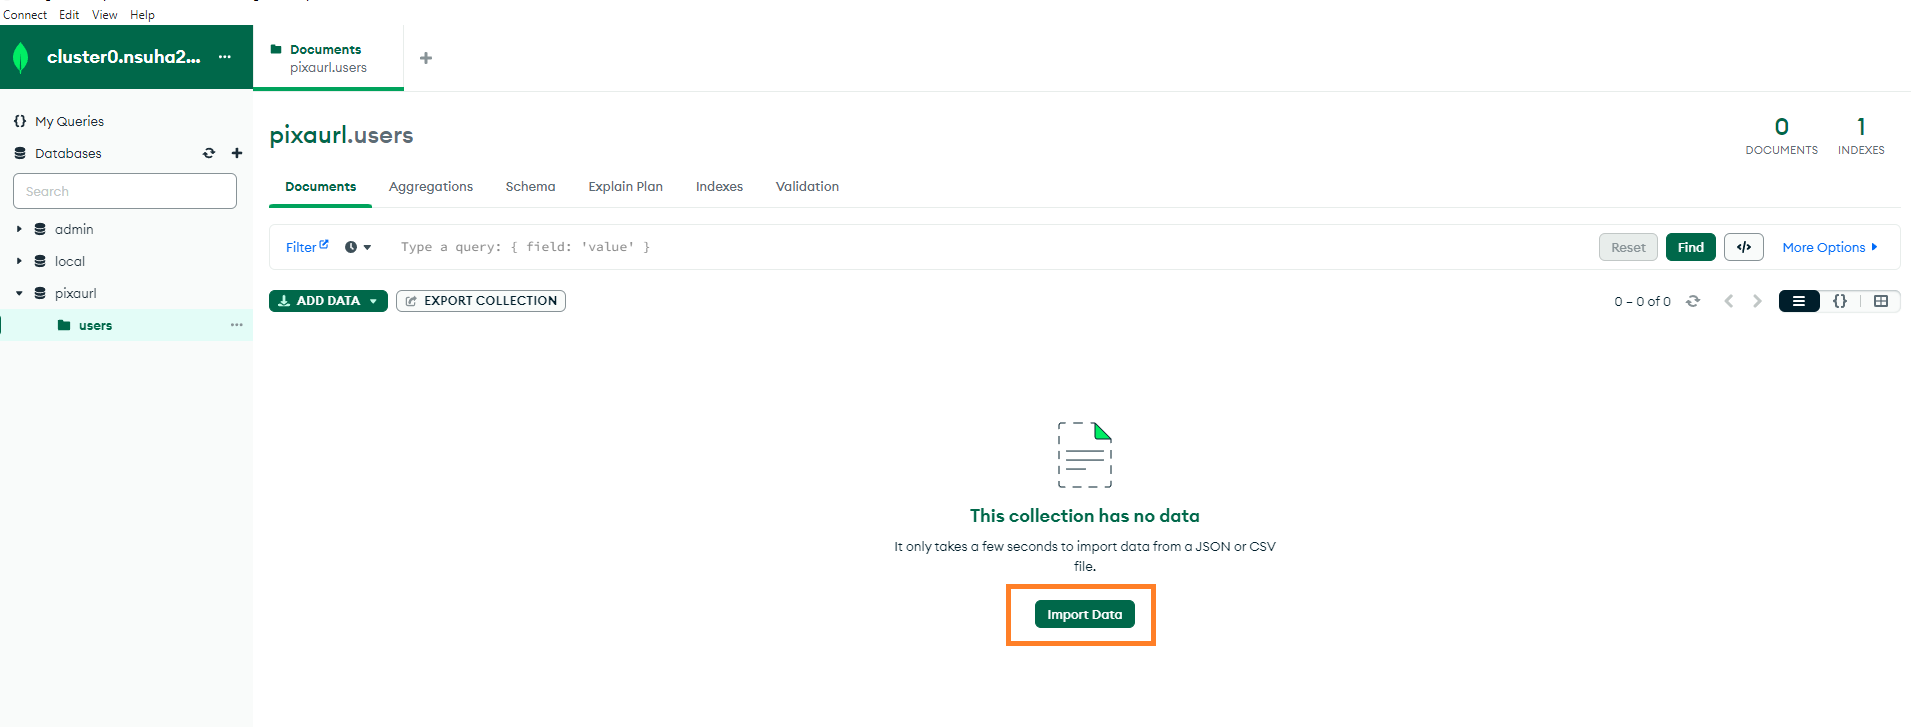
Step 3: Click on the users collection.

Step 4: Import the demo users JSON file.
Download demo users file:
Click here to download users.json
Import Demo Categories
Step 5: If the categories collection does not exist in your database, you must create it manually.
To create the categories collection:
- Click on your database name (example: pixascheduler)
- Click the "Create Collection" button

Enter the collection name exactly as:
categories
Important: The collection name must be lowercase and without any prefix.

Step 6: Now click on the newly created categories collection.
Step 7: Import the demo categories JSON file.
Download demo categories file:
Click here to download categories.json
Step 7: After importing both collections successfully, open your application in the browser:
https://your-domain.com/ or
https://your-domain.com/folder-name/
You will now see the login page for the PixaScheduler Admin Panel.
Demo Login Credentials
Admin Account
- Email: demoadmin@pixascheduler.com
- Password: demo@123#
User Account
- Email: demouser@pixascheduler.com
- Password: demo@123#
Script Installation
Prerequisites
Before installing the script, make sure Node.js is installed on your server and MongoDB is available.
You can check the Node.js version using the following command: node -v
Update Note
Please take a full backup before updating the script.
Installation Steps
Step 1: Extract the PixaScheduler package downloaded from Codecanyon. Inside the package, you will find the main files and source code.
Step 2: Open the Terminal or Command Prompt.
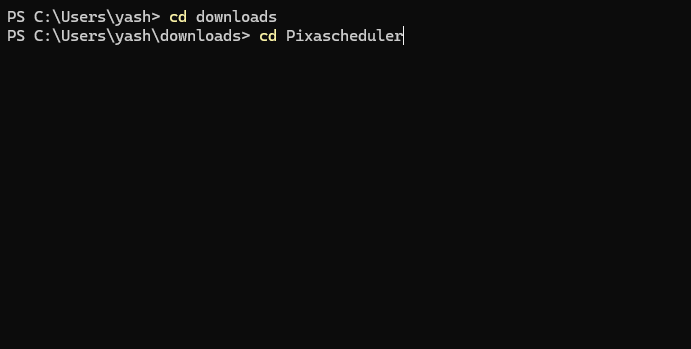
Step 3: Navigate to the extracted project directory:
cd Extract_file_location
Now move inside the project folder:
cd PixaScheduler
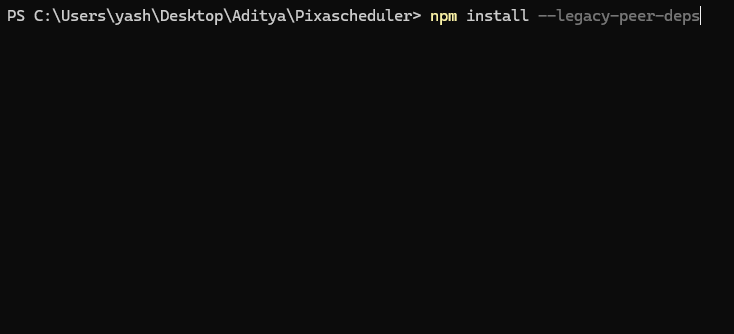
Step 4: Install required npm modules:
npm install --legacy-peer-deps
Basic Environment Configuration
Step 5: Open the .env file and configure the MongoDB connection URL. This step is required before running the application.
MONGODB_CONNECTION_URL=your_mongodb_connection_string
The application runs on port 3000 by default. You can change it for live if required:
PORT=3000
Application URL & PayPal Environment
Step 6: Configure the application URL and PayPal mode.
For local or testing environment, the following values are used:
let APP_URL = 'http://localhost:3000/';
let PAYPAL_URL = 'https://api-m.sandbox.paypal.com';
For production (live server), update the domain URL inside the production block:
if (process.env.NODE_ENV == "production") {
  APP_URL = 'https://your-domain.com/';
  PAYPAL_URL = 'https://api-m.paypal.com';
}
- Replace
https://your-domain.comwith your live domain URL - Sandbox PayPal is used for testing payments
- Live PayPal API is used automatically in production mode
Run the Application
Step 7: Start the application.
If running on a local server:
npm run dev
If running on a live server:
npm run build && npm start
Basic Setup
This section guides you through the basic configuration needed to run PixaScheduler after installation and MongoDB setup.
1. Next.js Configuration
Open the next.config.js file in your project root and configure your environment variables as shown below:
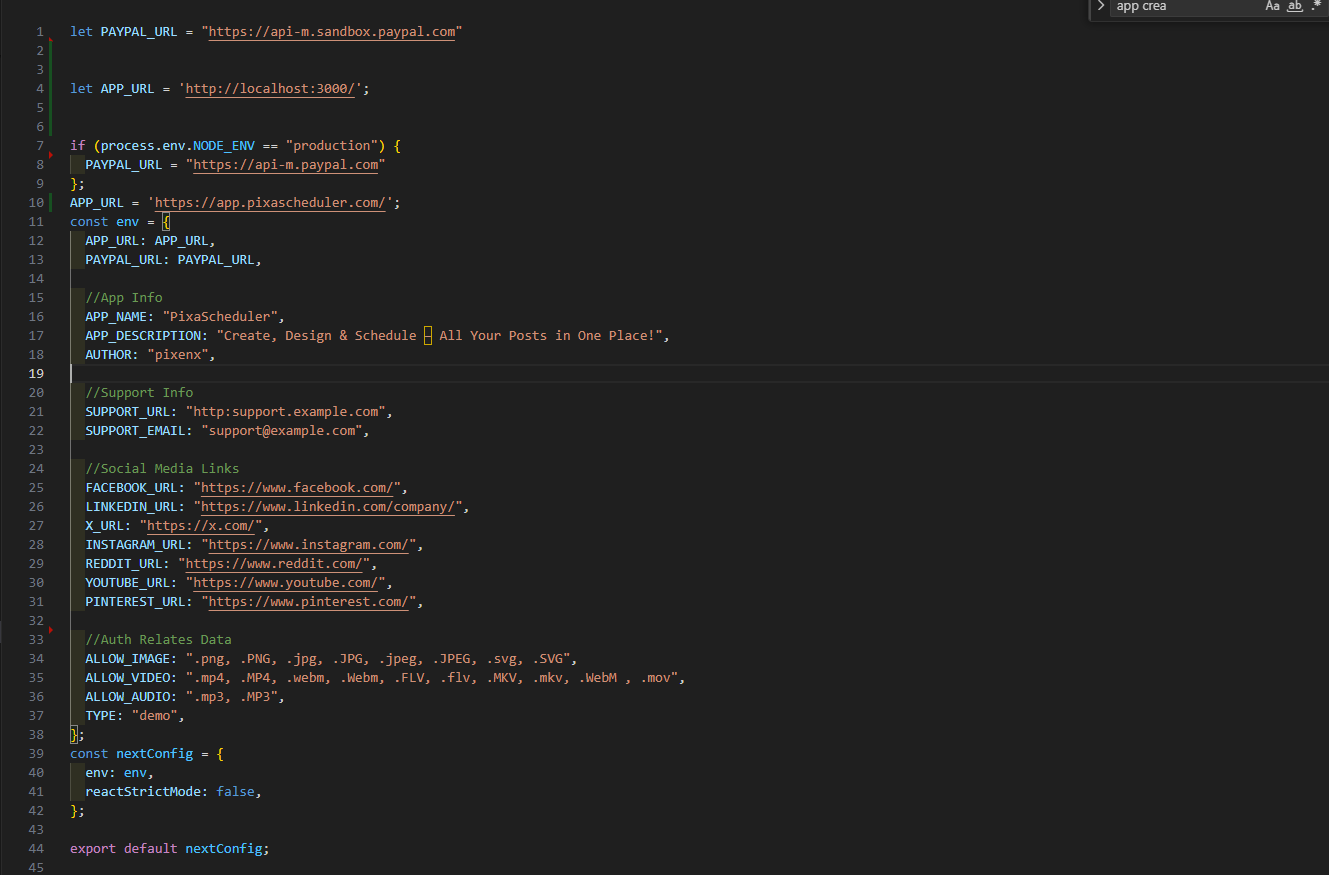
let PAYPAL_URL = "https://api-m.sandbox.paypal.com"
let APP_URL = 'http://localhost:3000/';

if (process.env.NODE_ENV == "production") {
  PAYPAL_URL = "https://api-m.paypal.com"
};
APP_URL = 'https://pixascheduler.pixelnx.com/';

const env = {
  APP_URL: APP_URL,
  PAYPAL_URL: PAYPAL_URL,
  APP_NAME: "PixaScheduler",
  APP_DESCRIPTION: "Create, Design & Schedule – All Your Posts in One Place!",
  AUTHOR: "pixenx",
  SUPPORT_URL: "http:support.example.com",
  SUPPORT_EMAIL: "support@example.com",
  FACEBOOK_URL: "https://www.facebook.com/",
  LINKEDIN_URL: "https://www.linkedin.com/company/",
  X_URL: "https://x.com/",
  INSTAGRAM_URL: "https://www.instagram.com/",
  REDDIT_URL: "https://www.reddit.com/",
  YOUTUBE_URL: "https://www.youtube.com/",
  PINTEREST_URL: "https://www.pinterest.com/",
  ALLOW_IMAGE: ".png, .PNG, .jpg, .JPG, .jpeg, .JPEG, .svg, .SVG",
  ALLOW_VIDEO: ".mp4, .MP4, .webm, .Webm, .FLV, .flv, .MKV, .mkv, .WebM , .mov",
  ALLOW_AUDIO: ".mp3, .MP3",
  TYPE: "demo",
};

const nextConfig = {
  env: env,
  reactStrictMode: false,
};

export default nextConfig;
2. Environment Variables (.env)
Use the existing .env file in your project root and ensure it contains the following details:
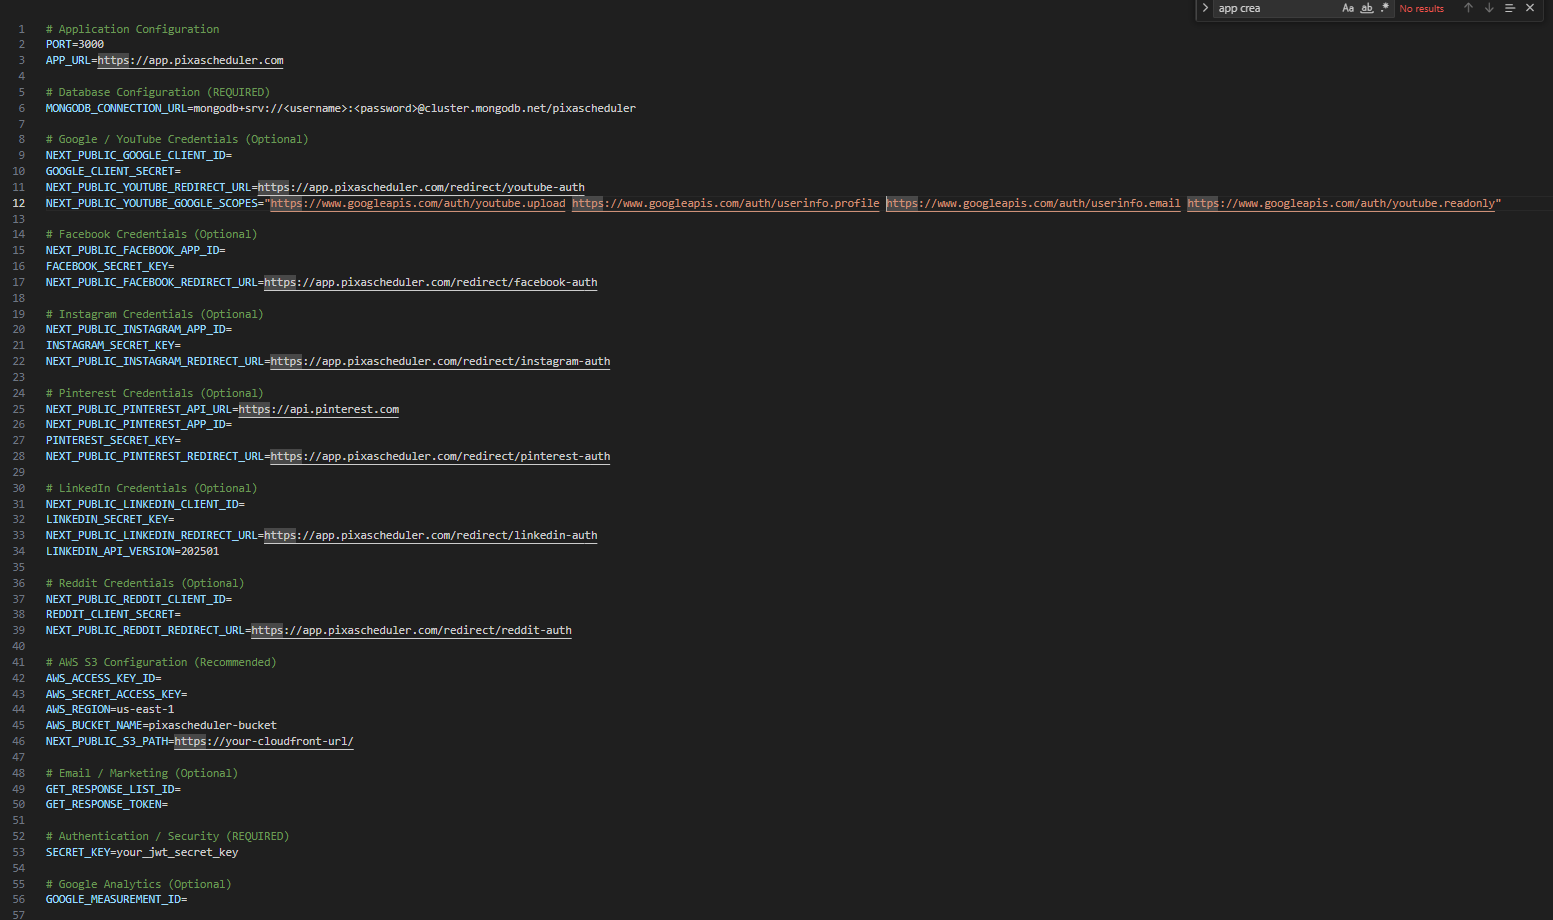
# SERVER CONFIG
PORT=3000
APP_URL="https://your-domain.com/"

# DATABASE CONFIG
MONGODB_CONNECTION_URL="YOUR_MONGODB_CONNECTION_URL"


# YOUTUBE / GOOGLE
NEXT_PUBLIC_GOOGLE_CLIENT_ID="YOUR_GOOGLE_CLIENT_ID"
GOOGLE_CLIENT_SECRET="YOUR_GOOGLE_CLIENT_SECRET"

NEXT_PUBLIC_YOUTUBE_REDIRECT_URL="https://your-domain.com/redirect/youtube-auth"
NEXT_PUBLIC_YOUTUBE_GOOGLE_SCOPES="https://www.googleapis.com/auth/youtube.upload https://www.googleapis.com/auth/userinfo.profile https://www.googleapis.com/auth/userinfo.email https://www.googleapis.com/auth/youtube.readonly"


# FACEBOOK AUTH
NEXT_PUBLIC_FACEBOOK_APP_ID="YOUR_FACEBOOK_APP_ID"
FACEBOOK_SECRET_KEY="YOUR_FACEBOOK_APP_SECRET"
NEXT_PUBLIC_FACEBOOK_REDIRECT_URL="https://your-domain.com/redirect/facebook-auth"


# INSTAGRAM AUTH
NEXT_PUBLIC_INSTAGRAM_APP_ID="YOUR_INSTAGRAM_APP_ID"
INSTAGRAM_SECRET_KEY="YOUR_INSTAGRAM_APP_SECRET"
NEXT_PUBLIC_INSTAGRAM_REDIRECT_URL="https://your-domain.com/redirect/instagram-auth"


# PINTEREST AUTH
NEXT_PUBLIC_PINTEREST_API_URL="api.pinterest.com"
NEXT_PUBLIC_PINTEREST_APP_ID="YOUR_PINTEREST_APP_ID"
PINTEREST_SECRET_KEY="YOUR_PINTEREST_APP_SECRET"
NEXT_PUBLIC_PINTEREST_REDIRECT_URL="https://your-domain.com/redirect/pinterest-auth"


# LINKEDIN AUTH
NEXT_PUBLIC_LINKEDIN_CLIENT_ID="YOUR_LINKEDIN_CLIENT_ID"
LINKEDIN_SECRET_KEY="YOUR_LINKEDIN_SECRET"
NEXT_PUBLIC_LINKEDIN_REDIRECT_URL="https://your-domain.com/redirect/linkedin-auth"
LINKEDIN_API_VERSION="202501"


# REDDIT AUTH
NEXT_PUBLIC_REDDIT_CLIENT_ID="YOUR_REDDIT_CLIENT_ID"
REDDIT_CLIENT_SECRET="YOUR_REDDIT_CLIENT_SECRET"
NEXT_PUBLIC_REDDIT_REDIRECT_URL="https://your-domain.com/redirect/reddit-auth"


# AWS S3 STORAGE
AWS_ACCESS_KEY_ID="YOUR_AWS_ACCESS_KEY"
AWS_SECRET_ACCESS_KEY="YOUR_AWS_SECRET"
AWS_REGION="us-east-1"
BUCKET_NAME="YOUR_S3_BUCKET_NAME"
NEXT_PUBLIC_S3_PATH="https://YOUR_CLOUDFRONT_URL/"


# GET RESPONSE API
GET_RESPONSE_LIST_ID="YOUR_GETRESPONSE_LIST_ID"
GET_RESPONSE_TOKEN="YOUR_GETRESPONSE_API_KEY"


# JWT CONFIG
SECRET_KEY="YOUR_JWT_SECRET_KEY"


# GOOGLE ANALYTICS
GOOGLE_MEASUREMENT_ID="YOUR_GA_MEASUREMENT_ID"
3. SMTP Setup
Configure SMTP settings from Admin Panel: Settings > Integrations > SMTP Settings. Fill in the host, port, username, and password to enable email notifications.
4. Payment Gateway Configuration
Enable payment options like PayPal, Stripe, and RazorPay from Admin Panel: Settings > Payments. You can check/uncheck the options to show them to users.
5. API Keys
Configure API keys for third-party services from Admin > Settings > Integrations > API Keys
- OpenAI Key
- Pexels Key
- Pixabay Key
- Unsplash Key
6. Subscription Plan Setup
Admin can create subscription plans from Admin Panel: Settings > Subscription Plans > Add Plan.
Options for creating a plan:
- Plan Name *
- Plan Period *
- Plan Type * (Paid / Admin)
- Pricing (USD / INR if RazorPay is selected)
- Total Posts (-1 for unlimited)
- Image Creation Limit (-1 for unlimited)
- Total Social Accounts
- AI Credits (optional)
- Description *
- Access (AI Text Generation, AI Image Generation, Third Party Image Apps, Editor Access, Template Access)
- Platform (PayPal, Stripe, RazorPay)
Note: Double-check all fields before submitting. Plan details cannot be updated once submitted.
7. Free User Signup Settings
This section explains how to configure limits and access for free users in PixaScheduler. These settings allow you to define what a free user can use after signing up.
Navigate to Admin Panel: Settings > Free User Signup Settings.
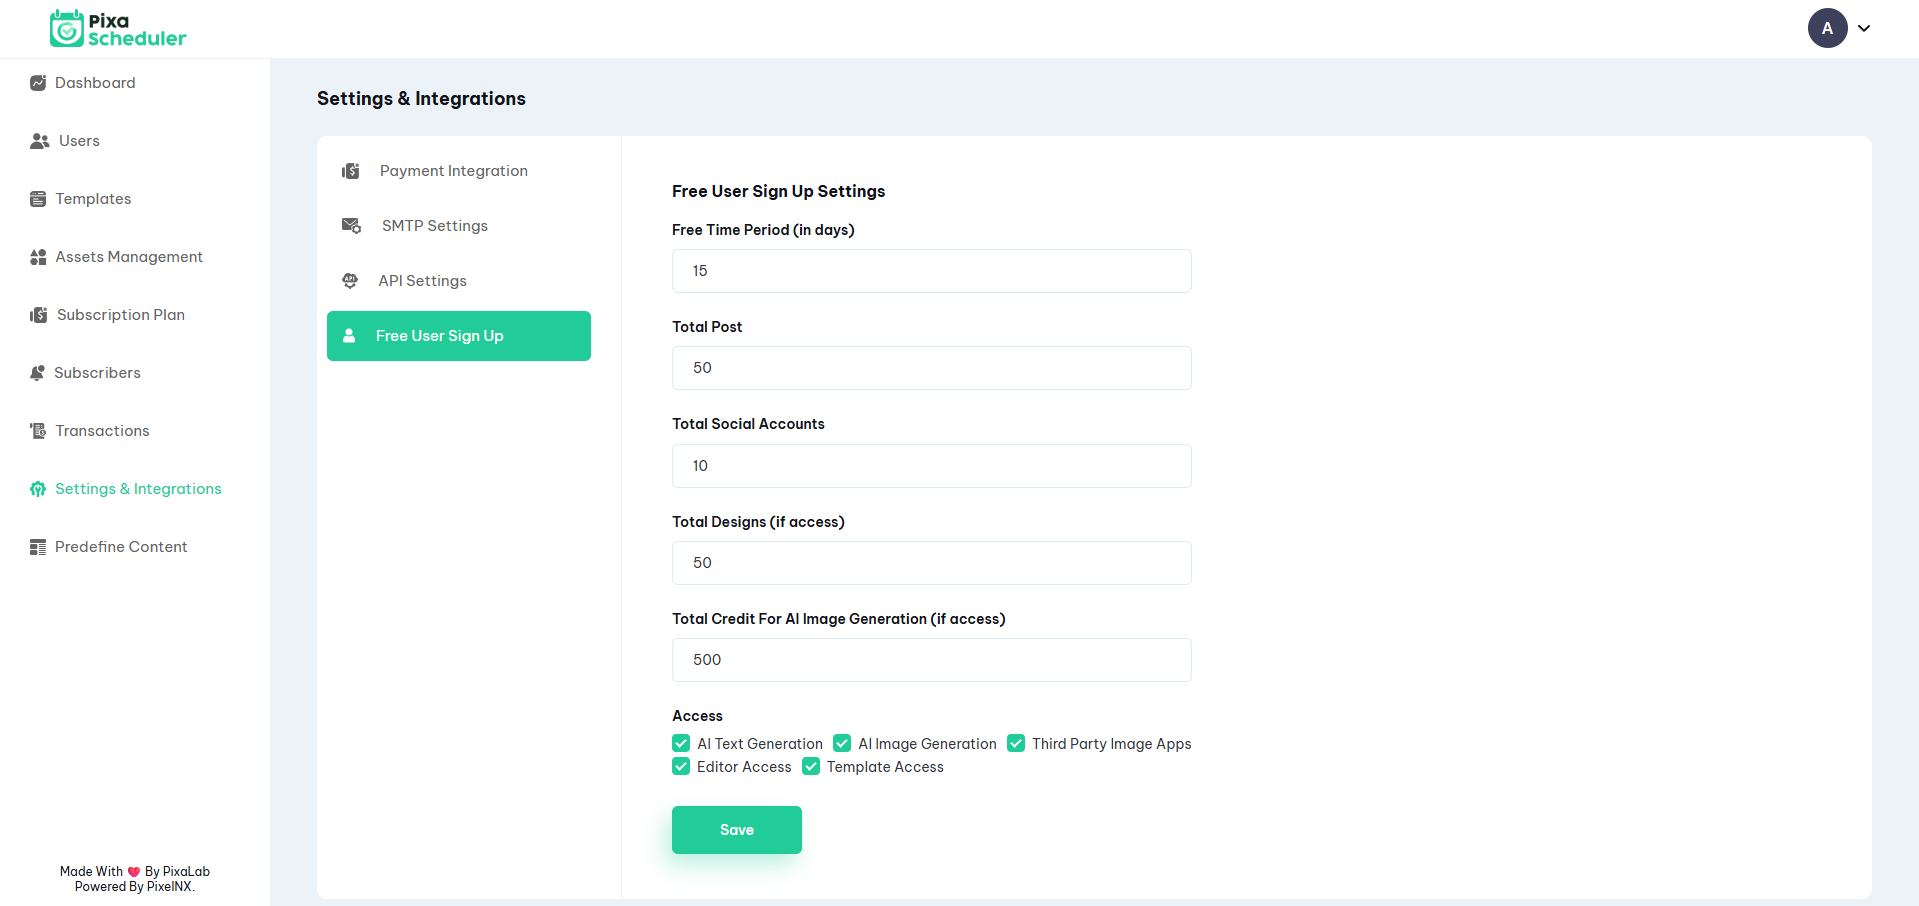
Configuration options:
- Free Time Period (in days): Number of days the user can use the free plan. Example: 15 days.
- Total Posts: Maximum number of posts the free user can schedule. Example: 50.
- Total Social Accounts: Maximum social accounts a free user can connect. Example: 2.
- Total Designs (if access): Maximum number of designs the free user can create. Example: 50.
- Total Credit for AI Image Generation (if access): Credits available for AI image generation. Example: 50.
- Access: Toggle features accessible to free users:
- AI Text Generation
- AI Image Generation
- Third Party Image Apps
- Editor Access
- Template Access
After configuring, click Save to apply the settings.
App Creation
Facebook & Instagram
How to Create and Configure App for Facebook & Instagram
This section explains how to create a Facebook app for business login and Instagram Graph API integration for PixaScheduler. Ensure you have a Facebook developer account before starting.
Step 1: Create the App
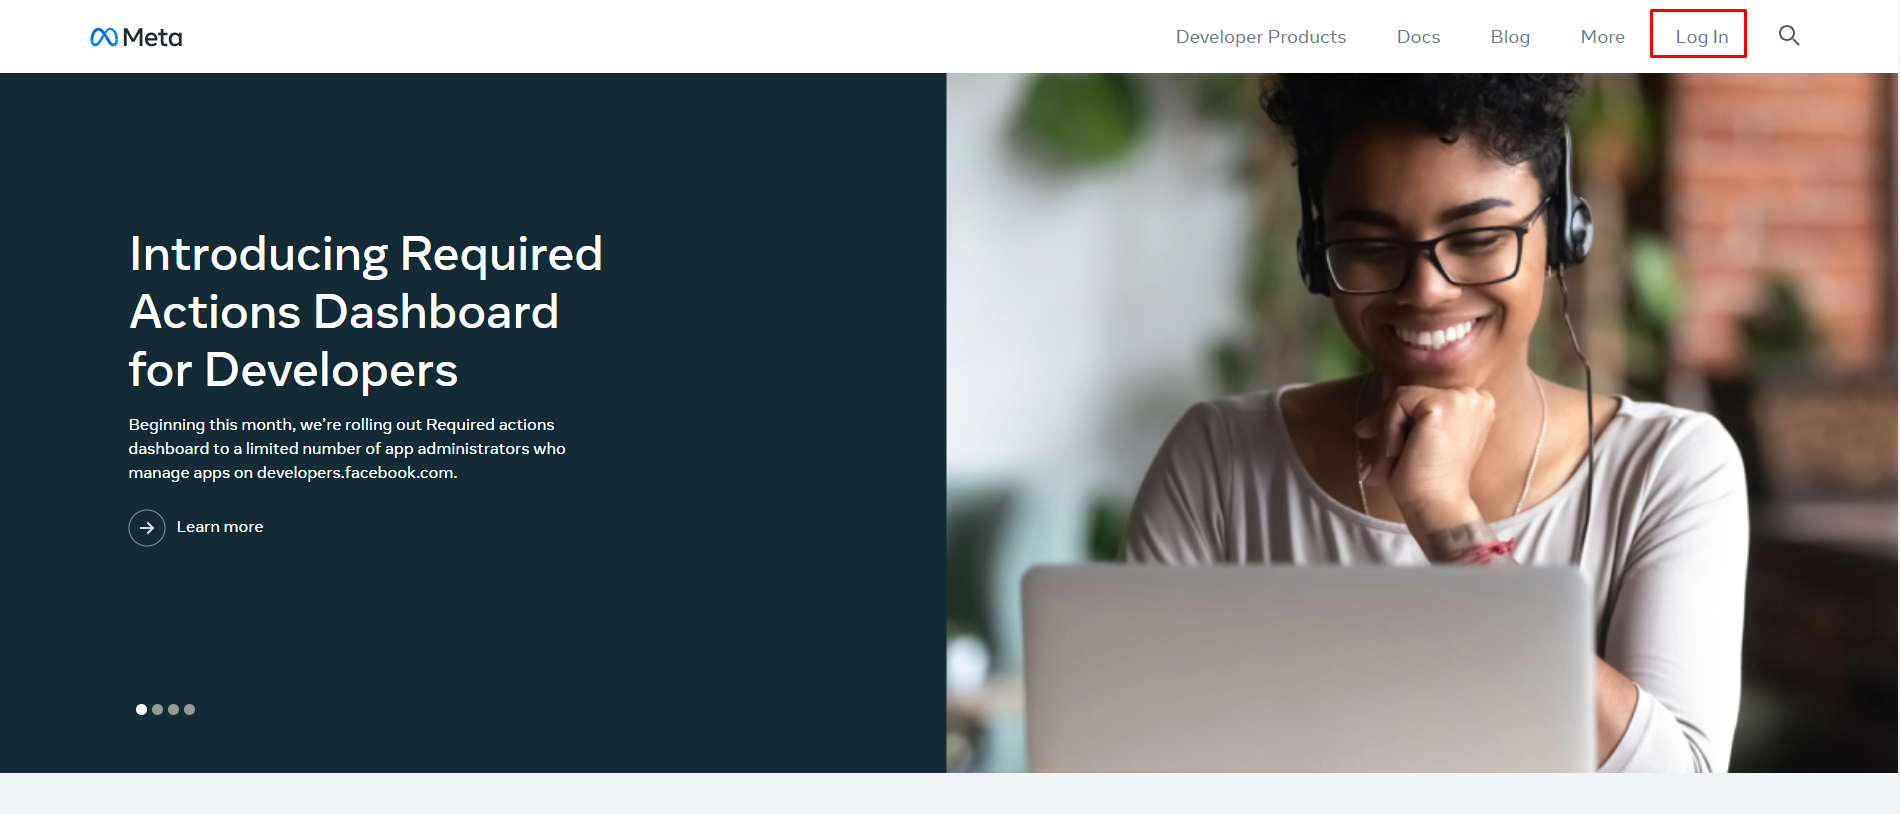
Go to https://developers.facebook.com/ and login.
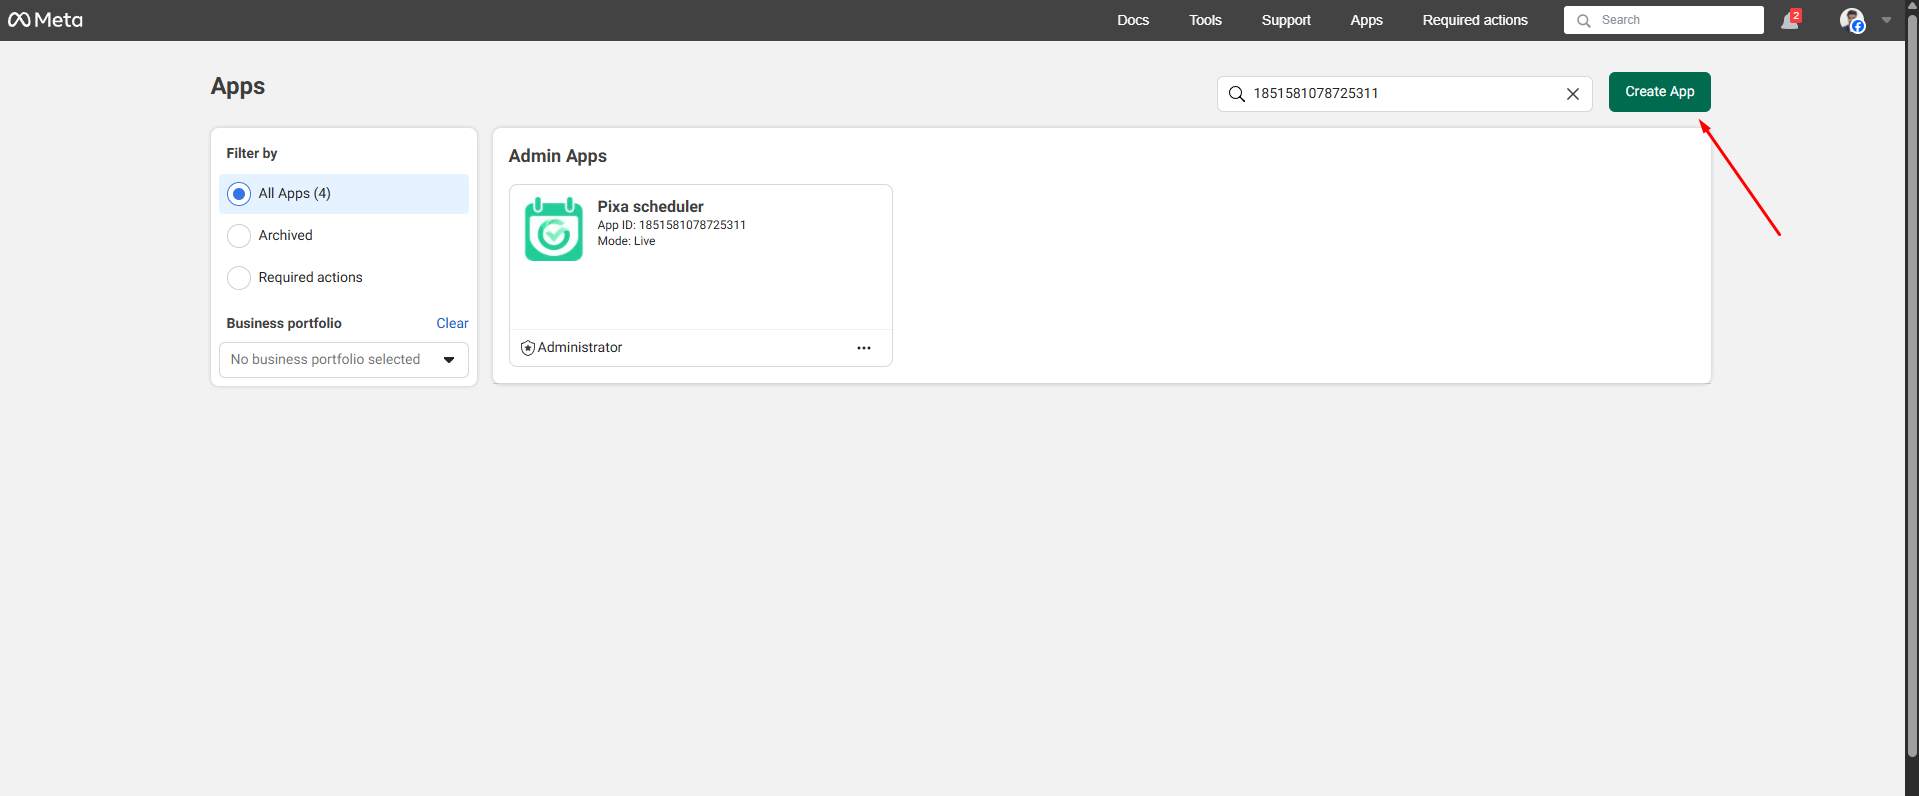
Click My Apps and then Create App.
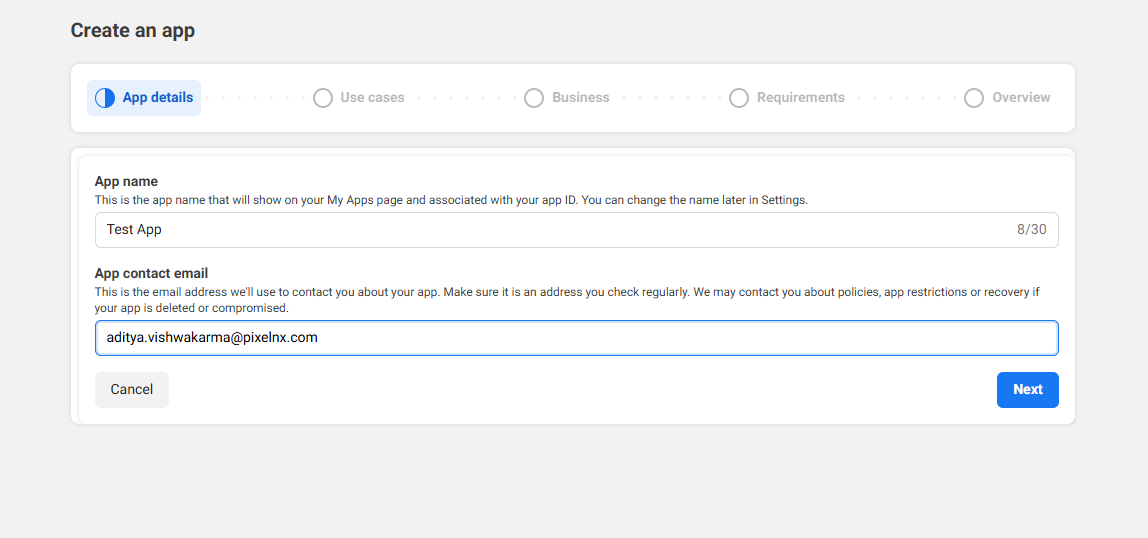
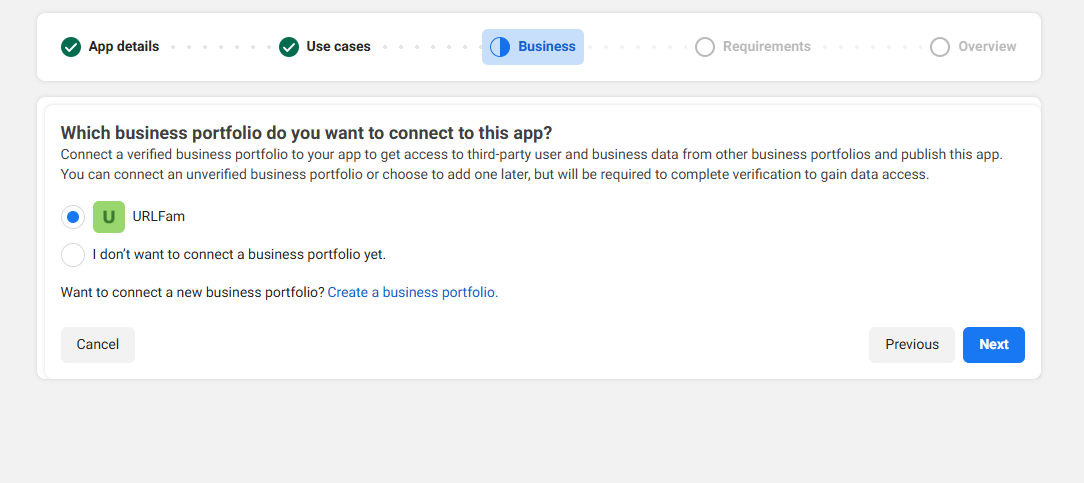
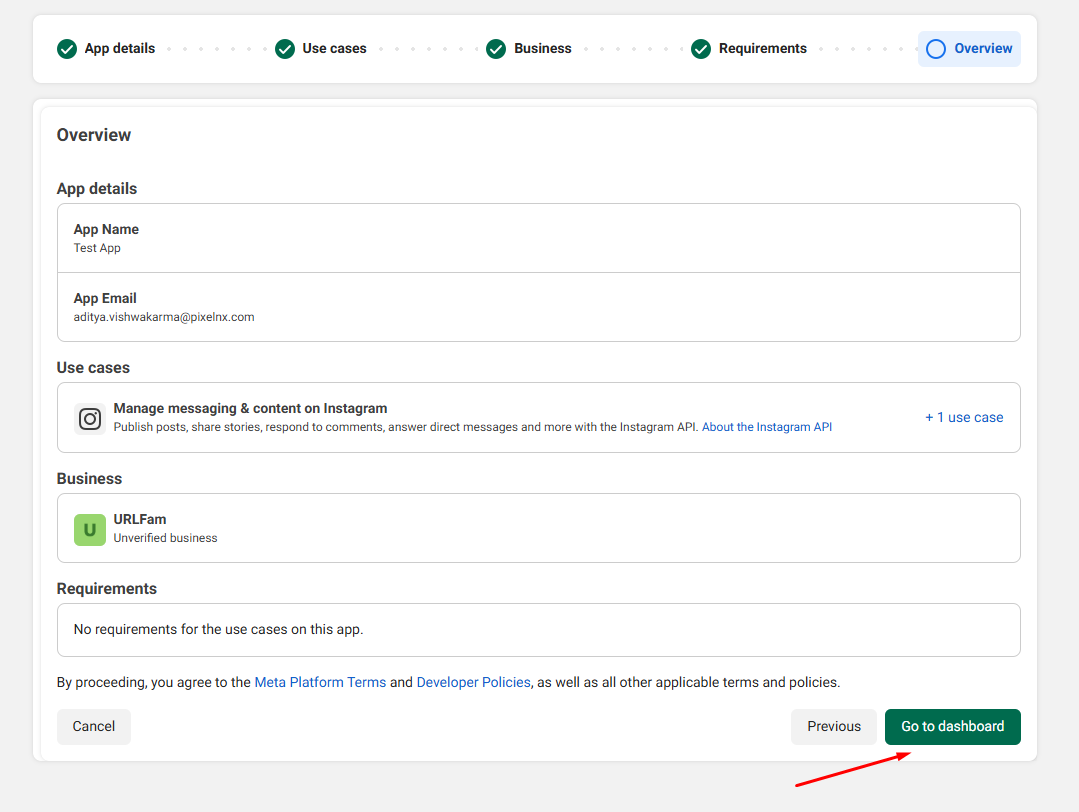
Enter app details like App Name, Business Email, select your Business Account, then click Create App.
Step 2: Select Use Cases
After app creation, select the following use cases depending on your requirements:
- Manage everything on your Page - For Facebook page management
- Manage messaging & content on Instagram - For Instagram business account access
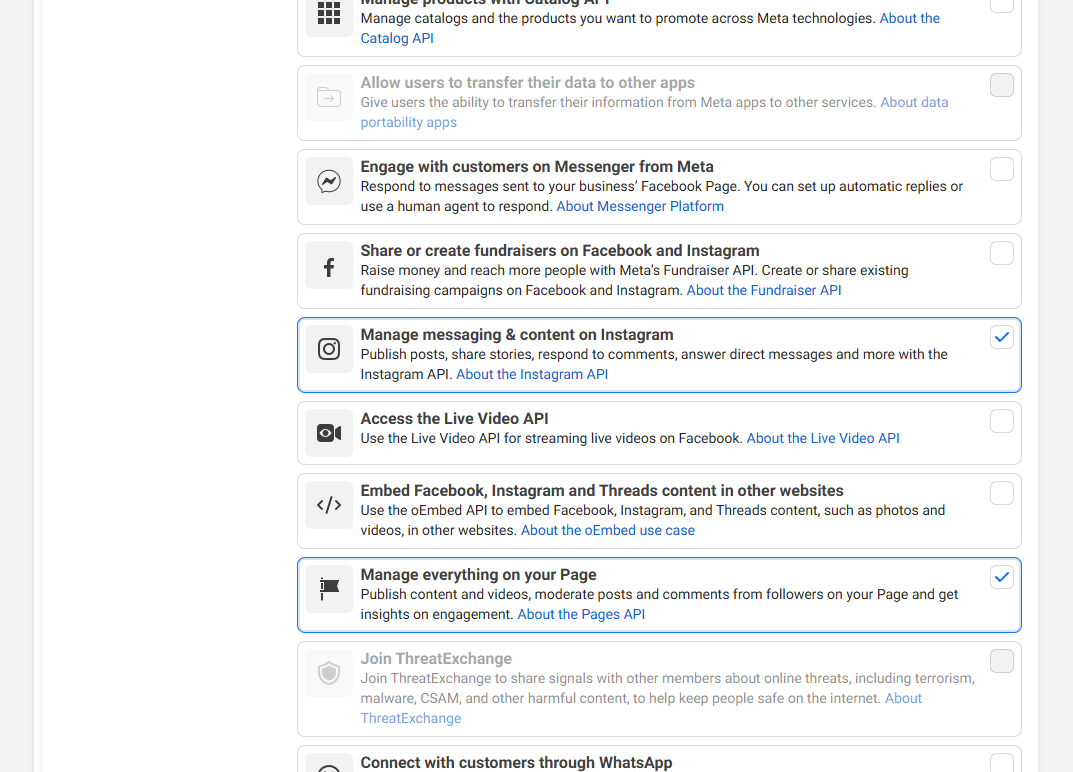
Click Next and go to the Dashboard. The app will now be created and ready for configuration.
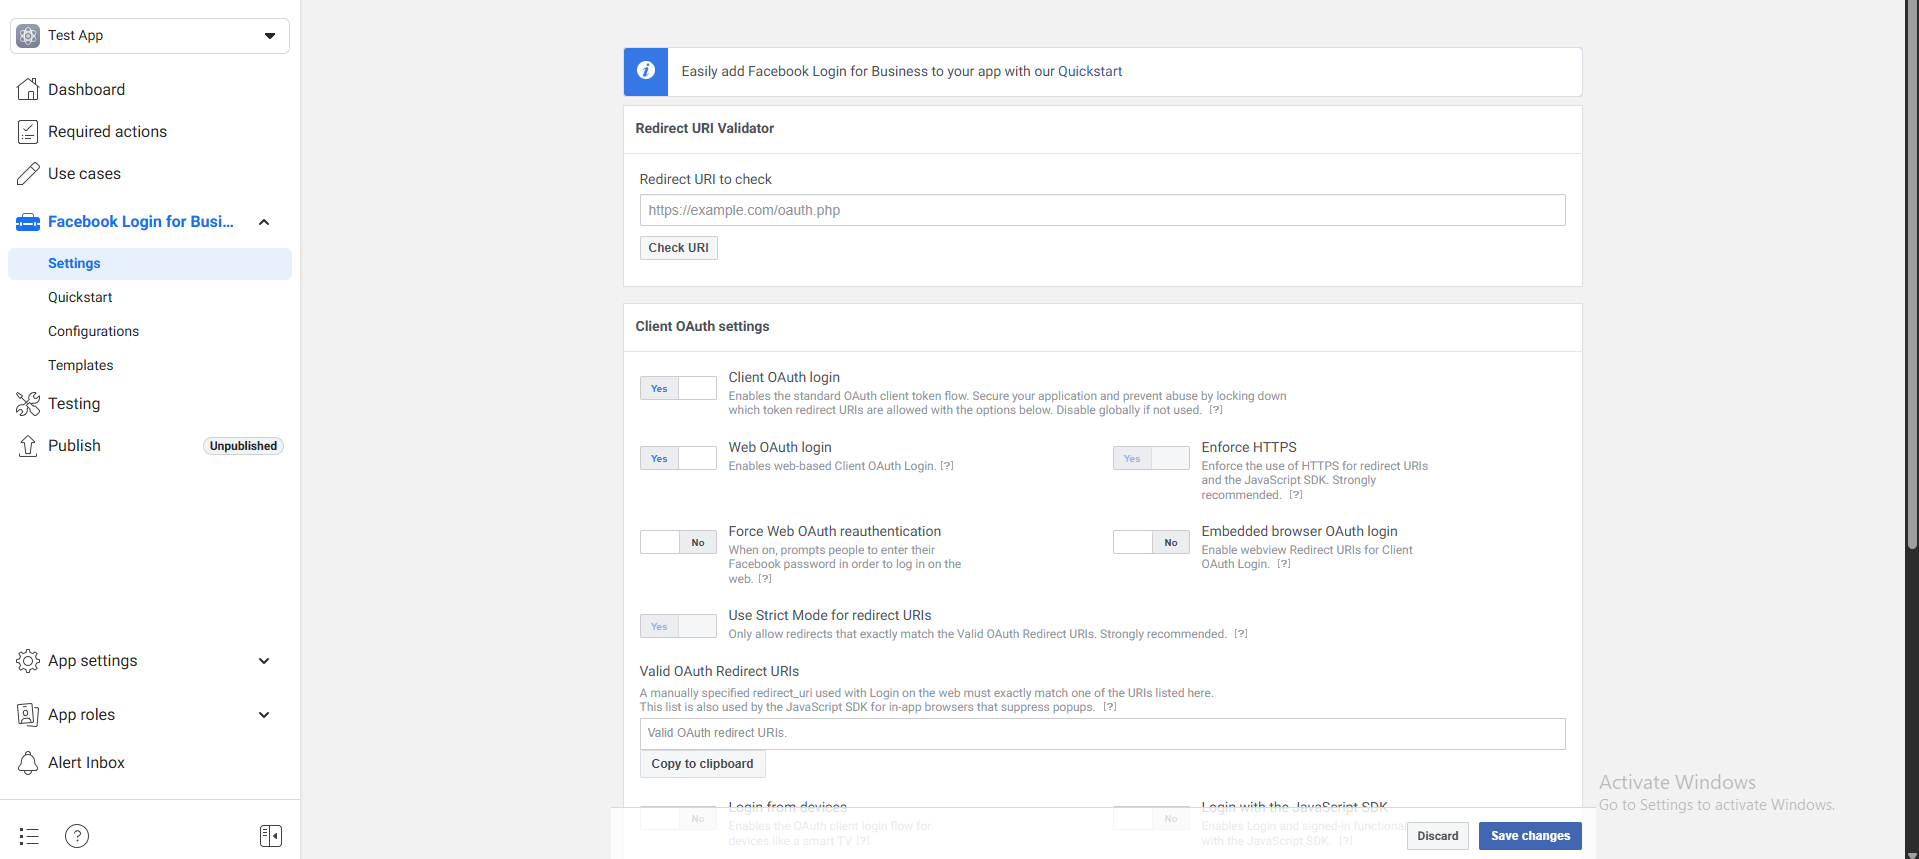
Step 3: Configure Facebook Login for Business
From the dashboard, go to Facebook Login under products. Click Set Up and configure your app settings:
- Add Valid OAuth Redirect URIs:
https://your-domain.com/redirect/facebook-auth
In PixaScheduler, this corresponds to:NEXT_PUBLIC_FACEBOOK_REDIRECT_URL=https://pixascheduler.pixelnx.com/redirect/facebook-auth - Add allowed domains for JavaScript SDK (your live domain)
- Save changes
Required permissions for posting:
- business_management
- pages_read_engagement
- pages_manage_posts
- pages_show_list
- public_profile
- pages_read_user_content
Step 4: Configure Instagram Graph API
From the dashboard, go to Instagram Graph API product and click Set Up. Configure:
- Valid OAuth Redirect URI:
https://your-domain.com/redirect/instagram-auth
In PixaScheduler, this corresponds to:NEXT_PUBLIC_INSTAGRAM_REDIRECT_URL=https://pixascheduler.pixelnx.com/redirect/instagram-auth - Instagram login permission scopes for posting:
- instagram_business_basic
- instagram_content_publish
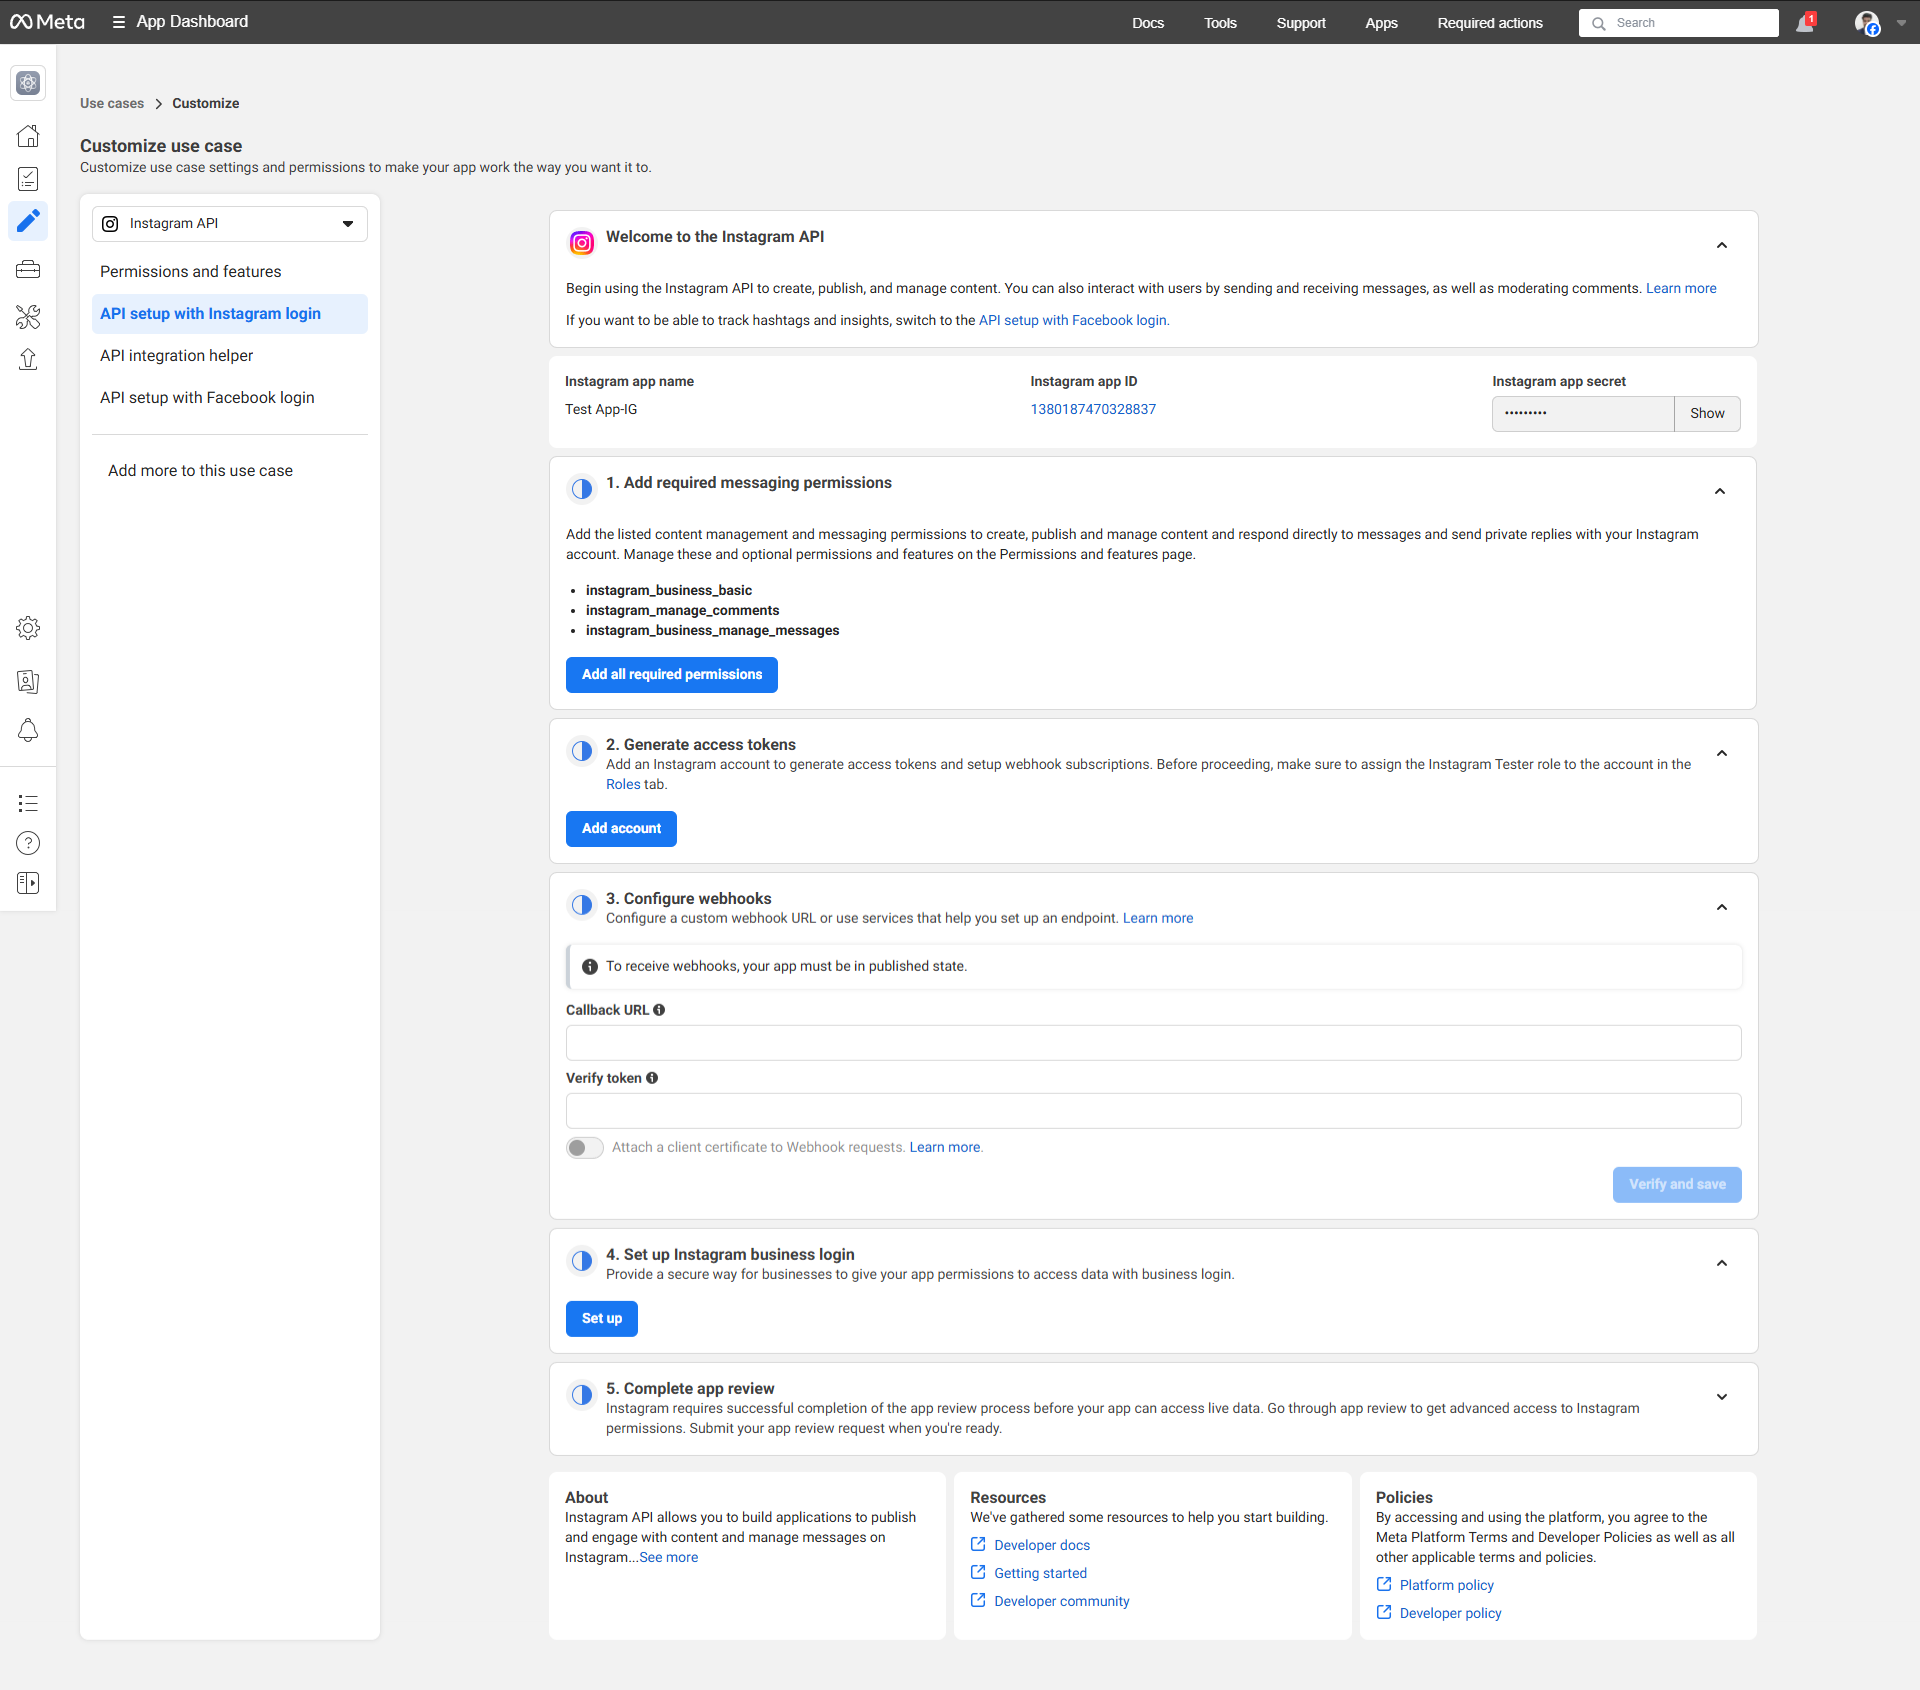
Step 5: Save App Credentials
Go to App Settings > Basic and copy the App ID and App Secret. You will need these for connecting Facebook and Instagram accounts in PixaScheduler.
Step 6: Add Credentials to .env
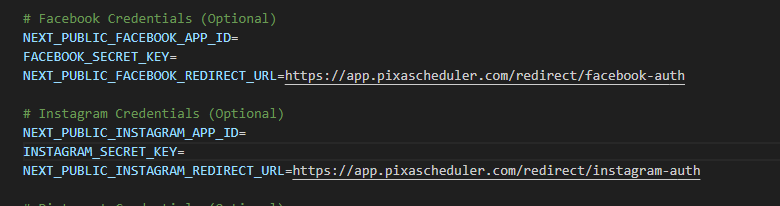
Open your .env file and add the following entries:
# Facebook Credentials (Optional)
NEXT_PUBLIC_FACEBOOK_APP_ID=your_facebook_app_id
FACEBOOK_SECRET_KEY=your_facebook_secret_key
NEXT_PUBLIC_FACEBOOK_REDIRECT_URL=https://pixascheduler.pixelnx.com/redirect/facebook-auth

# Instagram Credentials (Optional)
NEXT_PUBLIC_INSTAGRAM_APP_ID=your_instagram_app_id
INSTAGRAM_SECRET_KEY=your_instagram_secret_key
NEXT_PUBLIC_INSTAGRAM_REDIRECT_URL=https://pixascheduler.pixelnx.com/redirect/instagram-auth
Note: Replace your_facebook_app_id,
your_facebook_secret_key, your_instagram_app_id, and
your_instagram_secret_key with the actual values from your apps.
Step 7: Privacy Policy and Terms
Ensure that your Privacy Policy URL and Terms of Service URL are set in the following format:
- Privacy Policy:
https://yourdomain.com/policy/privacy-policy - Terms of Service:
https://yourdomain.com/policy/terms-and-services
Video Guide
How to Create and Configure LinkedIn App
This guide explains how to create a LinkedIn Developer App and connect it with
PixaScheduler.
Replace your-domain.com with your actual live domain everywhere.
Step 1: Open LinkedIn Developer Portal
Visit https://developer.linkedin.com/ and sign in with your LinkedIn account.
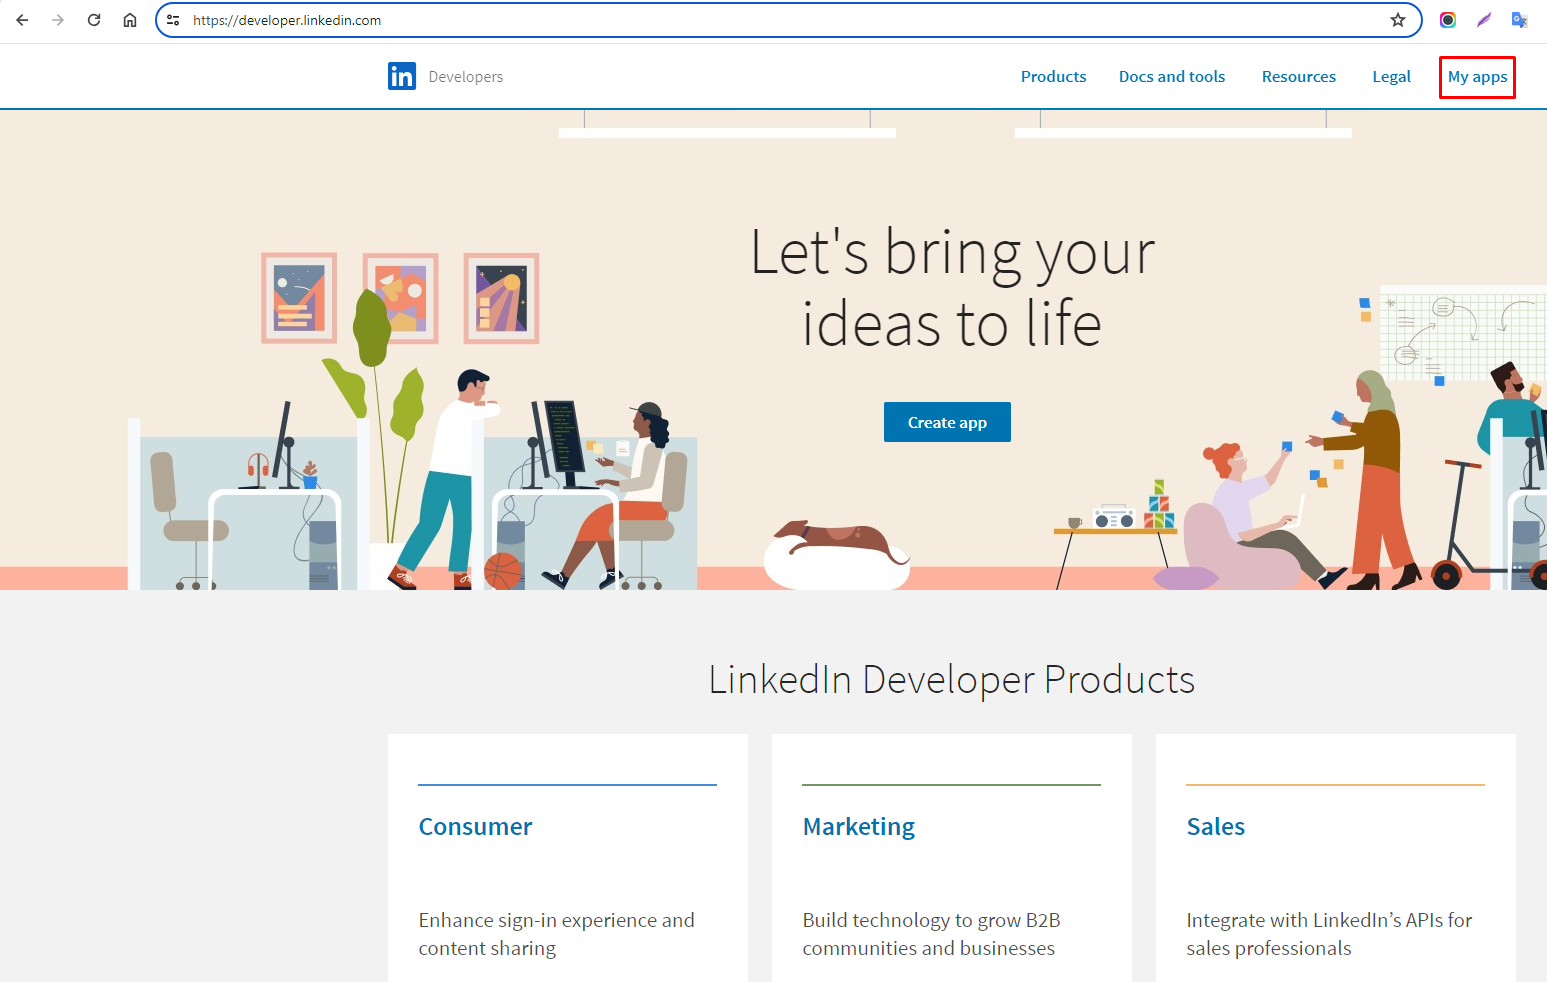
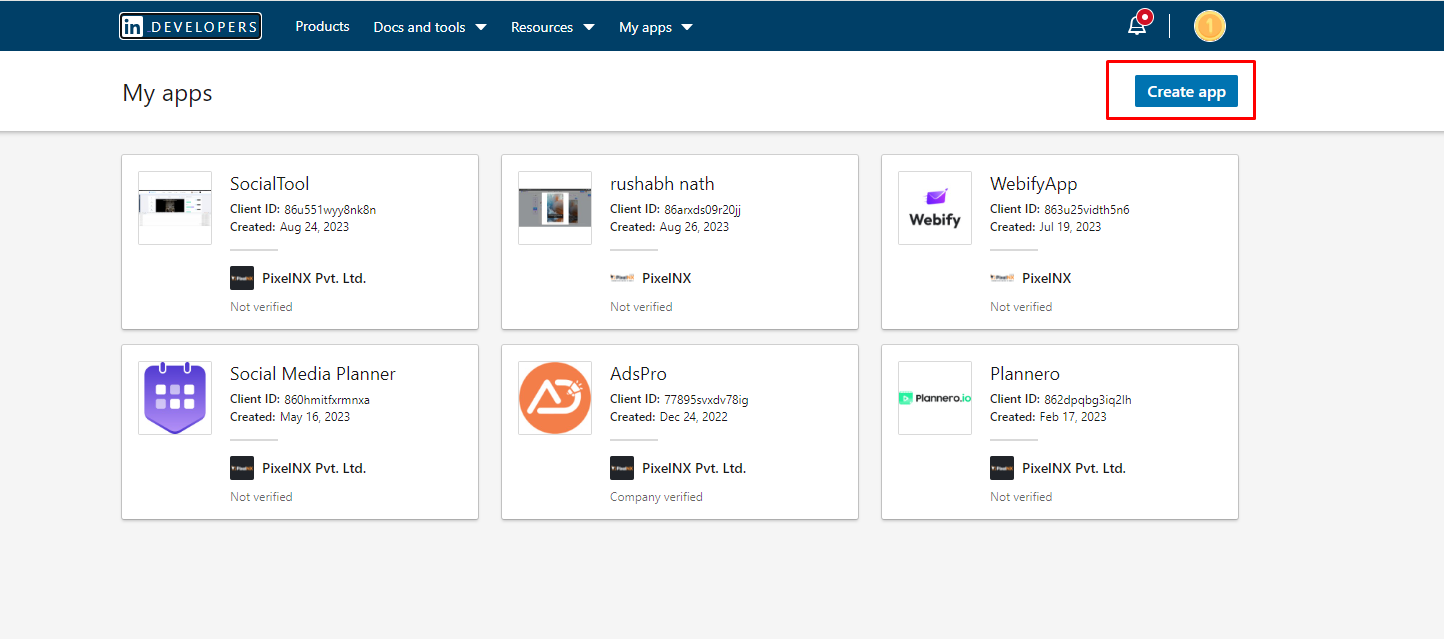
Step 2: Create a New App
Navigate to My Apps and click on the Create App button.
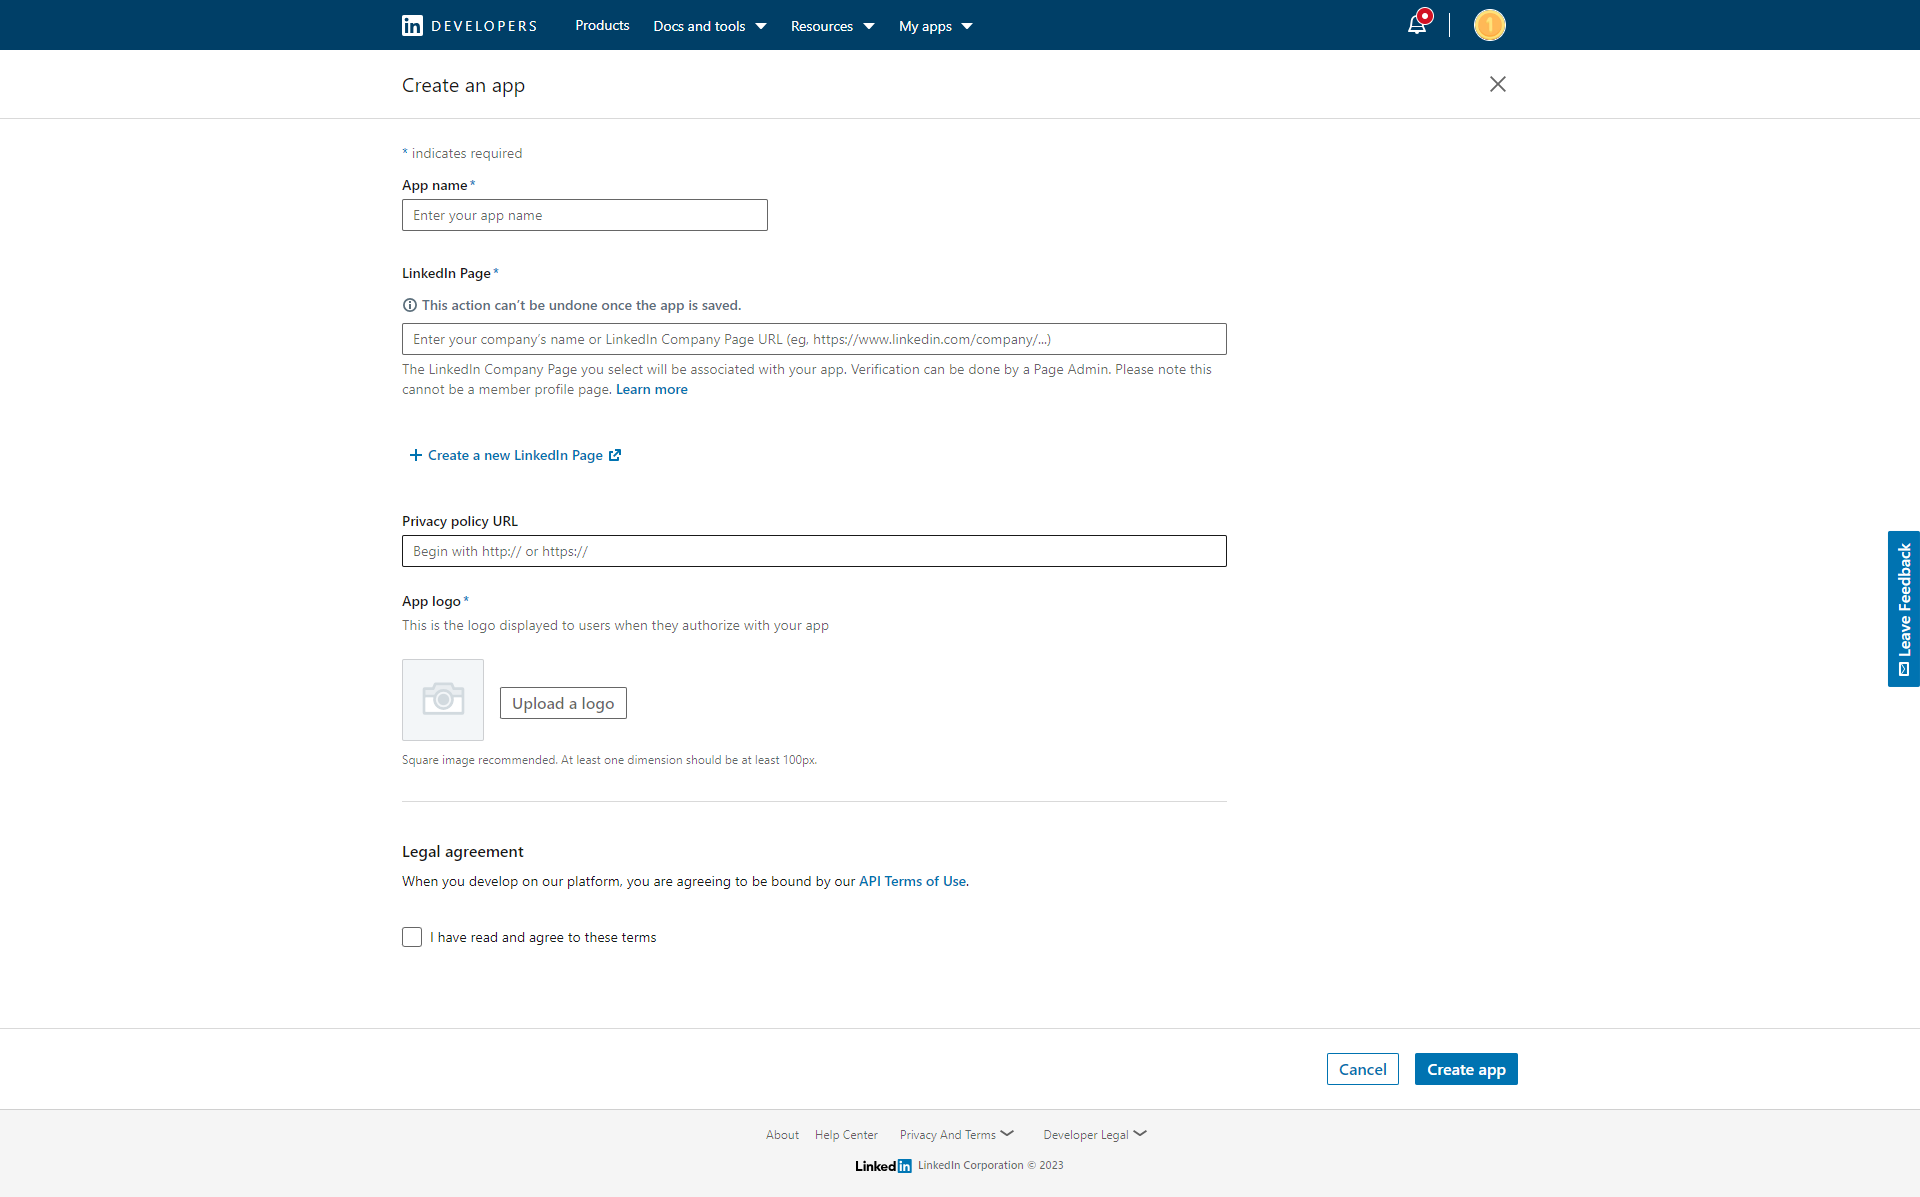
Step 3: Enter App Details
Fill in the following details:
- App Name
- LinkedIn Page (required – company page)
- Privacy Policy URL:
https://your-domain.com/policy/privacy-policy - Application Logo
Accept the agreement and click Create App.
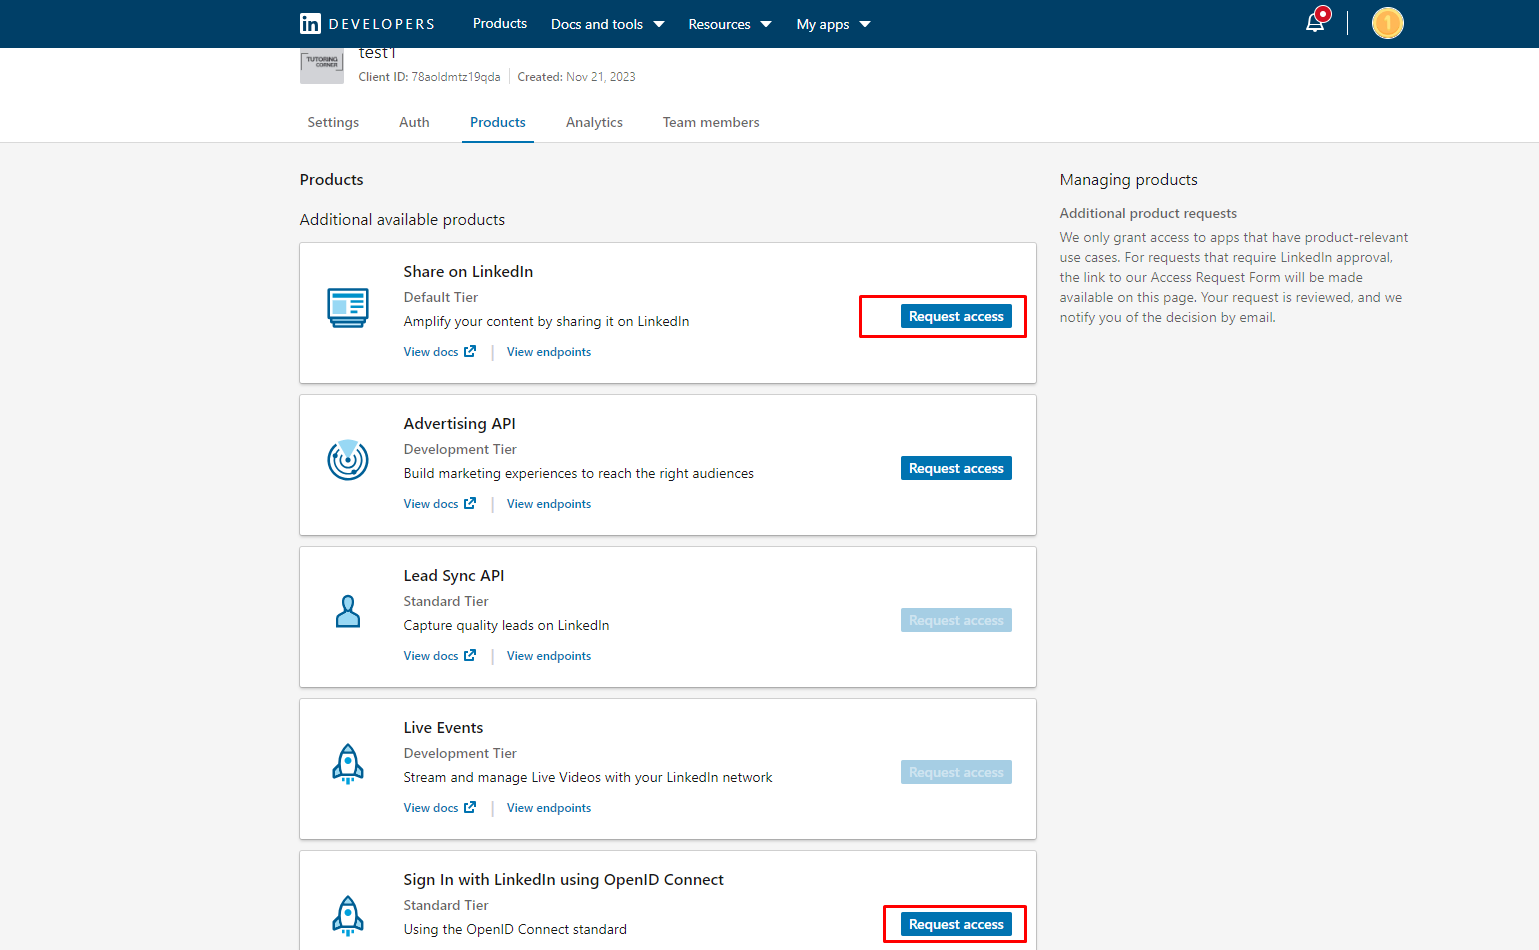
Step 4: Enable LinkedIn Products
After creating the app, enable the following products:
- OpenID Connect (for login)
- Share on LinkedIn (for posting content)
Click Request Access for both products.
Step 5: Configure OAuth Settings
Navigate to Auth section of your LinkedIn app.
Here you will find:
- Client ID
- Client Secret
Add the following Authorized Redirect URL:
https://your-domain.com/redirect/linkedin-auth

Step 6: Required Permissions (Scopes)
PixaScheduler requires the following permissions:
- openid
- profile
- w_member_social (for posting)
These permissions are automatically requested during OAuth login.
Add LinkedIn Credentials to .env File
After creating your LinkedIn app and configuring the OAuth redirect URL, you must add the LinkedIn credentials to your .env file.
# LinkedIn Credentials (Optional)
NEXT_PUBLIC_LINKEDIN_CLIENT_ID=your_linkedin_client_id
LINKEDIN_SECRET_KEY=your_linkedin_client_secret
NEXT_PUBLIC_LINKEDIN_REDIRECT_URL=https://your-domain.com/redirect/linkedin-auth
LINKEDIN_API_VERSION=202501
Important Notes:
-
Replace
your-domain.comwith your actual live domain - The Redirect URL added here must exactly match the Redirect URL configured in your LinkedIn App settings
-
Do not expose
LINKEDIN_SECRET_KEYpublicly -
Restart your application after updating the
.envfile
Step 8: App Status
By default, the app works in Development Mode. Submit the app for LinkedIn review if required for production usage.
Video Guide
How to Create and Configure a Pinterest App
This section explains how to create a Pinterest Developer App and connect it
with
PixaScheduler.
All URLs below use your-domain.com. Replace it with your actual
live domain.
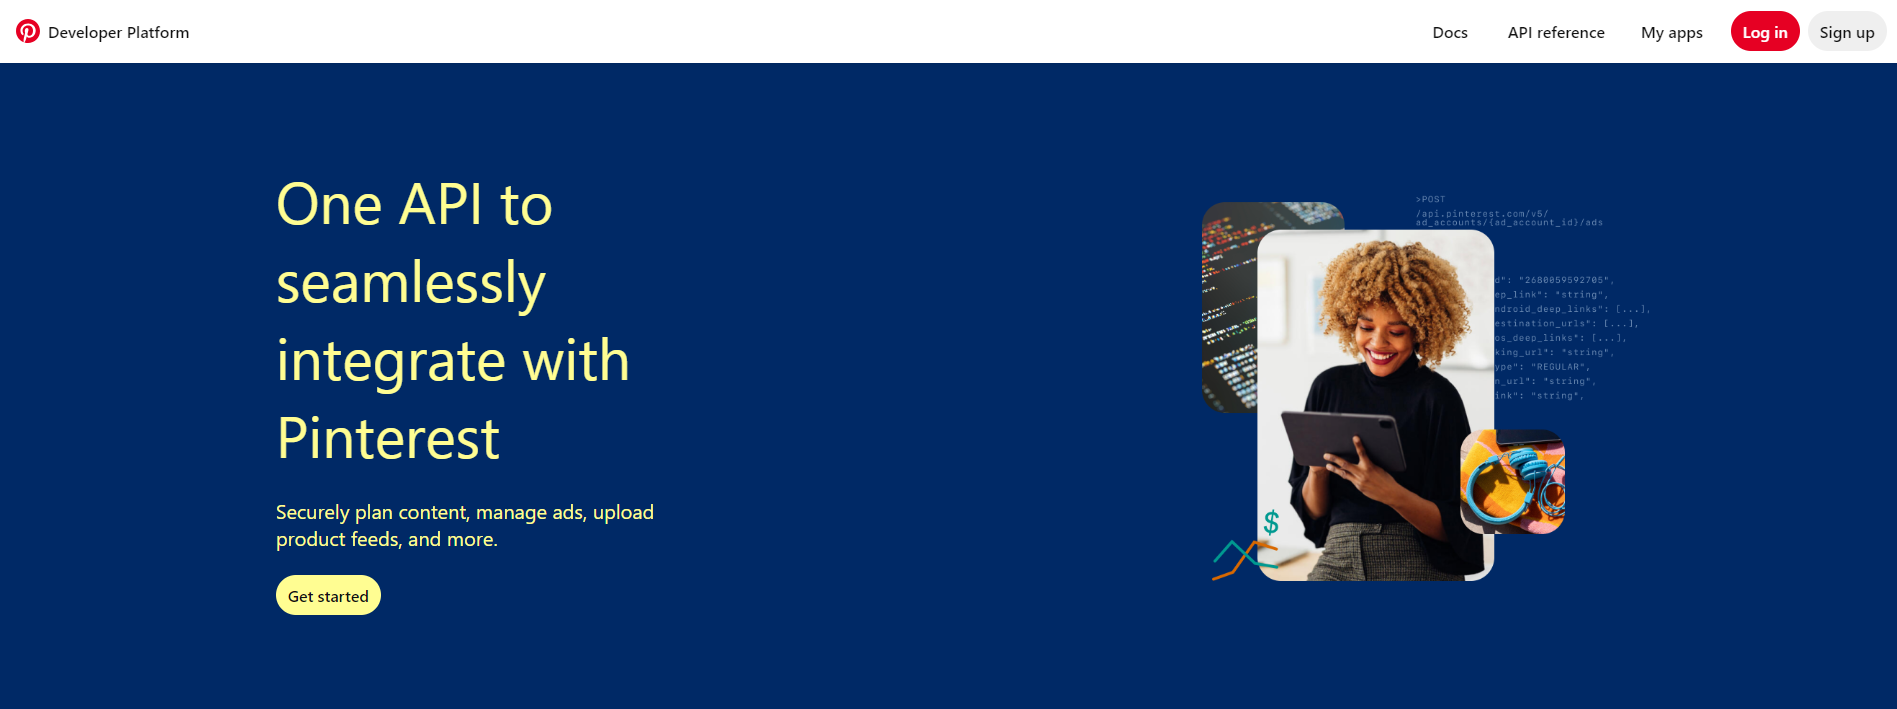
Step 1: Open Pinterest Developer Portal
Visit https://developer.pinterest.com/ and log in using your Pinterest account.
Step 2: Create a New App
From the dashboard, click on the My Apps section and then click Create App.
Step 3: Fill App Details
Provide the following information:
- App Name
- App Icon
- Company Name
- Company Website / App URL:
https://your-domain.com - Privacy Policy URL:
https://your-domain.com/policy/privacy-policy - App Purpose
Select the following options:
- Developer Purpose: Option 1
- Use Case: Pinner App
- Audience: Pinners & Creators
Submit the app for review.
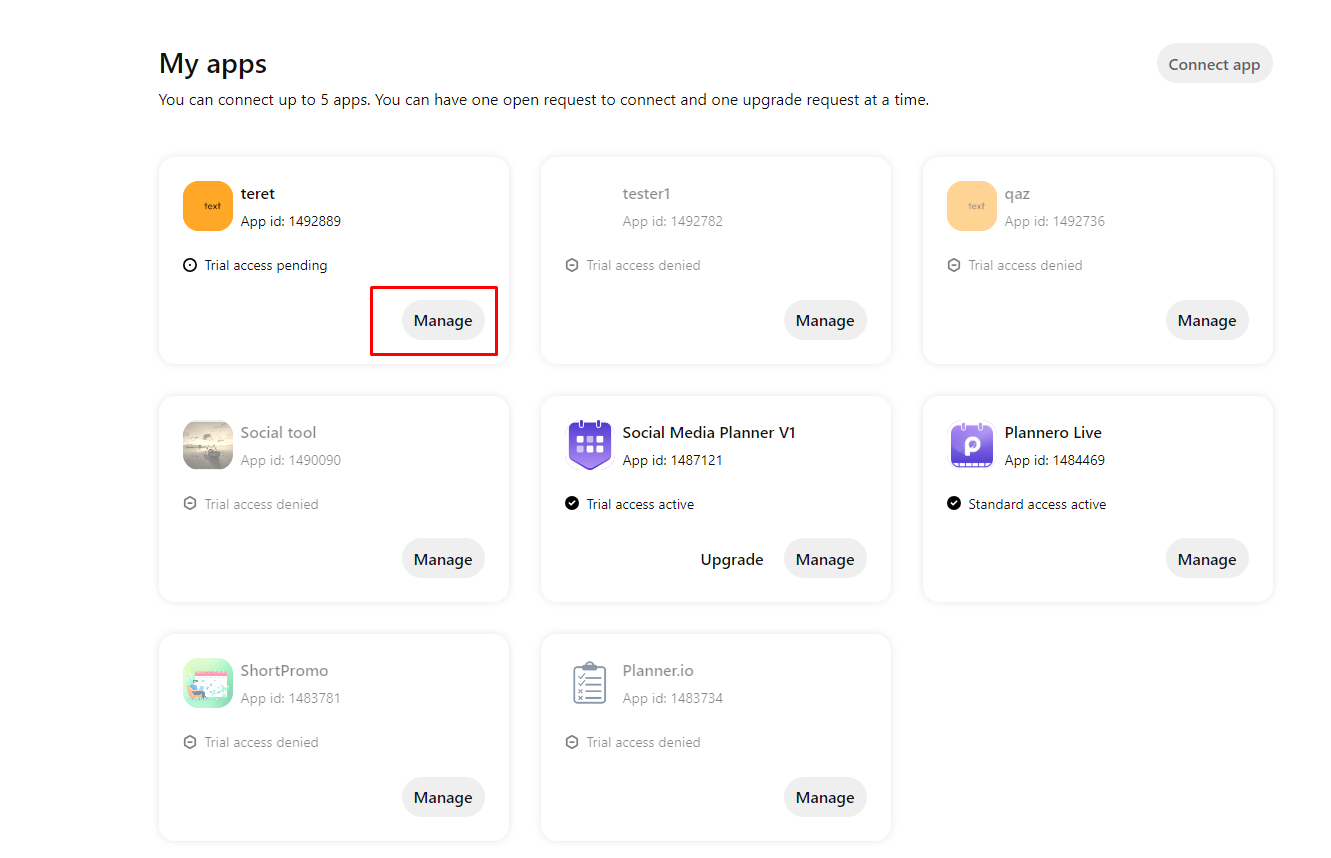
Note: Pinterest will review your app and initially provide Trial Access.
Step 4: Manage the App
Once trial access is granted, click on Manage for the created app.
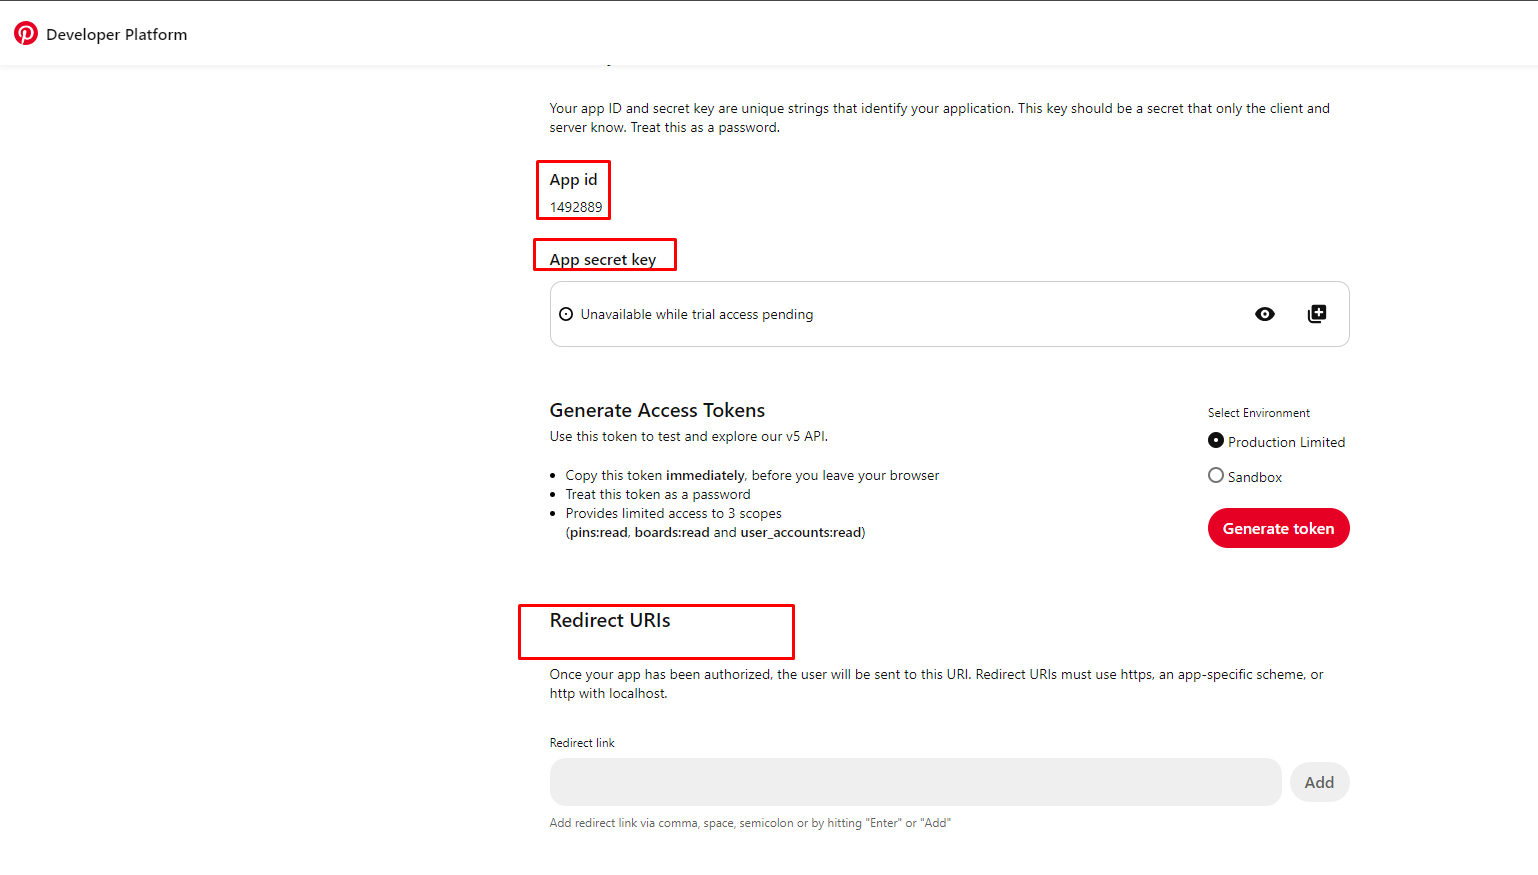
Step 5: Configure OAuth Settings
From the app settings page, copy the following credentials:
- App ID
- App Secret
Add the following Redirect URL:
https://your-domain.com/redirect/pinterest-auth
This URL must exactly match the redirect URL configured in your application.
Step 6: Upgrade App Access
After trial access, you will see an Upgrade button. Complete the required information and submit the app for full production access.
Step 7: Add Pinterest Credentials to .env File
Open your .env file and add the following values:
# Pinterest Credentials (Optional)
NEXT_PUBLIC_PINTEREST_API_URL=https://api.pinterest.com
NEXT_PUBLIC_PINTEREST_APP_ID=your_pinterest_app_id
PINTEREST_SECRET_KEY=your_pinterest_app_secret
NEXT_PUBLIC_PINTEREST_REDIRECT_URL=https://your-domain.com/redirect/pinterest-auth
Important:
- Replace your-domain.com with your live domain
- Redirect URL must match Pinterest app settings exactly
- Restart the application after updating the .env file
Video Guide
YouTube
How to Create and Configure YouTube App
This guide explains how to create a Google / YouTube application and connect it
with PixaScheduler.
All URLs mentioned below use your-domain.com. Please replace it
with your actual live domain.
Step 1: Open Google Cloud Console
Go to https://console.cloud.google.com/ and sign in.
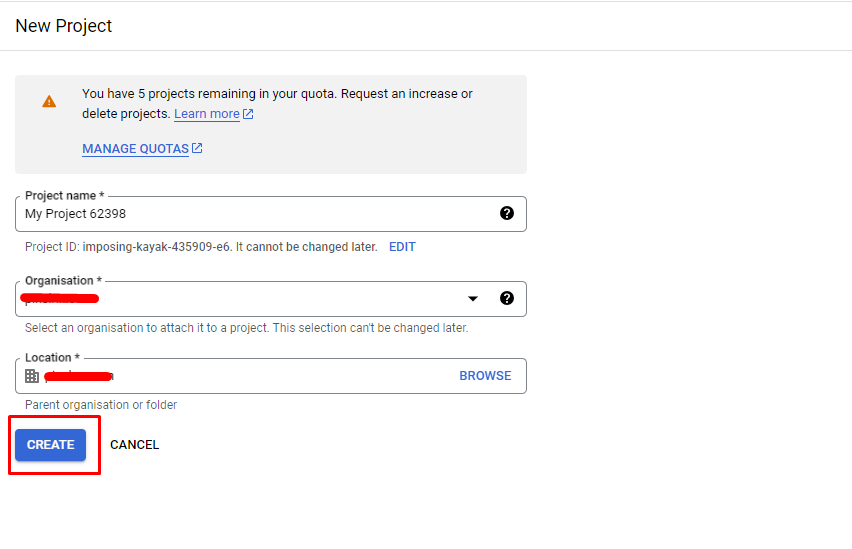
Step 2: Create a New Project
Click the project dropdown (top navigation) and choose New Project.
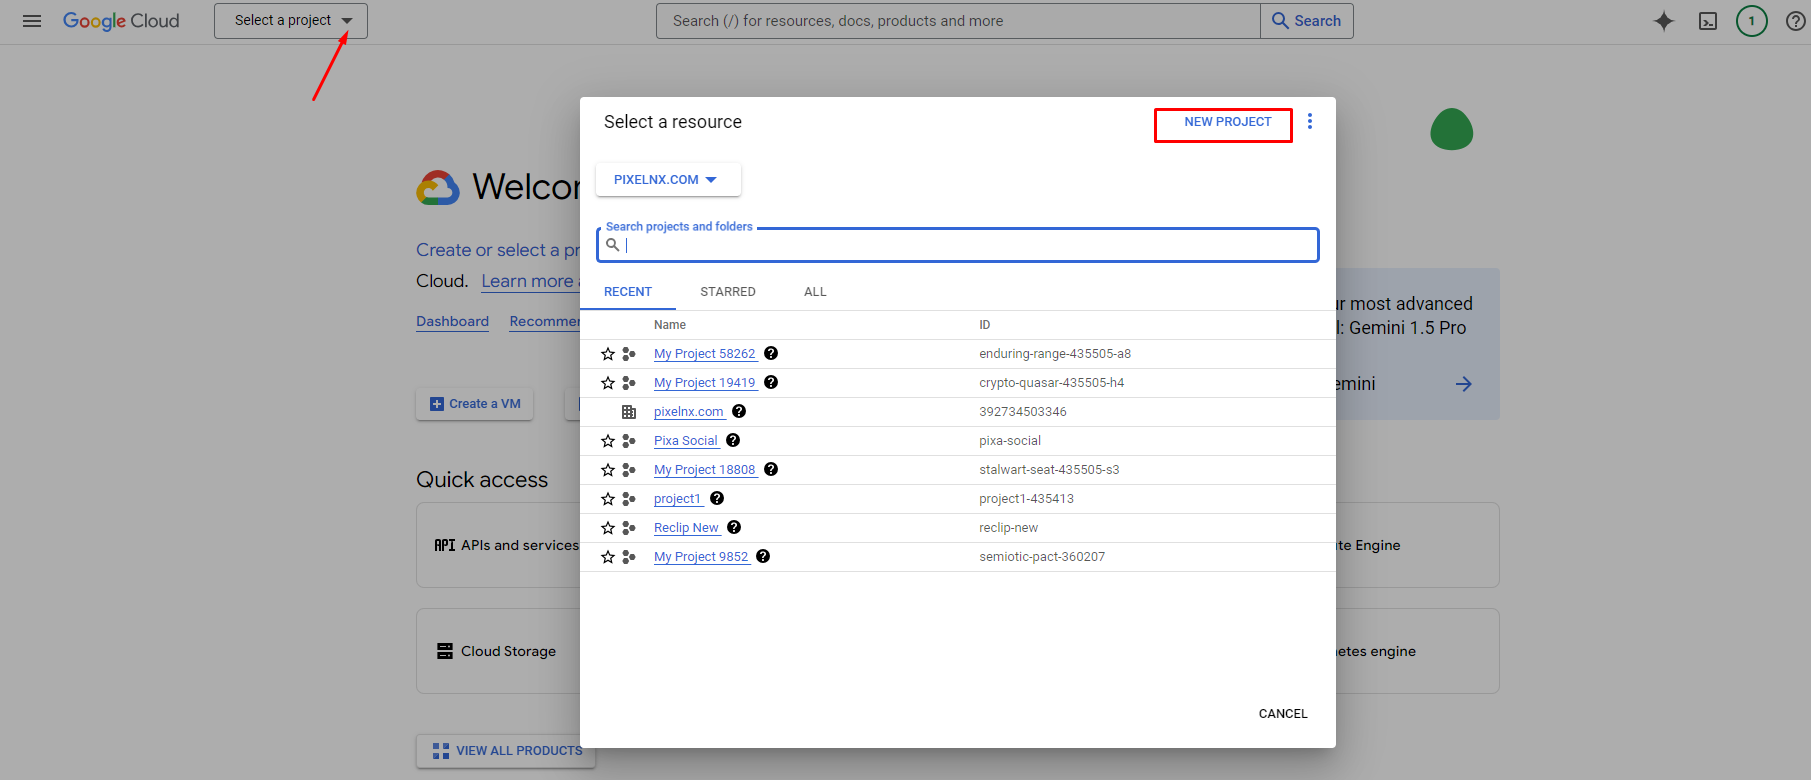
Enter project name and details, then click Create.
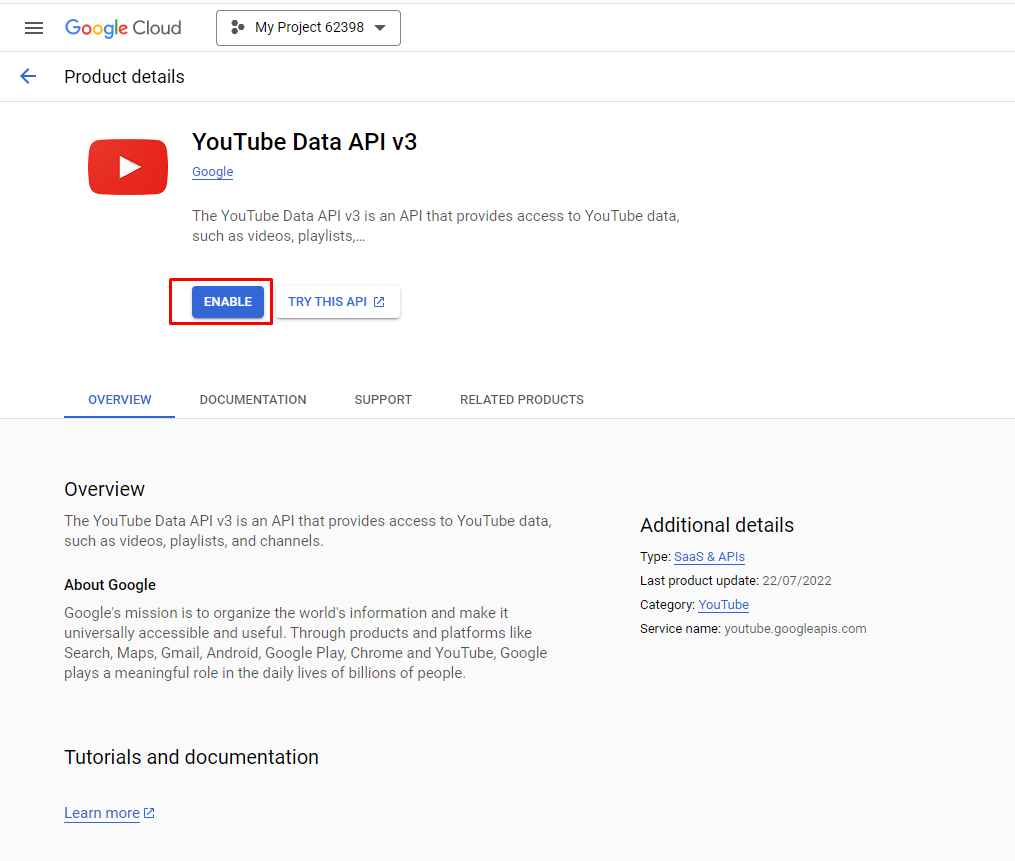
Step 3: Enable YouTube Data API
Select your project, search for YouTube Data API v3, and enable it.
Step 4: Configure OAuth Consent Screen
Navigate to APIs & Services → OAuth Consent Screen.
Select External user type (recommended for SaaS applications).
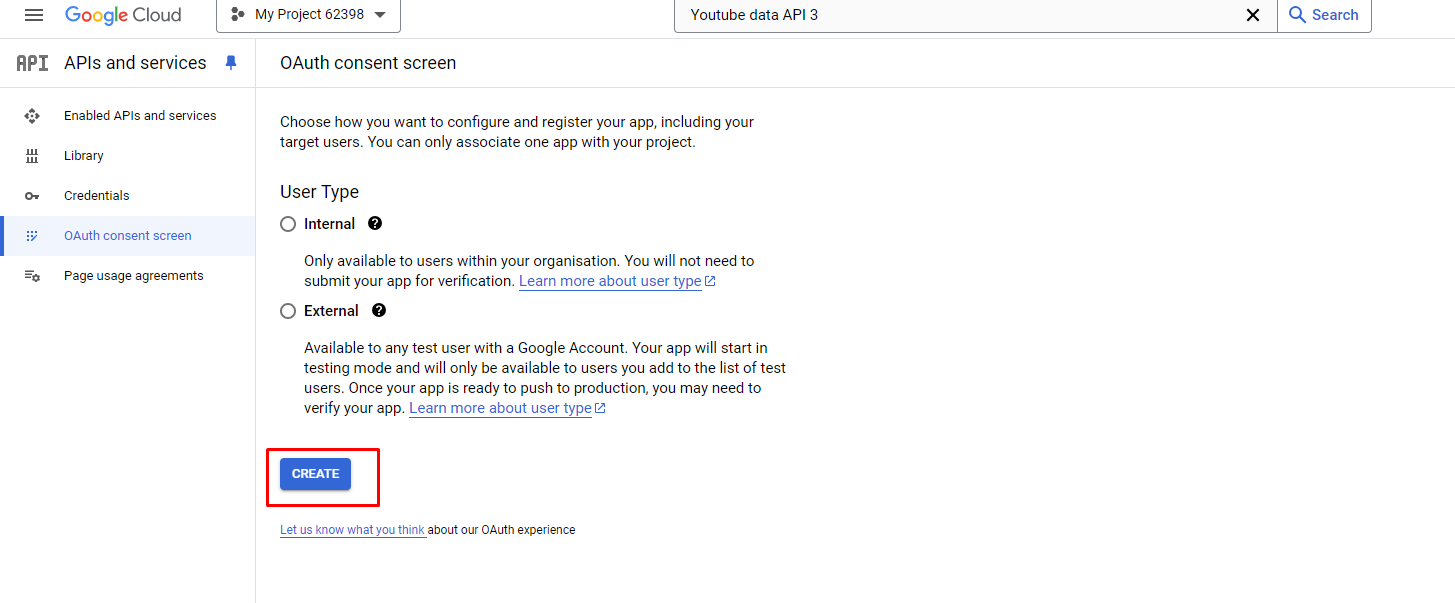
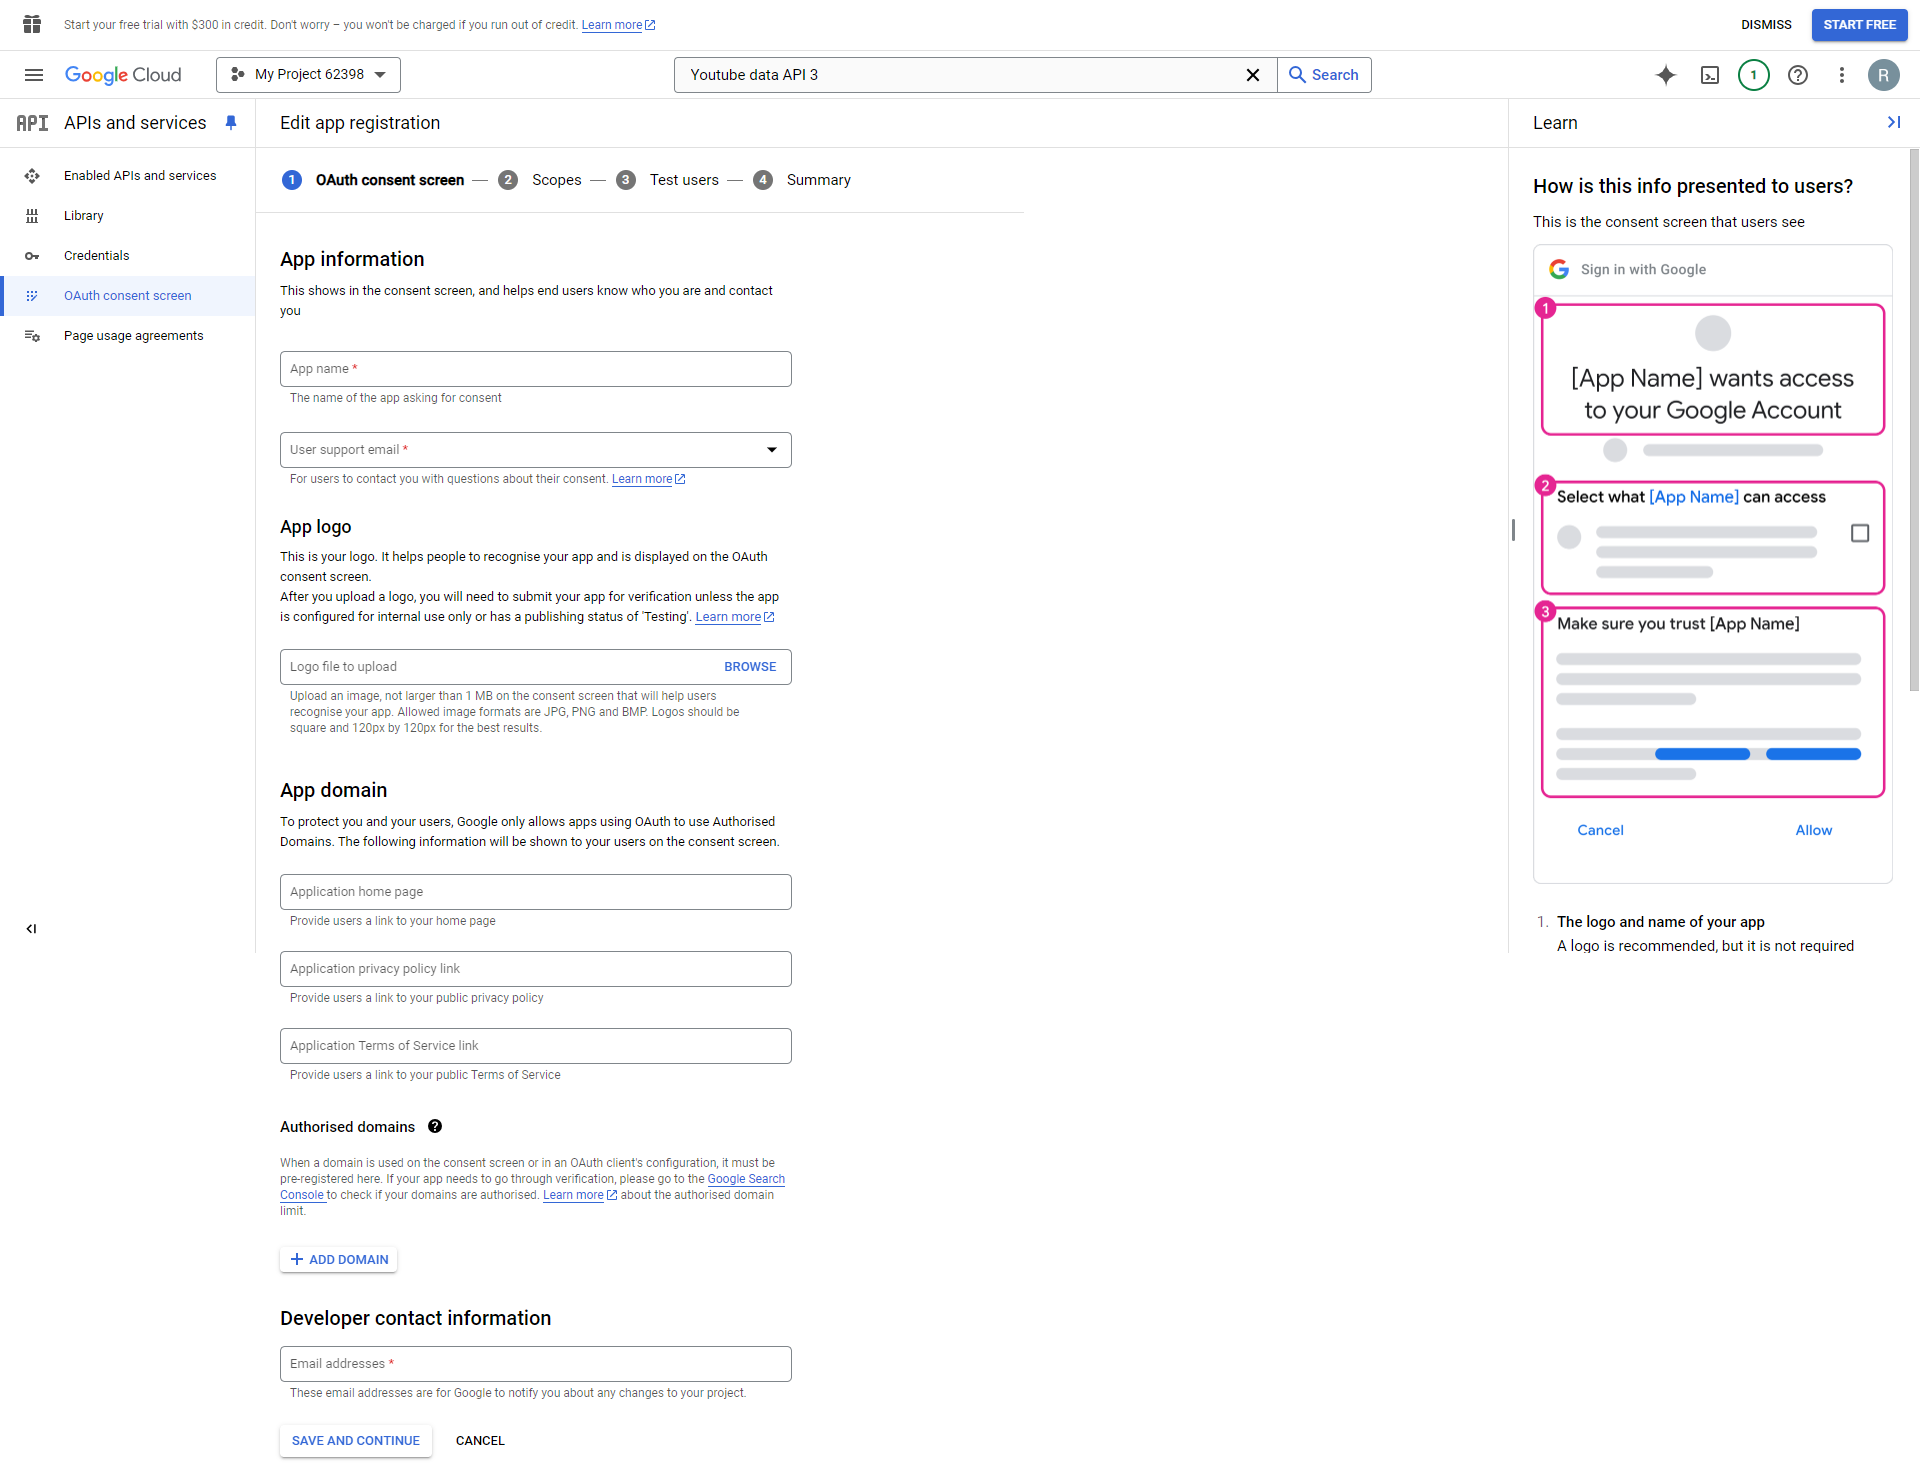
Fill in the required details:
- App Name
- User Support Email
- App Logo (optional)
- Authorized Domain:
your-domain.com - Developer Contact Information
Step 5: Add Required OAuth Scopes
Click Add or Remove Scopes and select the following:
- https://www.googleapis.com/auth/youtube.upload
- https://www.googleapis.com/auth/youtube.readonly
- https://www.googleapis.com/auth/userinfo.profile
- https://www.googleapis.com/auth/userinfo.email
Save and continue.
Step 6: Add Test Users (Optional)
If the app is in testing mode, add test users and proceed.
Step 7: Publish the App
When ready, publish the app and complete Google verification if required.
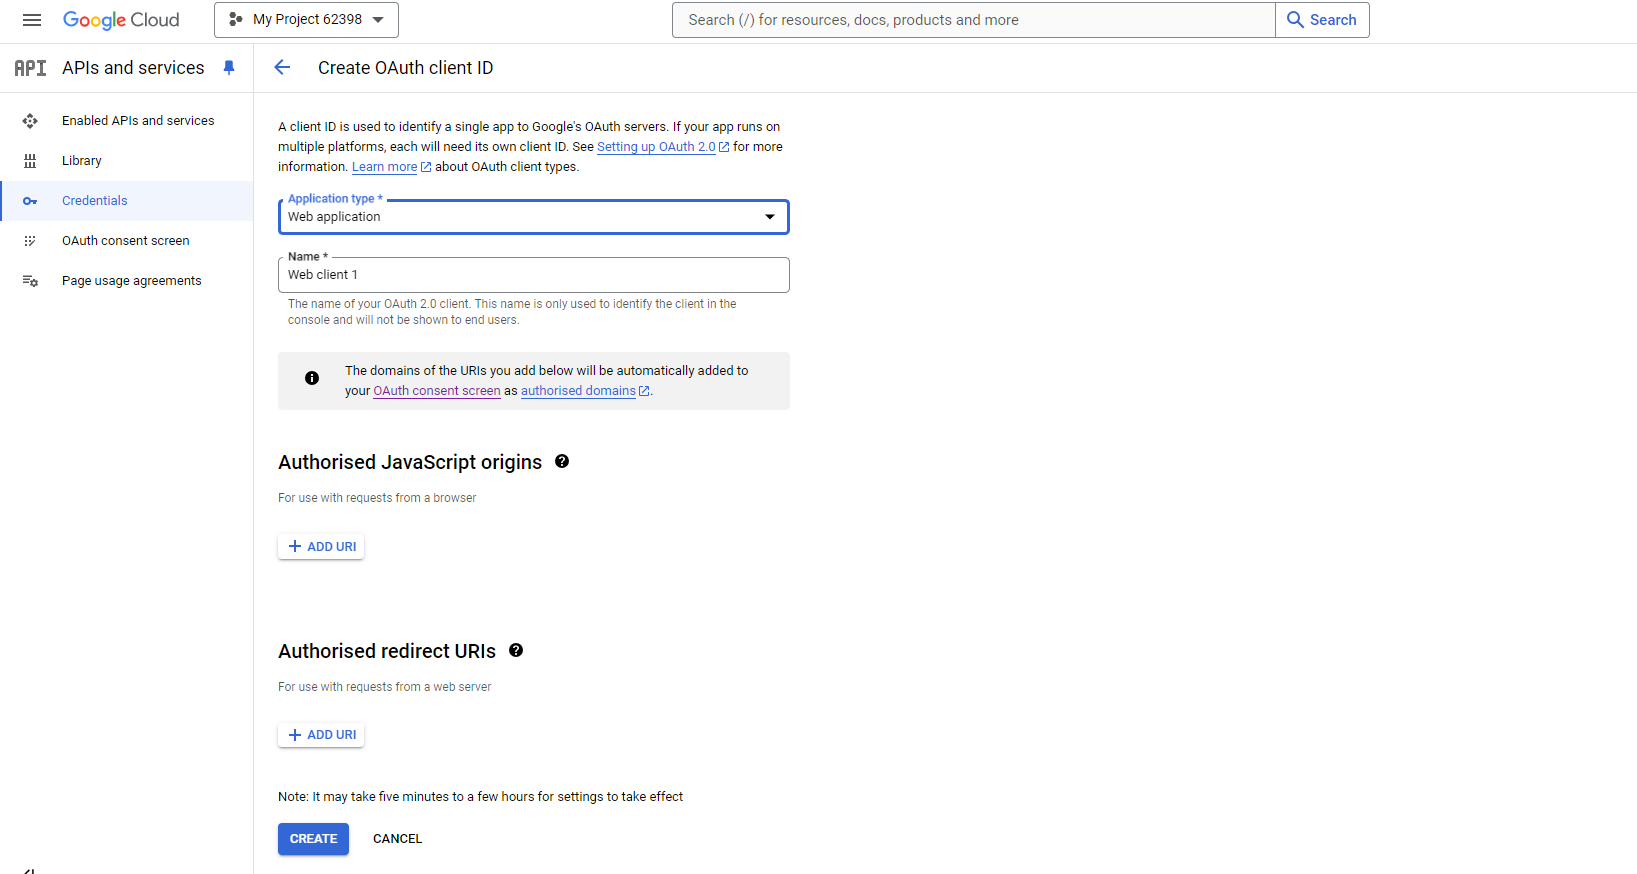
Step 8: Create OAuth Client ID
Go to APIs & Services → Credentials → Create Credentials → OAuth Client ID.
Select Web Application and use the following values:
-
Authorized JavaScript Origins
https://your-domain.com -
Authorized Redirect URI
https://your-domain.com/redirect/youtube-auth
Important: Replace your-domain.com with your actual
live domain.
Step 9: Copy Client ID & Secret
After creation, copy the credentials.
Step 10: Add YouTube Credentials to .env File
Open your .env file and add the following:
# Google / YouTube Credentials (Optional)
NEXT_PUBLIC_GOOGLE_CLIENT_ID=your_google_client_id
GOOGLE_CLIENT_SECRET=your_google_client_secret
NEXT_PUBLIC_YOUTUBE_REDIRECT_URL=https://your-domain.com/redirect/youtube-auth

# YouTube OAuth Scopes
NEXT_PUBLIC_YOUTUBE_GOOGLE_SCOPES="https://www.googleapis.com/auth/youtube.upload https://www.googleapis.com/auth/youtube.readonly https://www.googleapis.com/auth/userinfo.profile https://www.googleapis.com/auth/userinfo.email"
Note:
Make sure the redirect URL in your Google OAuth settings
exactly matches the value added in the .env file.
Video Guide
How to Create and Configure a Reddit App
This section explains how to create a Reddit Developer App and connect it with
PixaScheduler. All URLs below use your-domain.com.
Replace it with your actual live domain.
Step 1: Open Reddit Developer Portal
Visit https://www.reddit.com/prefs/apps and log in using your Reddit account.
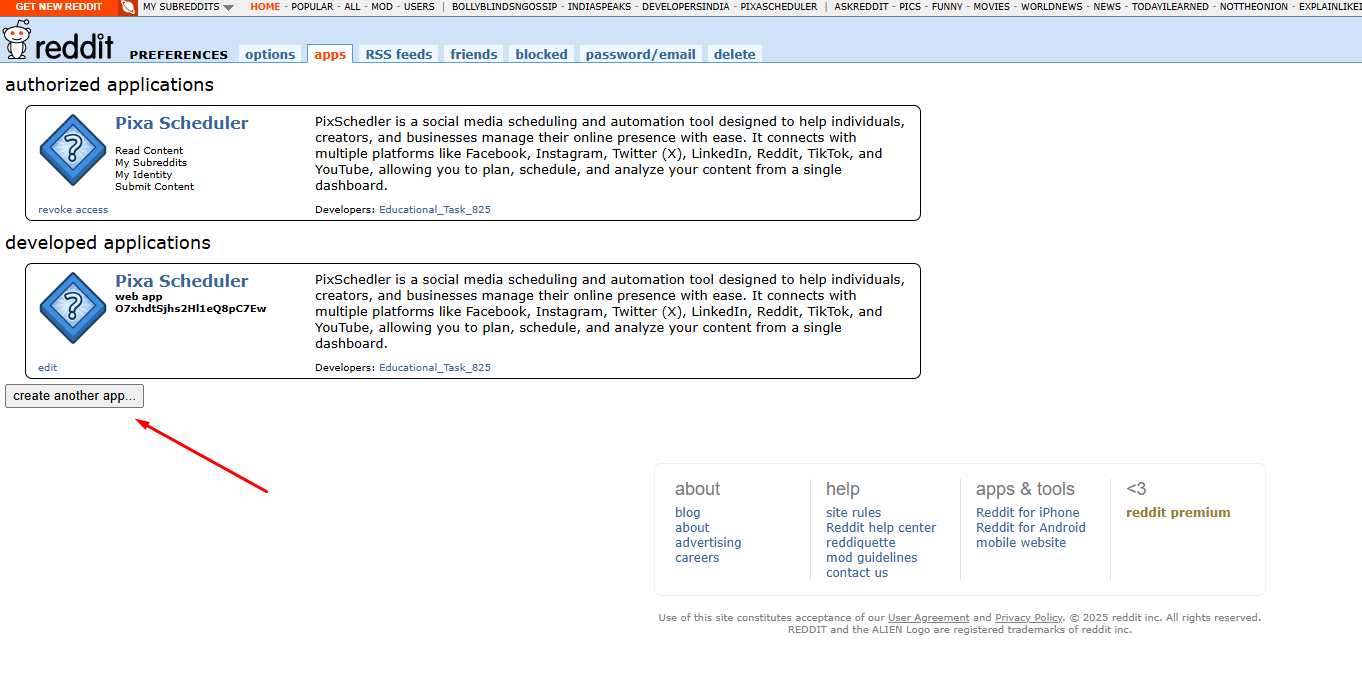
Step 2: Create a New App
Scroll down to the Developed Applications section and click Create App or Create Another App.
Step 3: Fill App Details
Provide the following information:
- App Name
- App Description (optional)
- About URL (optional)
- Redirect URI:
https://your-domain.com/redirect/reddit-auth
Select the script or web app option depending on your use case. For PixaScheduler integration, choose web app.
Step 4: Copy App Credentials
After creating the app, copy the following credentials:
- Client ID
- Client Secret
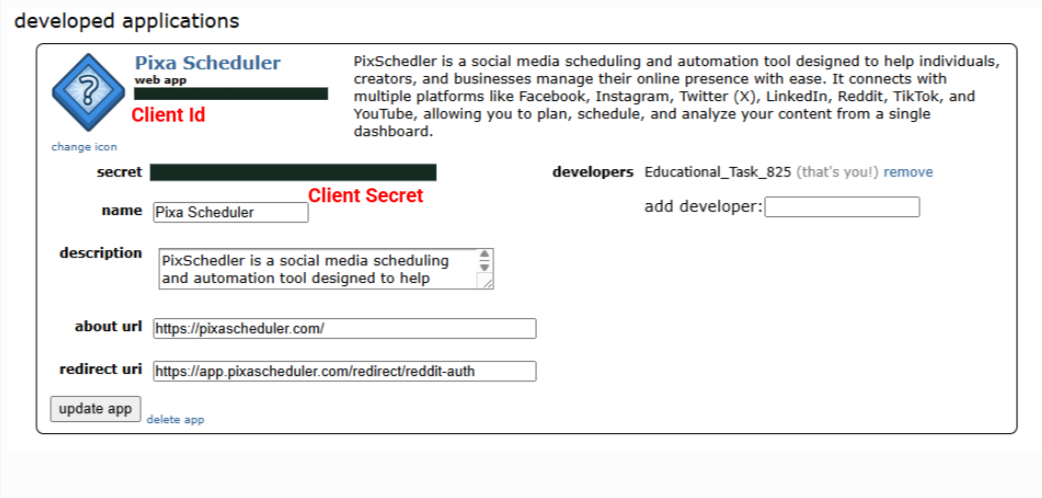
Step 5: Configure Redirect URL
Ensure that the following Redirect URL is added exactly in your Reddit app:
https://your-domain.com/redirect/reddit-auth
This URL must match exactly with the one used in your application for OAuth authentication.
Step 6: Add Reddit Credentials to .env File
Open your .env file and add the following values:
# Reddit Credentials (Optional)
NEXT_PUBLIC_REDDIT_CLIENT_ID=your_reddit_client_id
REDDIT_CLIENT_SECRET=your_reddit_client_secret
NEXT_PUBLIC_REDDIT_REDIRECT_URL=https://your-domain.com/redirect/reddit-auth
Important:
- Replace your-domain.com with your live domain
- Redirect URL must match exactly with Reddit app settings
- Restart the application after updating the .env file
Video Guide
Admin Dashboard
Admin Dashboard comes with the various backend settings to manage the platform.
Dashboard
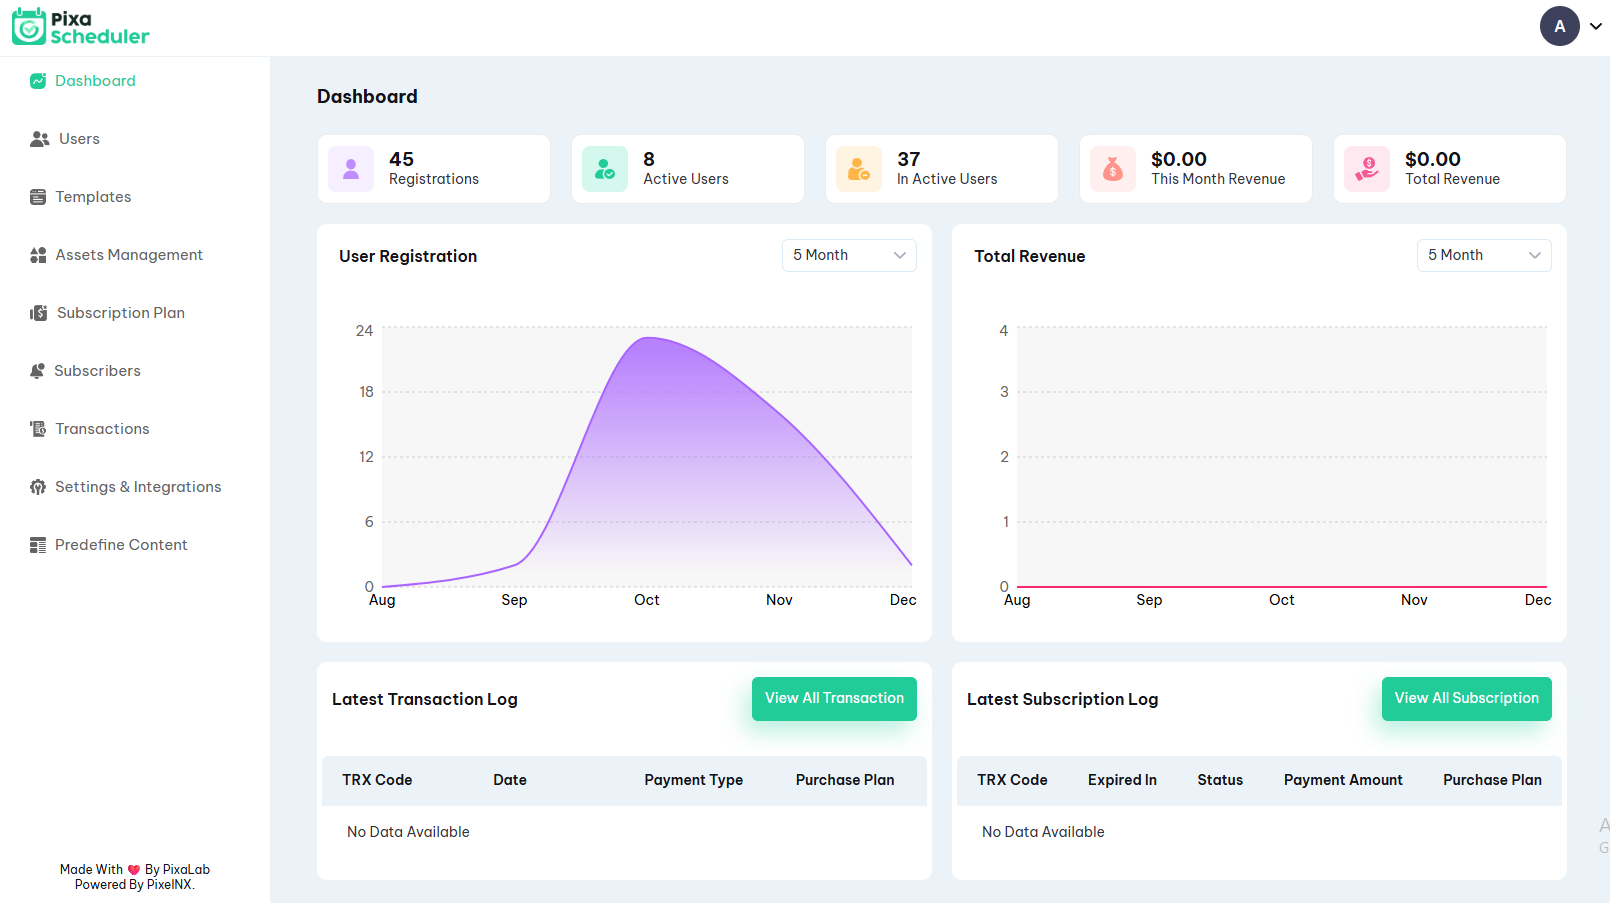
The Admin Dashboard provides a complete overview of platform activity, user engagement, and revenue performance in a single consolidated view.
Dashboard Overview
The dashboard displays key platform information using summary cards, charts, and logs:
- Active Users – Total number of currently active users
- User Registrations – Total registered users on the platform
- Total Revenue – Total revenue generated from subscriptions
The visual charts help admins analyze growth and performance:
- User Registration Chart – Shows registration trends over time
- Total Revenue Chart – Displays revenue trends based on subscriptions
The dashboard also includes activity logs for better monitoring:
- Latest Transaction Log – Displays recent payment transactions
- Subscription Log – Shows active, expired, and renewed subscriptions
Users
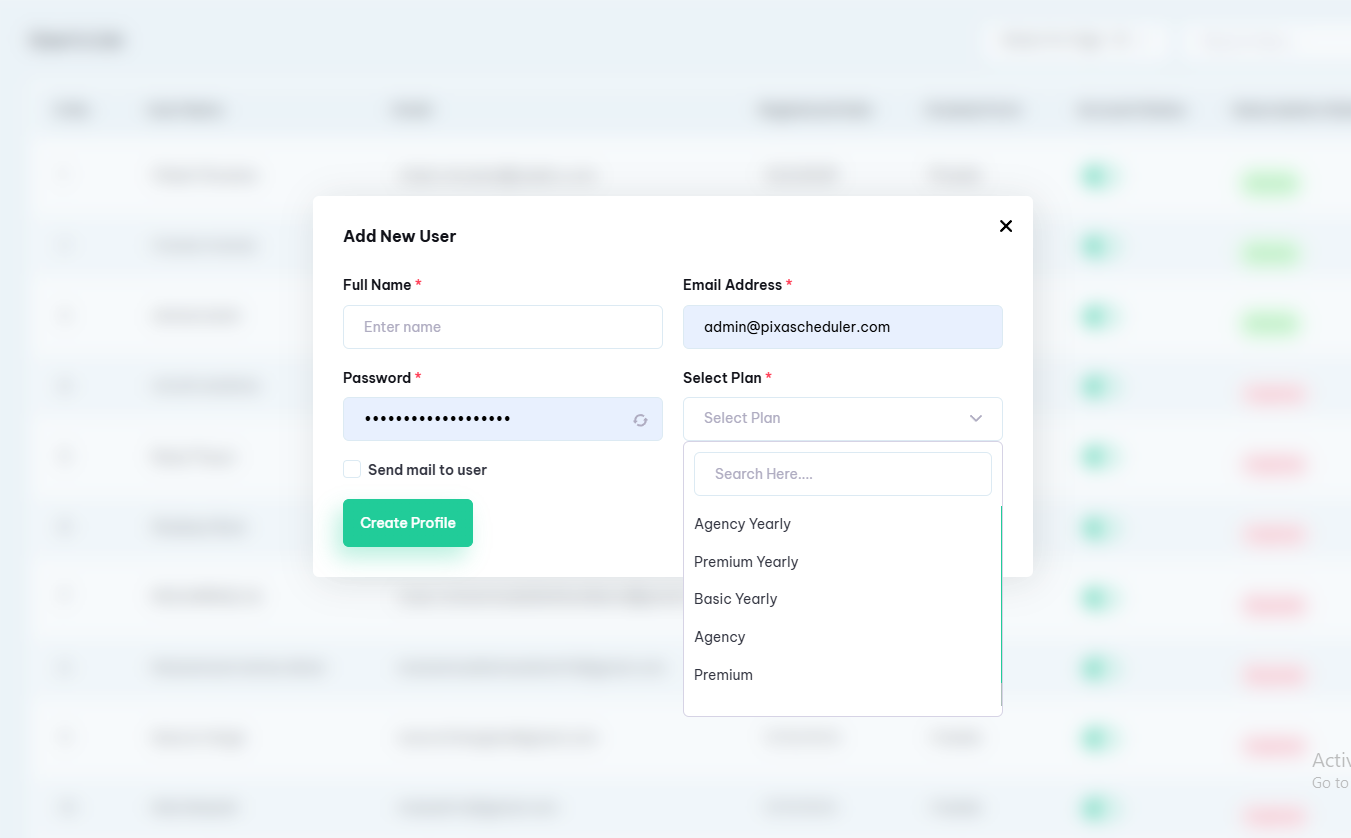
It will show the list of all users. The admin can also view, add, edit, delete the existing users.
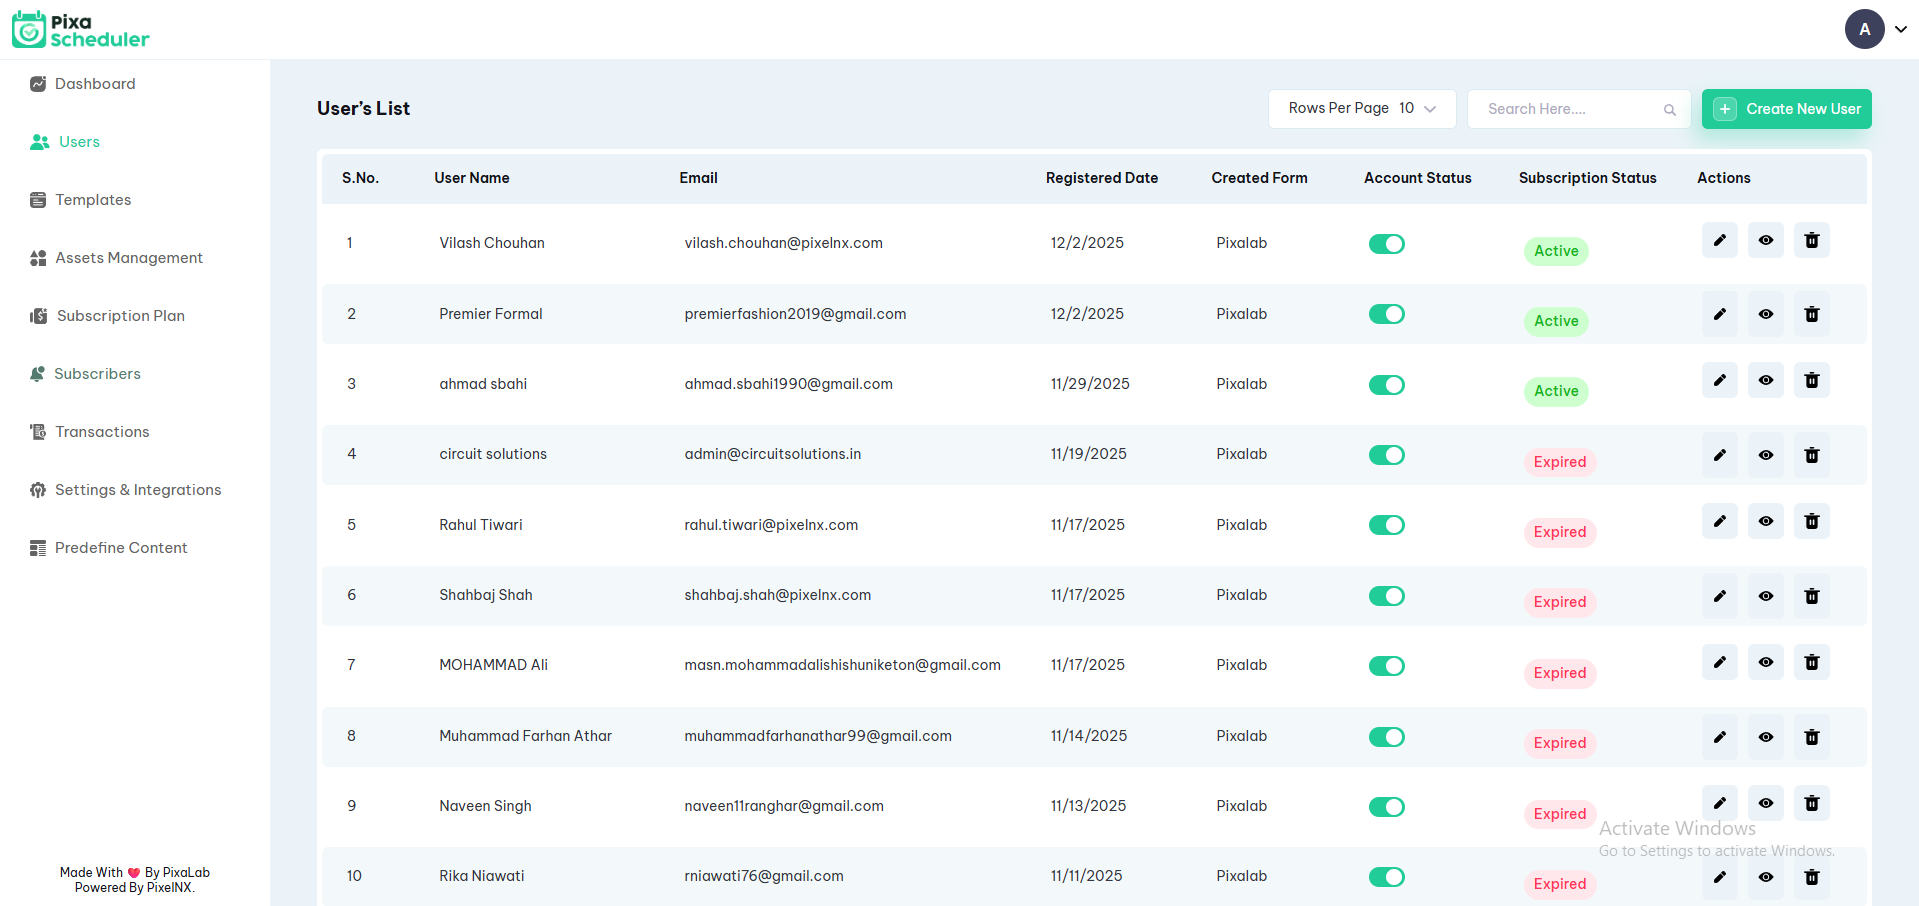
On adding new user, admin can enter basic details, select user type as User or Template Creator, select plan and select user status as Active or Inactive
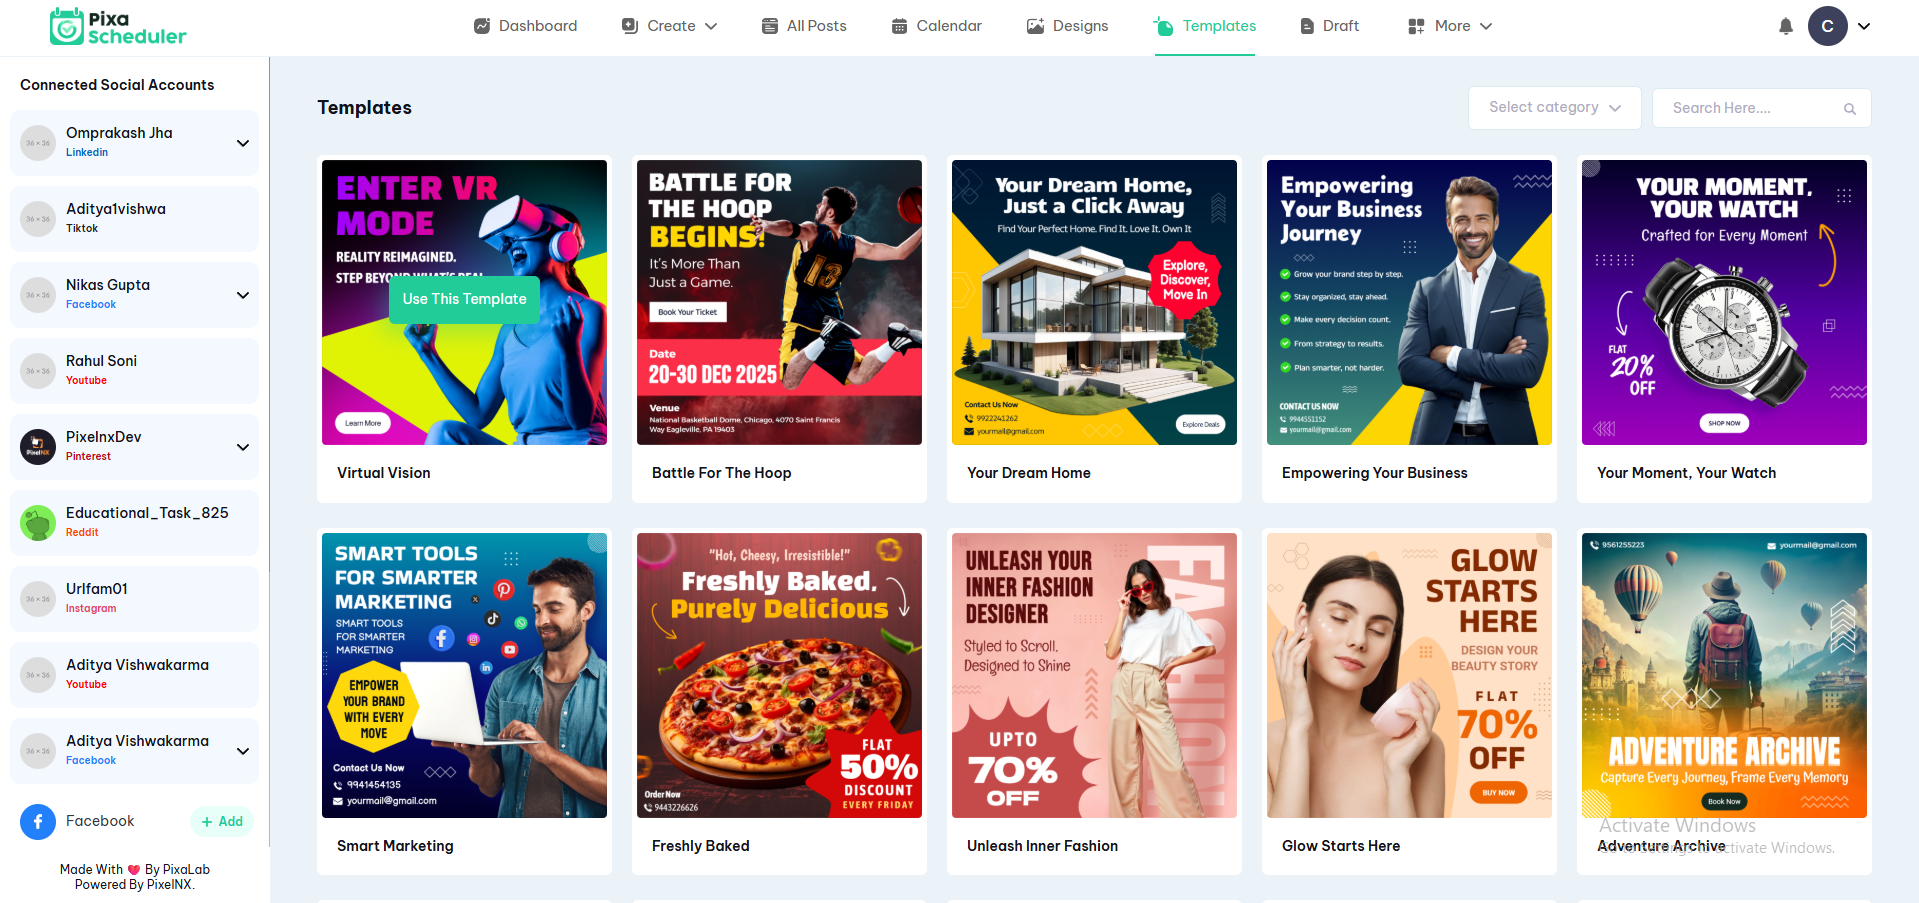
Templates
Using the templates setting, you can create new templates, edit, delete, view and change status of existing templates.
How to Create New Template
1. Click on "Create Template" Button and enter the template title, select the layout as Portrait, Square, Landscape and Custom Size.
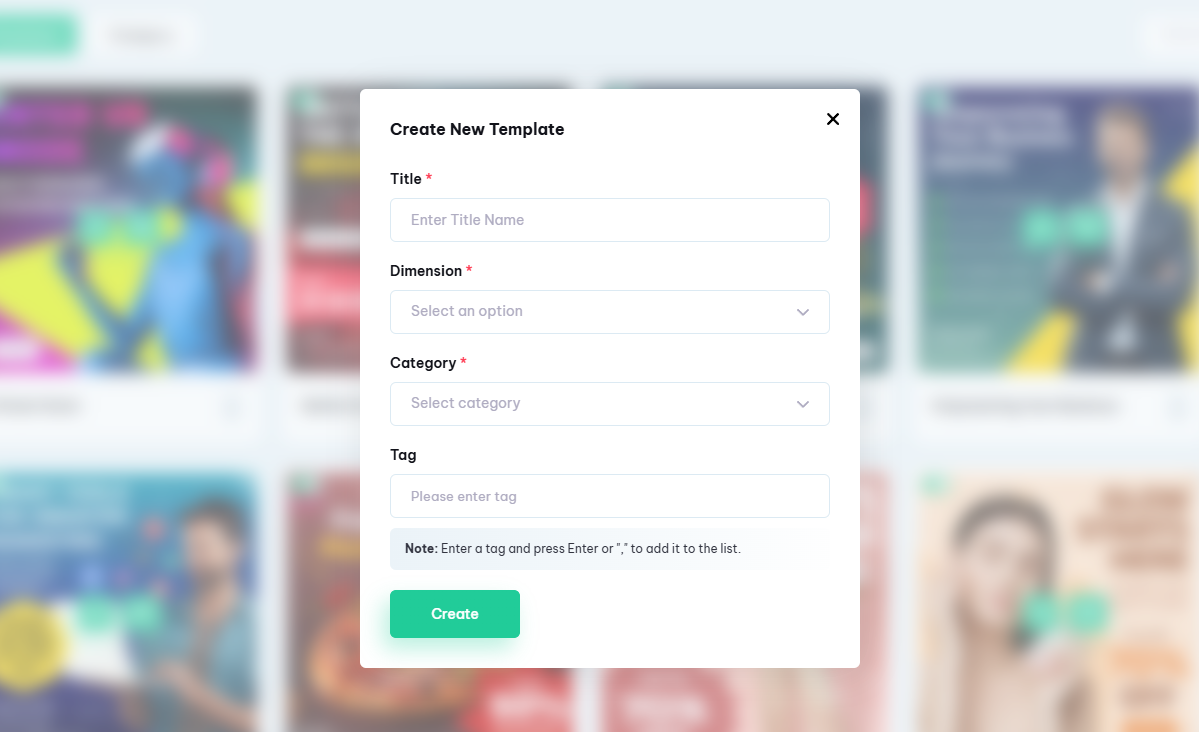
2. An editor screen will appear containing various editing elements. You can customize your template with a user-friendly editor.

Settings : You can enter title, resize the template, select background and default colour.
Text : You can enter the text and can also customize font family, size, text alignment, colour, BG colour, and many more.
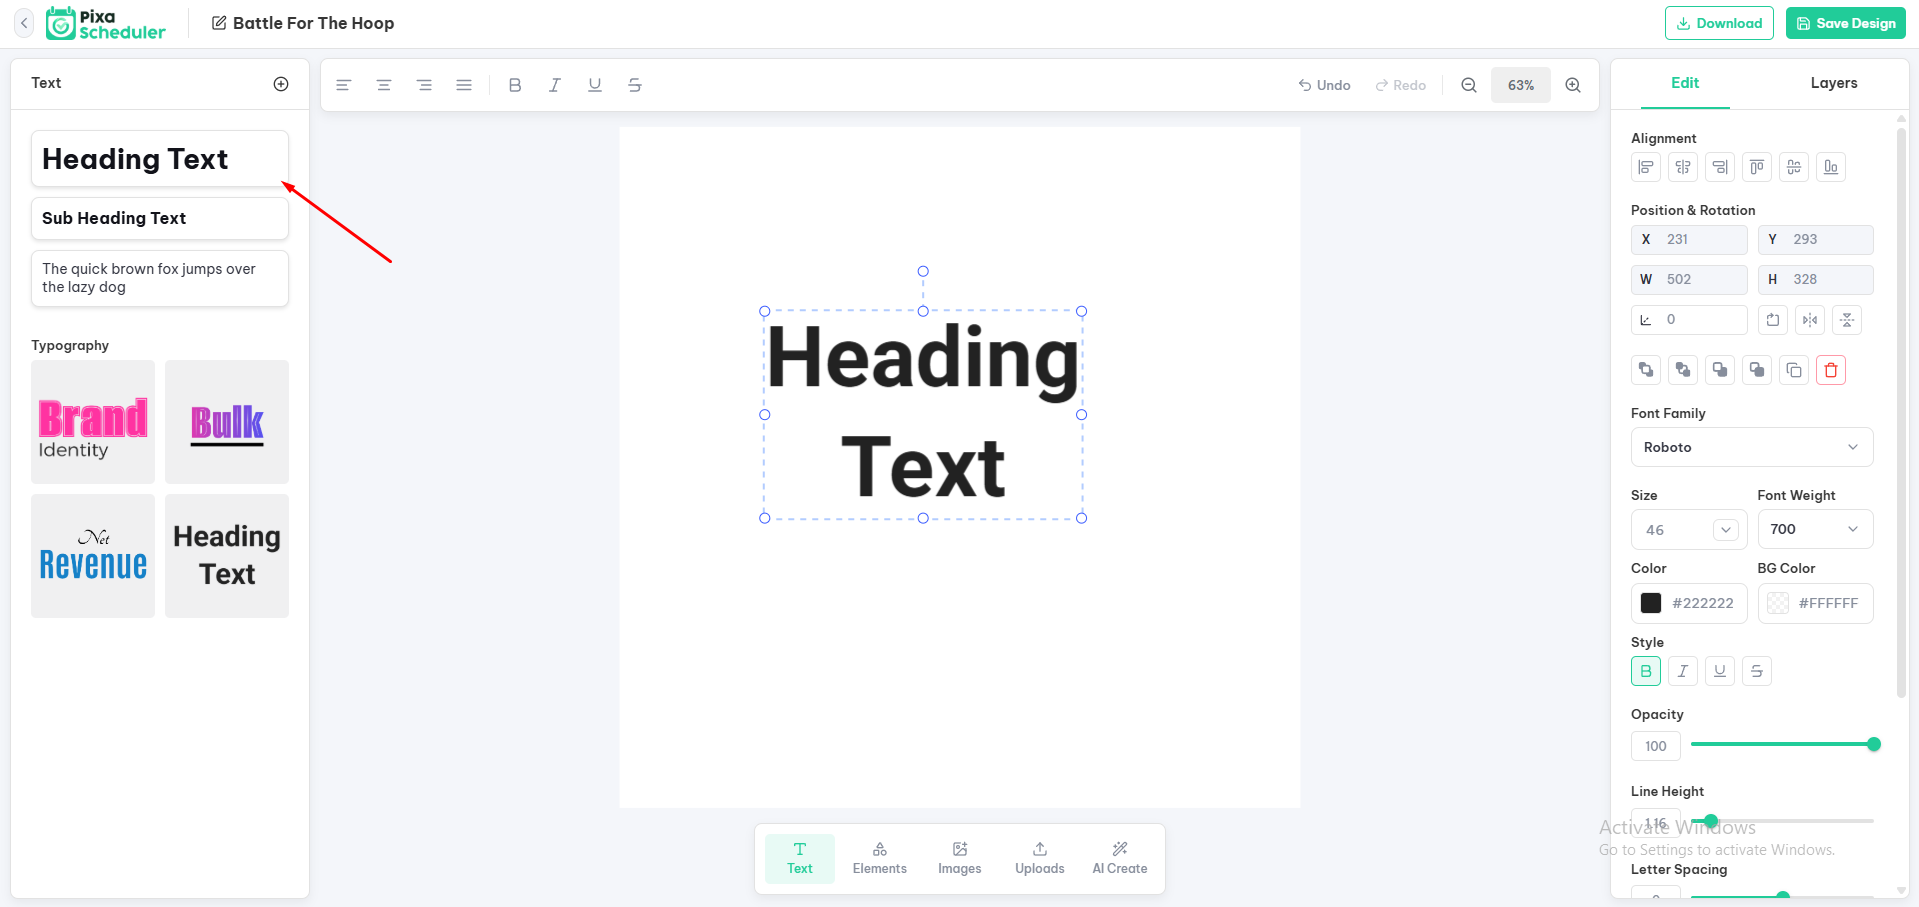
Image : You can add images, crop the image, apply image filter, customize image using editor and can also create a group.
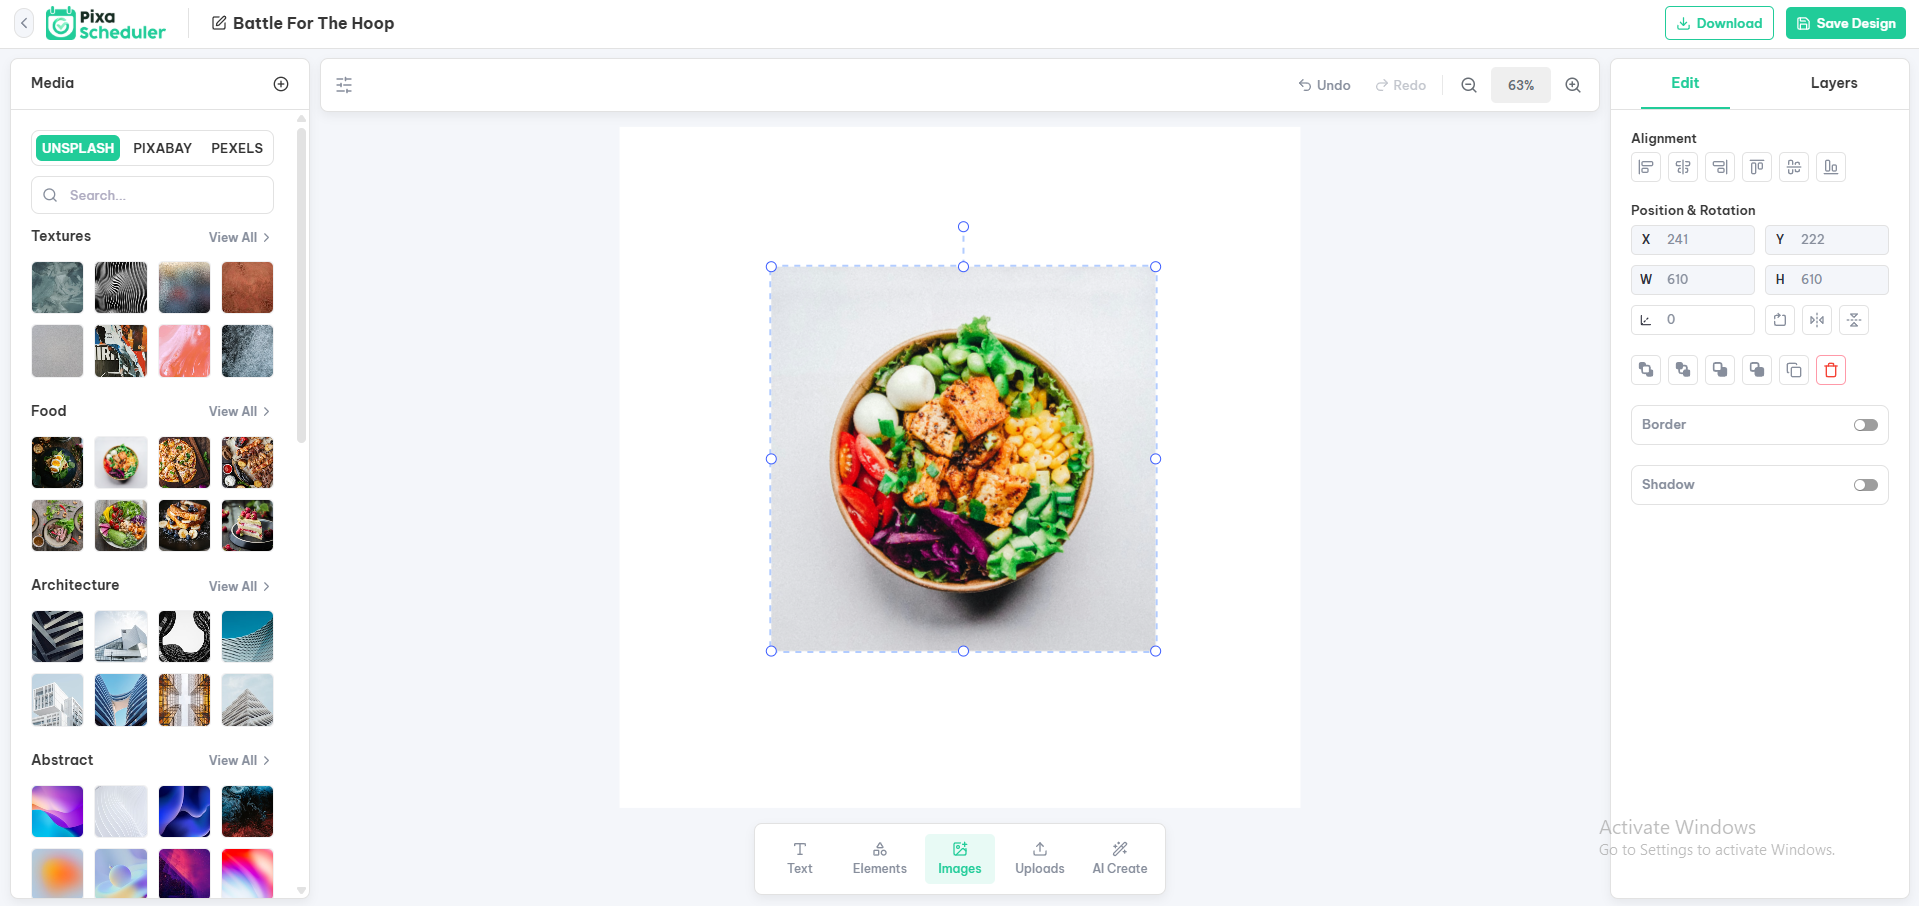
Shapes : In this setting you can select the frames and shapes that was added in the Assets section. With frames option image masking can be accomplished.
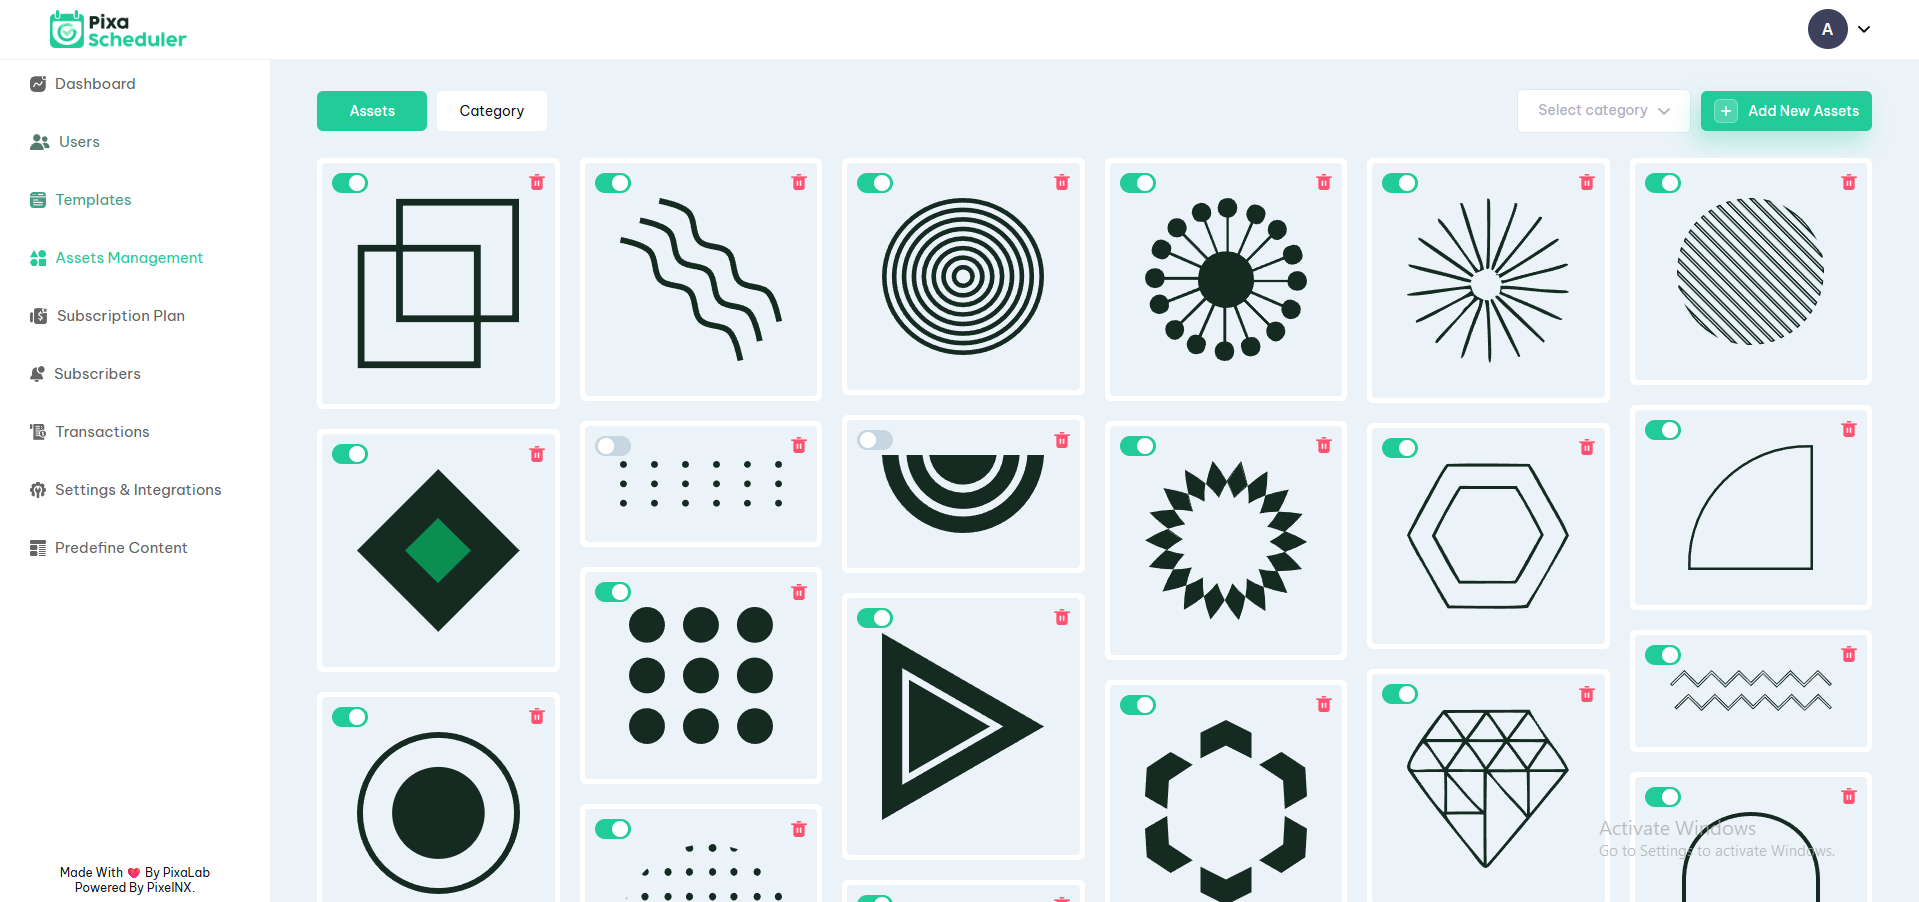
Assets
Asset Management allows the admin to manage design assets used in the editor. It includes Assets and Asset Categories. (assets are not included in this package)
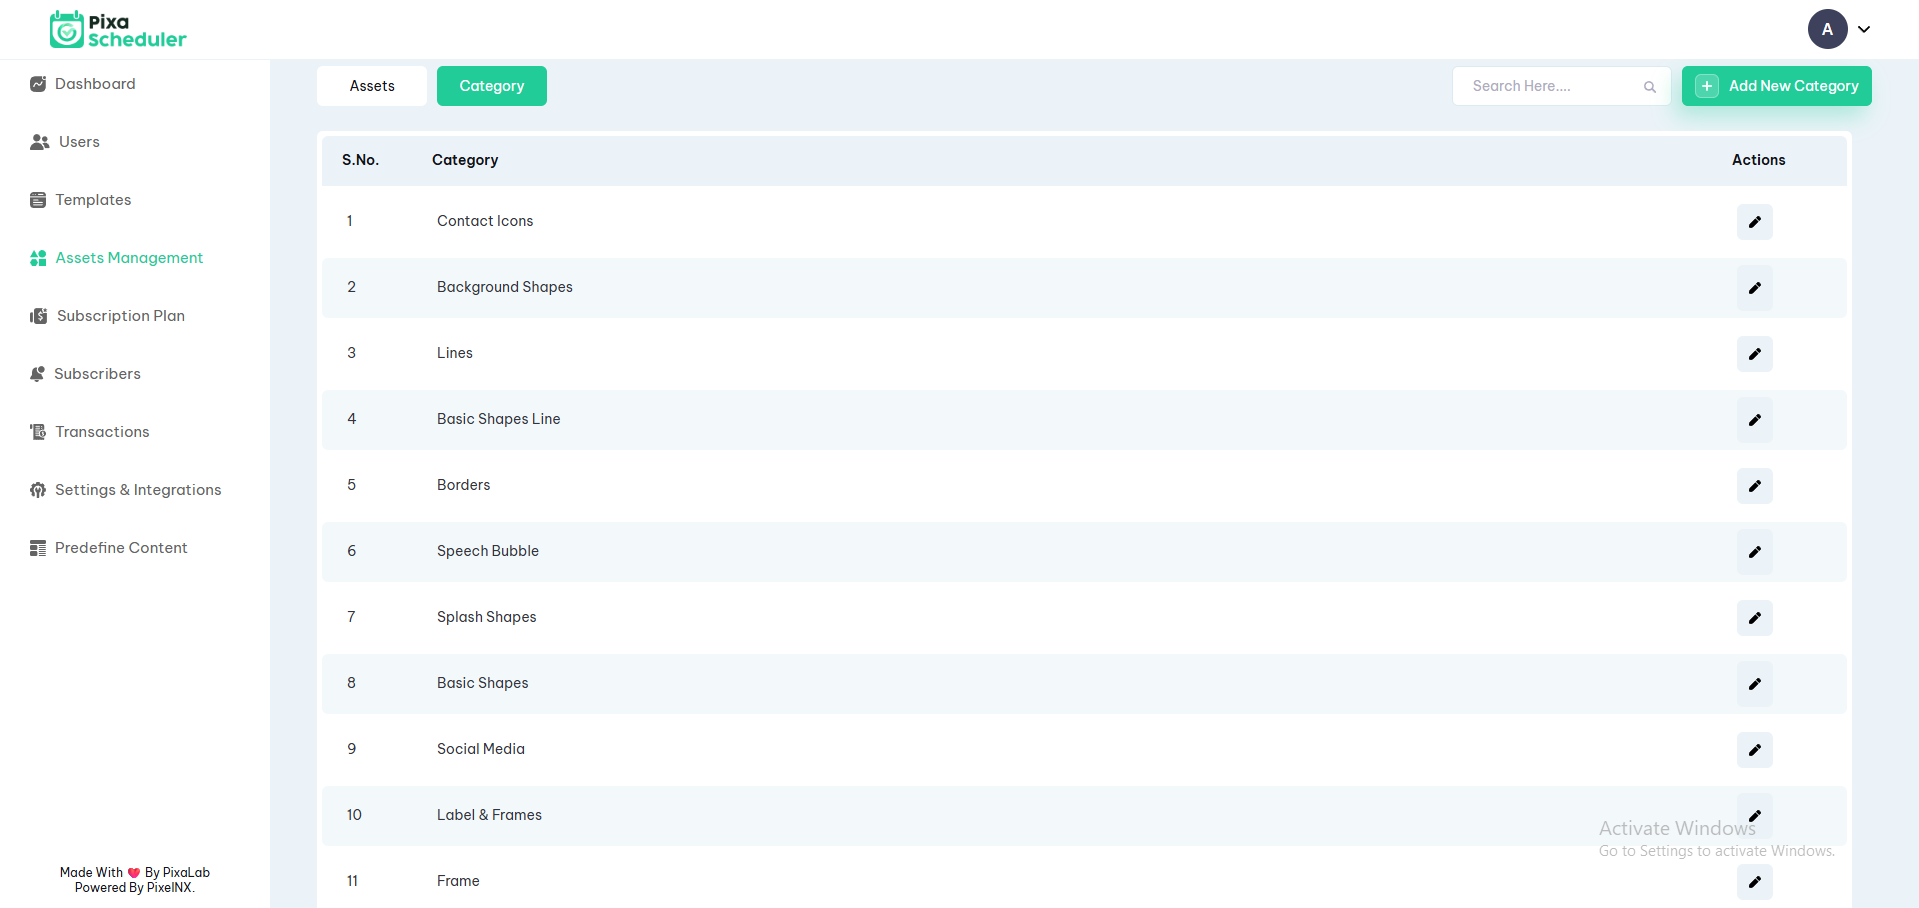
Asset Categories
Categories are created to organize assets effectively. Admin can add, edit, activate, or deactivate asset categories.
These categories are selected during asset upload.
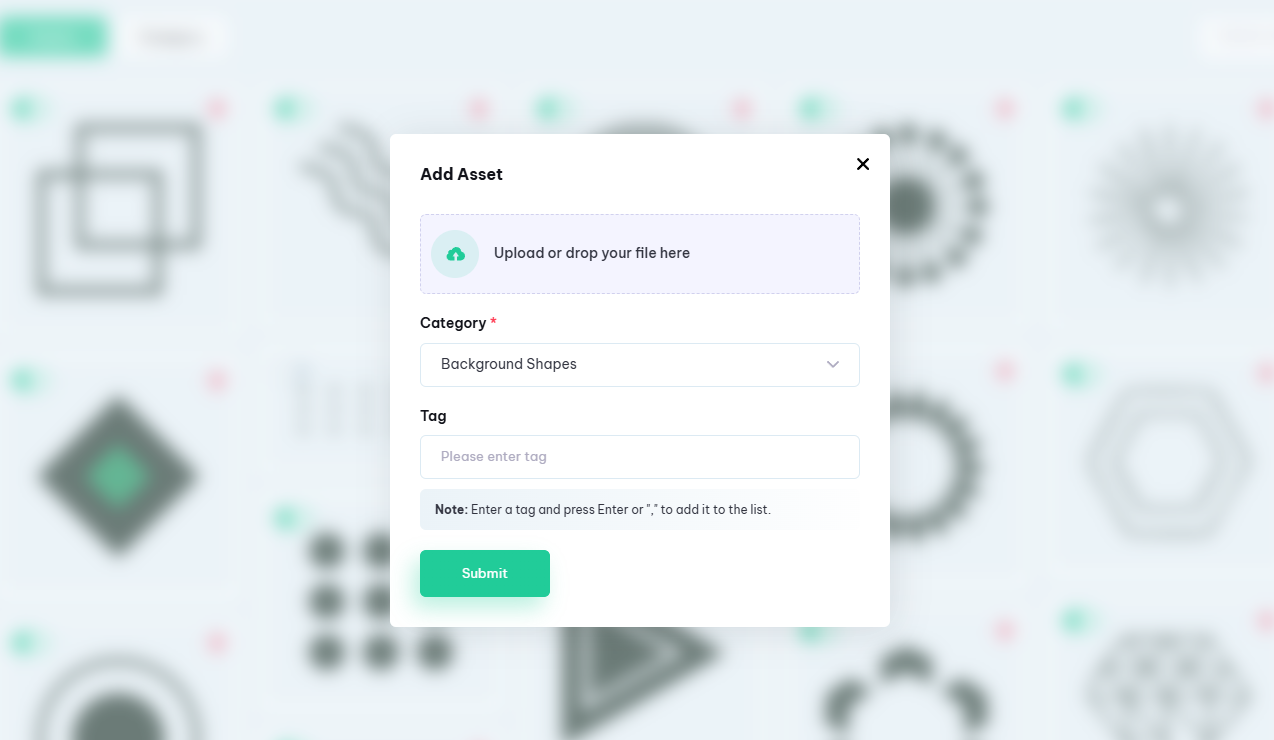
Add Asset
To add a new asset, click on the "Add New Asset" button. Upload the asset, enter tags, and select the appropriate category.
Supported formats:
- SVG – Used for regular shapes and icons
- PNG – Used for frame assets (masking functionality)
Frame assets must be uploaded in PNG format to support image masking inside the editor.
Note: Uploaded assets are available under the Elements section in the editor.
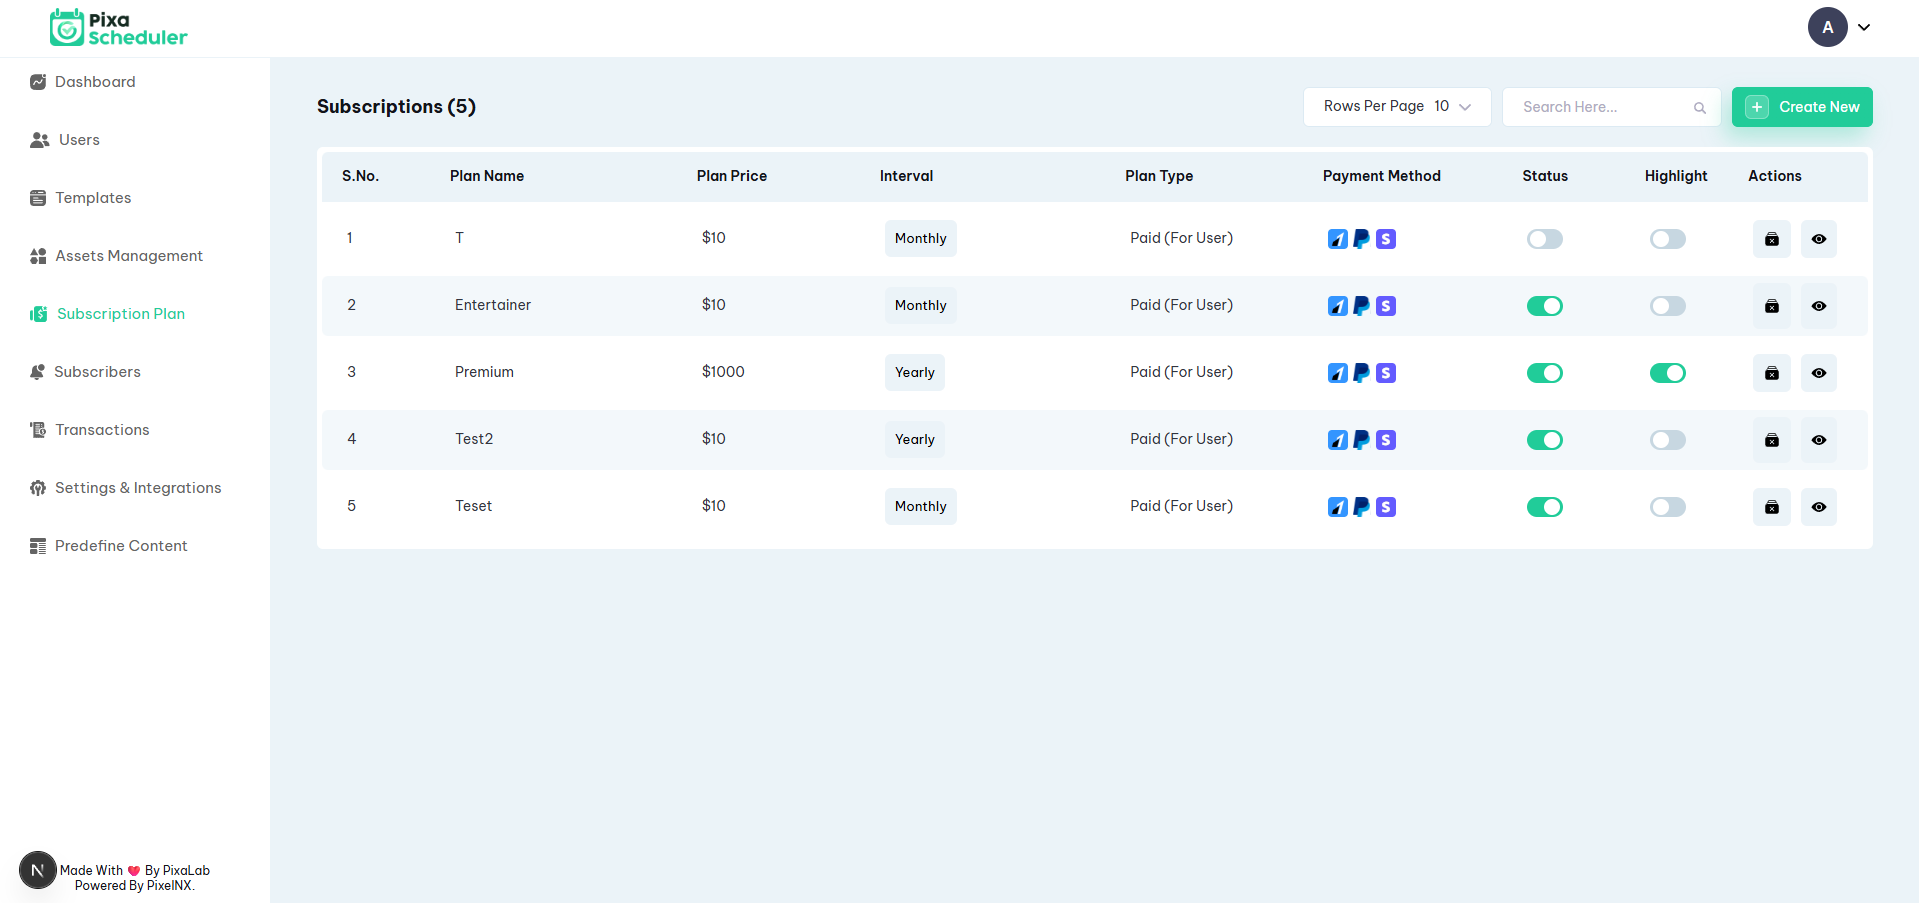
Subscription Plans
Subscription Plans allow the admin to control pricing, limits, and feature access for users. Admin can create paid plans, manage subscriptions, and view transaction logs.
Payment Configuration (Required)
Before creating any subscription plan, admin must configure at least one payment gateway from the admin panel.
Navigate to: Settings & Integrations > Payment Settings
The platform supports the following payment gateways:
- PayPal
- Stripe
- Razorpay
Enter valid credentials for the selected gateway. Paid plans cannot be purchased unless payment credentials are properly configured.
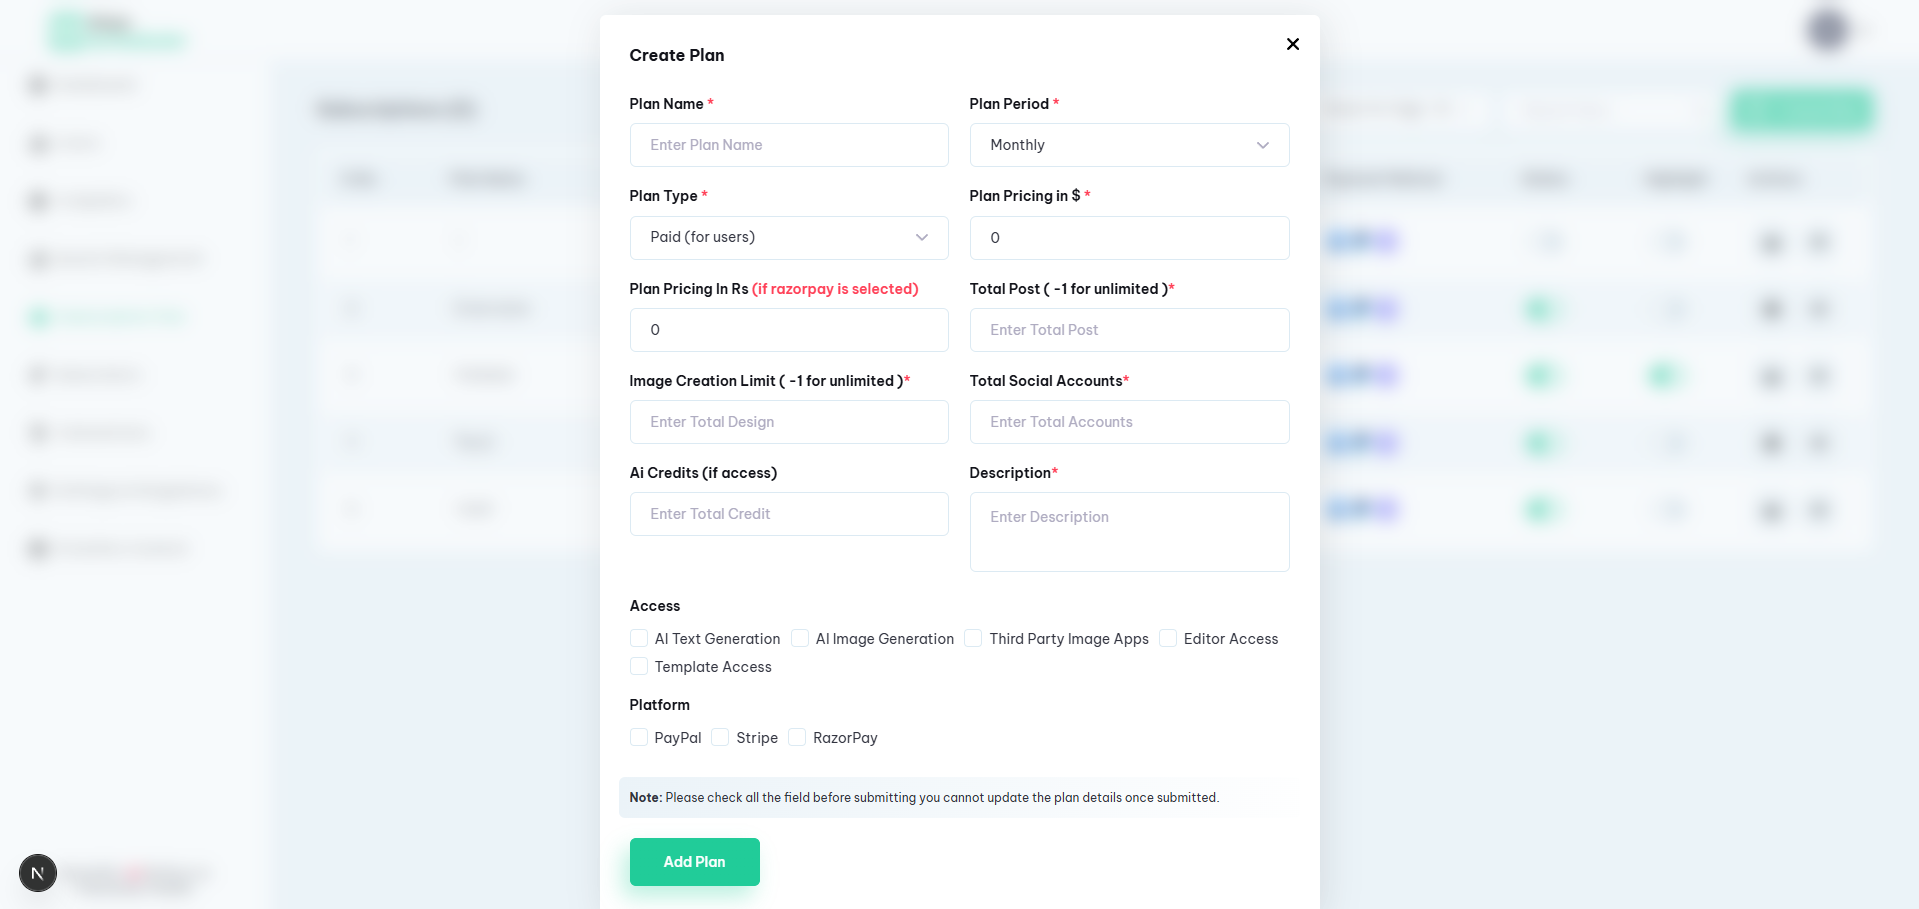
Create Plan
To create a new subscription plan, click on the Add Plan button and enter the following details:
- Plan Name – Name of the subscription plan
- Plan Period – Monthly or Yearly
- Plan Type – Paid (for users)
- Plan Pricing – Price of the plan $
- Plan Pricing in Rs – Required if Razorpay is selected
- Total Posts – Use -1 for unlimited posts
- Image / Template Creation Limit – Use -1 for unlimited designs
- Total Social Accounts – Number of social accounts user can connect
- Total Credit for AI Image Generation – Credit limit if access is enabled
- Description – Short description of the plan
Access Control
Admin can enable or disable the following features for each plan:
- AI Text Generation
- AI Image Generation
- Third Party Image Apps
- Editor Access
- Template Access
Platform Configuration
Select the payment platforms applicable for this plan:
- PayPal
- Stripe
- Razorpay
Make sure the selected platforms match the configured payment gateways.
Note: Please review all fields carefully before submitting. Once a plan is created, its details cannot be updated.
Settings & Integrations
Integrations section allows the admin to configure platform-wide services. These settings control payments, email delivery, third-party APIs, and free user access limits.
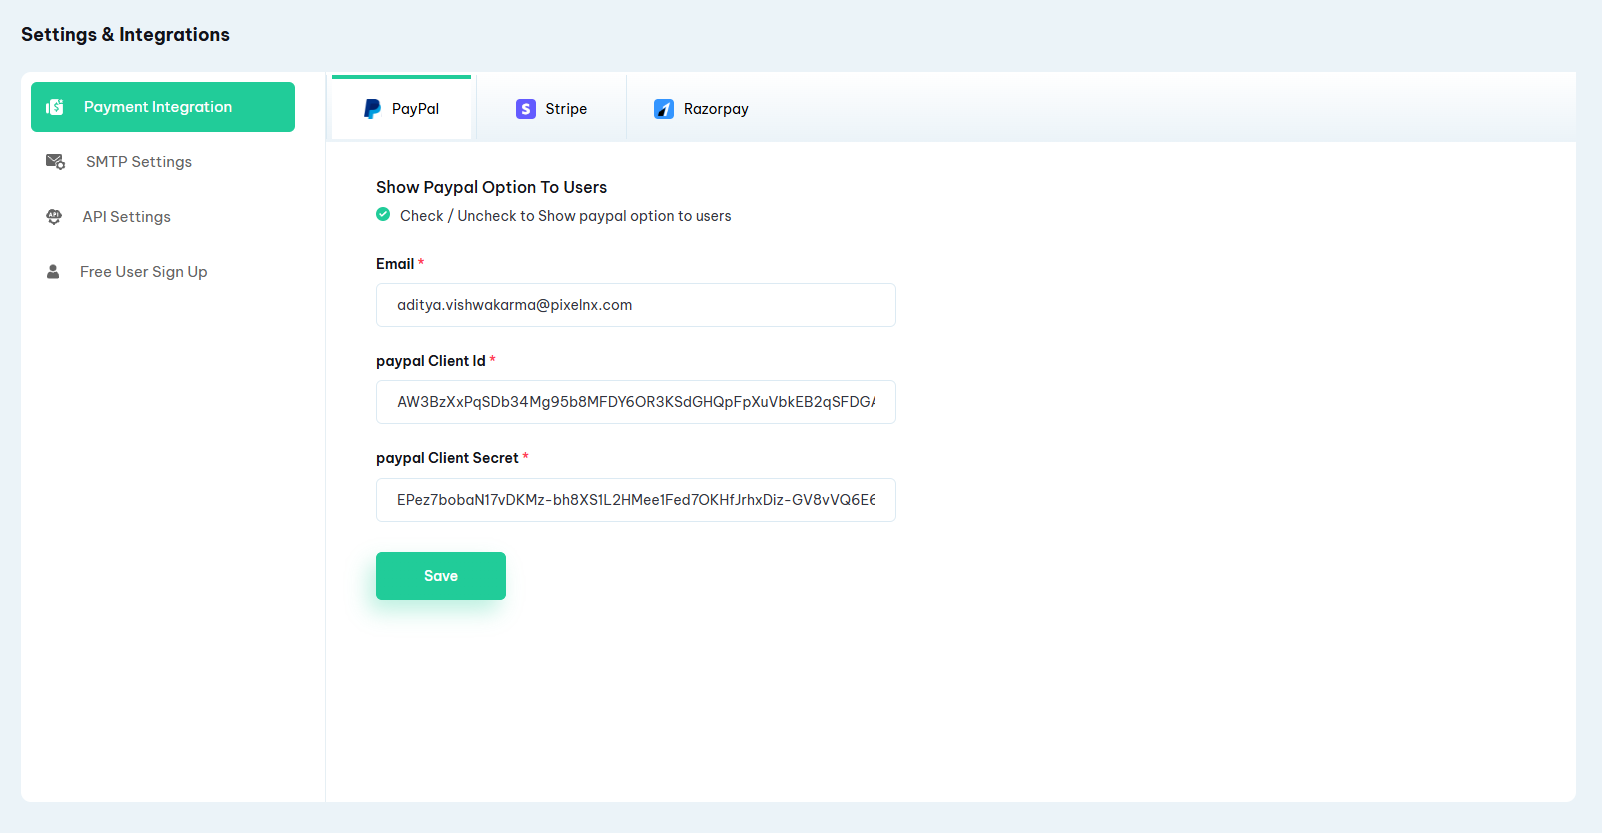
Payment Settings
Payment Settings allow admin to configure payment gateways used for subscription purchases.
The platform supports the following payment gateways:
- PayPal
- Stripe
- Razorpay
Admin can enable or disable payment options displayed to users. At least one payment gateway must be configured to create paid plans.
Available fields:
- Show PayPal option to users (Enable / Disable)
- PayPal Client ID
- PayPal Client Secret
- Stripe Credentials
- Razorpay Credentials
Note: If you change the payment gateway, existing subscription data may not be retrieved because recurring payments are tied to the original payment provider.
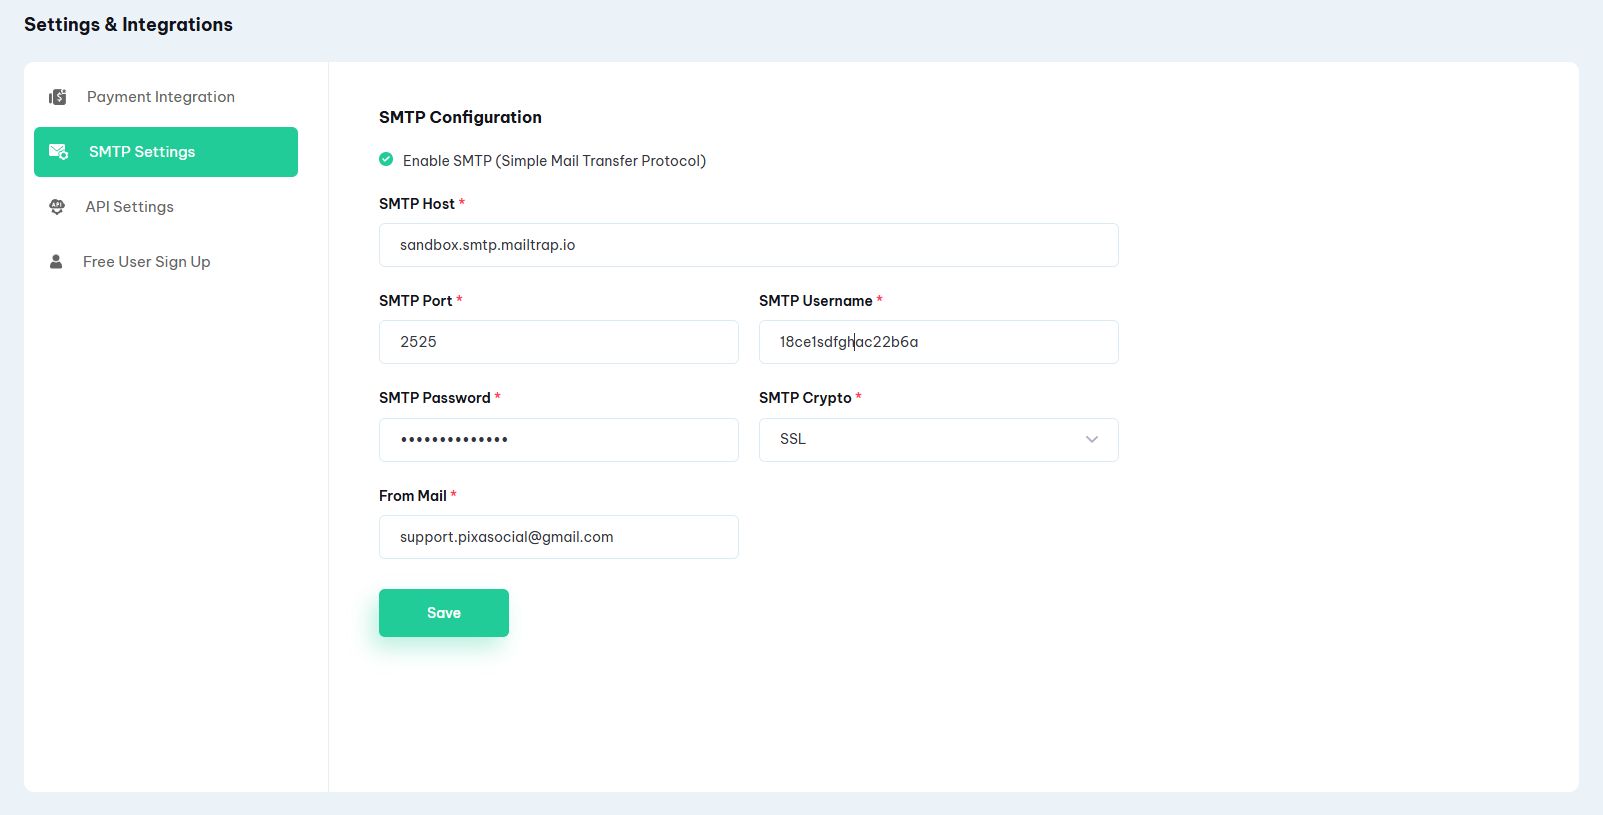
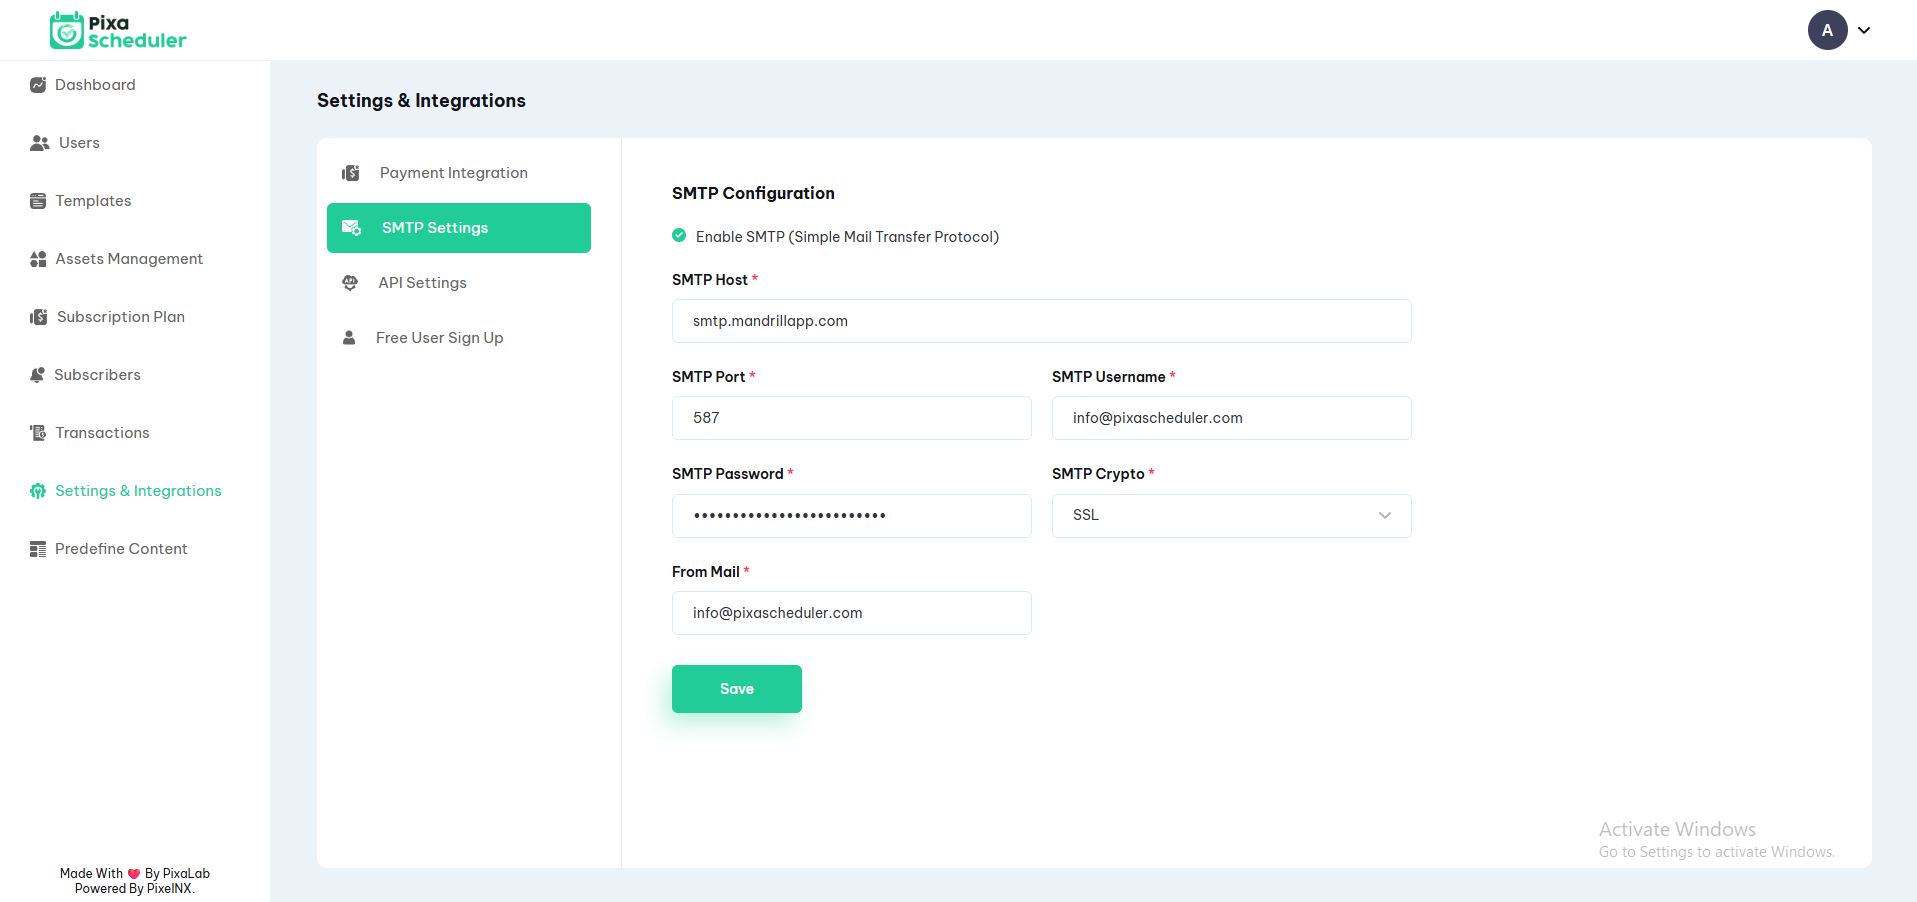
SMTP Configuration
SMTP settings are used to send emails such as signup emails, notifications, invoices, and password recovery emails.
Available fields:
- Enable SMTP
- SMTP Host
- SMTP Port
- SMTP Username
- SMTP Password
- SMTP Encryption (SSL / TLS)
- From Email Address
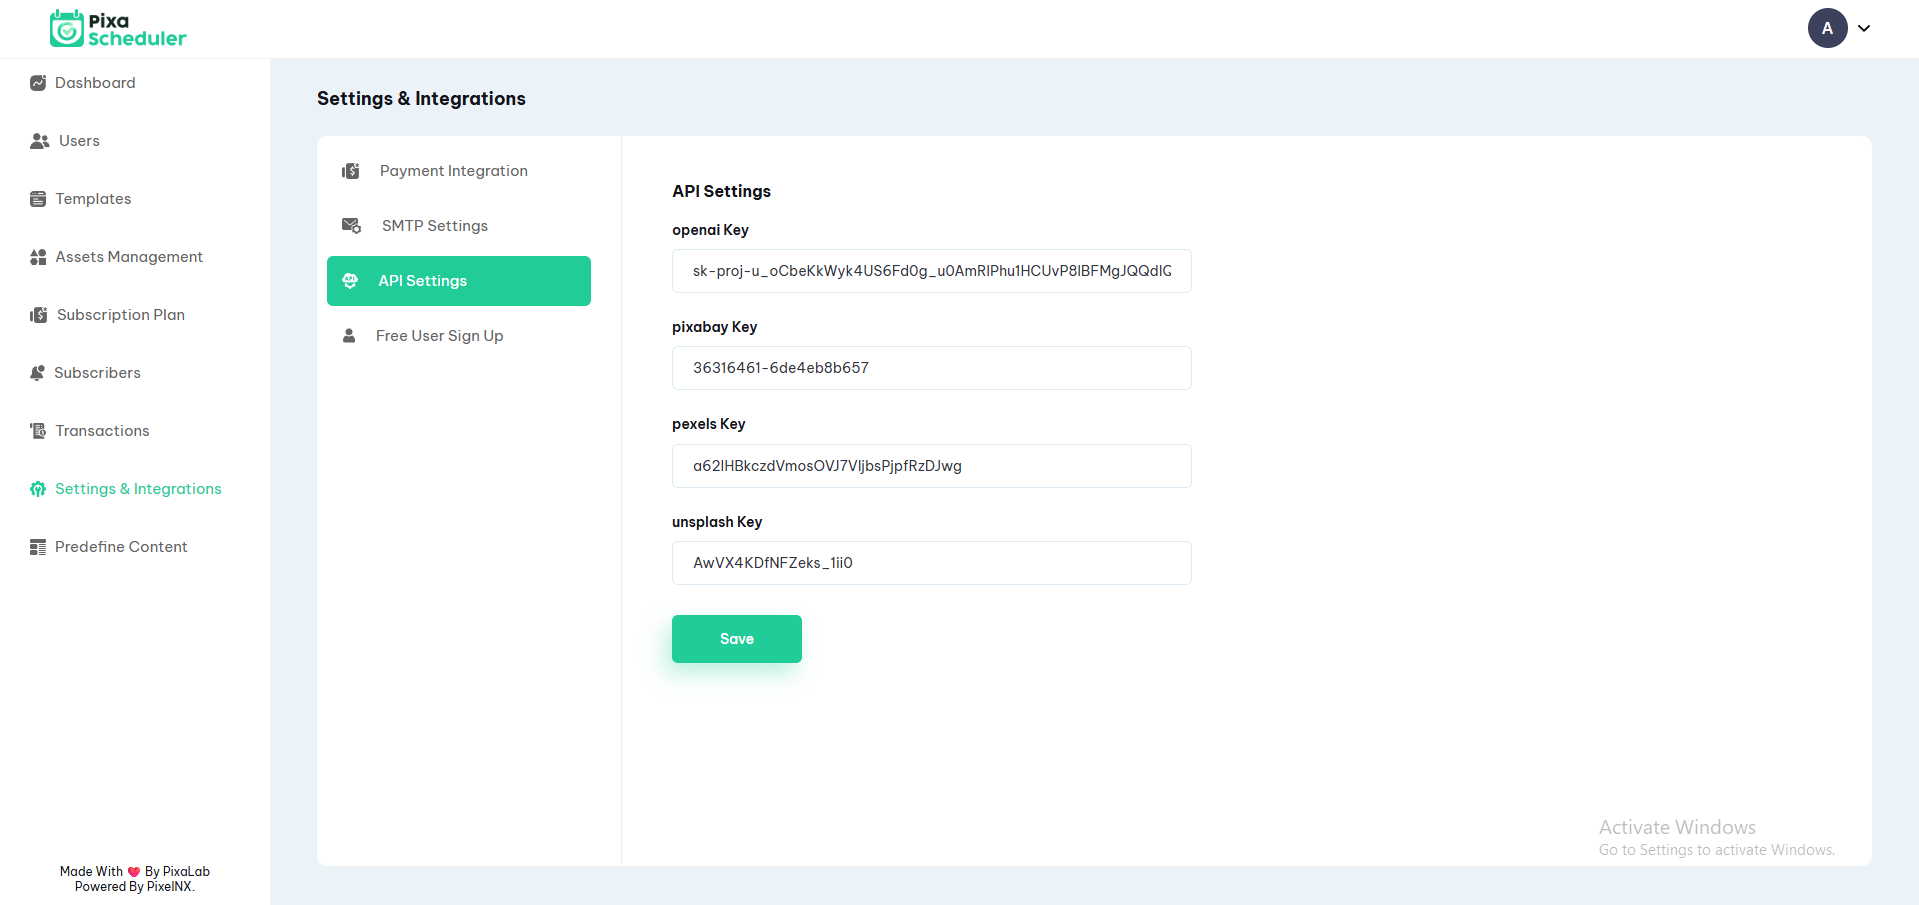
API Settings
API Settings allow admin to configure third-party services used for AI generation and media resources.
Supported API keys:
- OpenAI API Key (AI text and image generation)
- Pixabay API Key
- Pexels API Key
- Unsplash API Key
These APIs are used within the editor and content creation features. If an API key is missing, related functionality will be unavailable.
Free User Sign Up Settings
Free User Sign Up Settings define the default limits and access assigned to users who register without purchasing a subscription.
Configurable limits:
- Free Time Period (in days)
- Total Posts
- Total Social Accounts
- Total Designs (if editor access is enabled)
- Total Credit for AI Image Generation
Feature access control:
- AI Text Generation
- AI Image Generation
- Third Party Image Apps
- Editor Access
- Template Access
These settings help control platform usage for free users and encourage upgrades to paid subscription plans.
Predefined Content
Predefined Content allows the admin to create reusable text content that users can quickly insert while creating posts. This helps maintain consistency and saves time for frequently used captions, hashtags, or promotional messages.
Content added here is available to users during post creation and can be reused across multiple platforms.
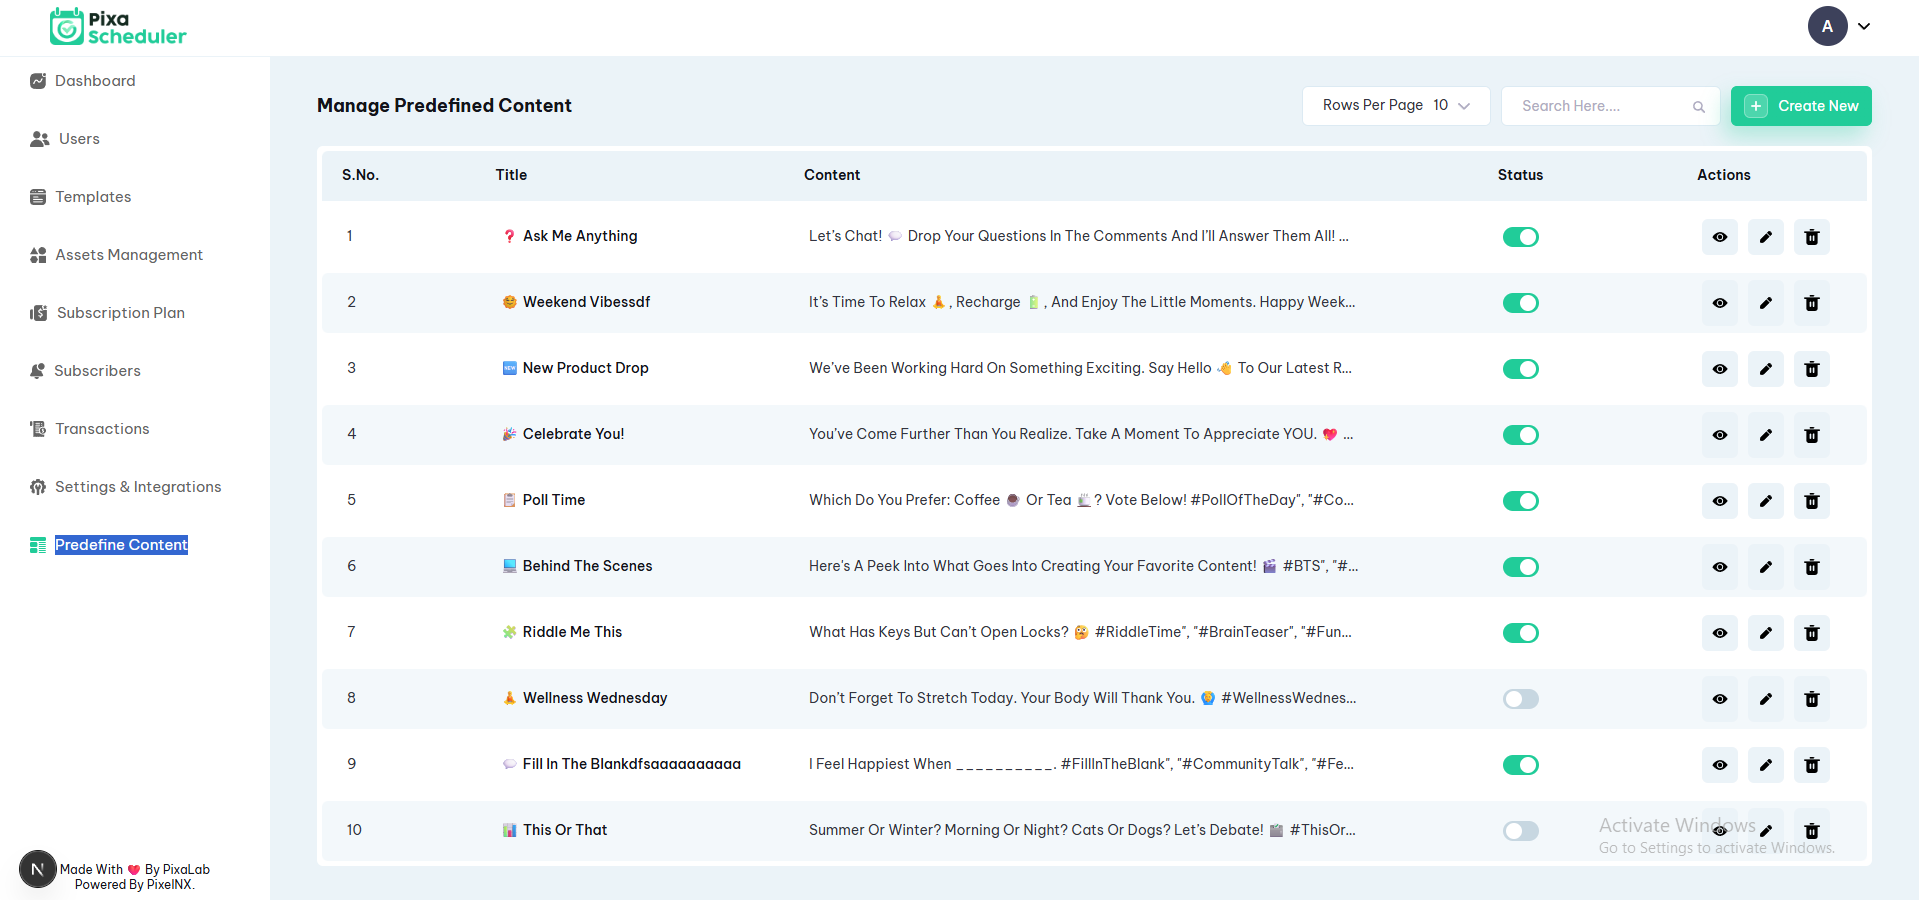
Add Predefined Content
To add predefined content, click on the "Add Content" button and enter the required details.
Available fields:
- Title (for easy identification)
- Content (caption, description, or hashtags)
- Status (Active / Inactive)
Only active predefined content will be visible to users. Inactive content will remain hidden but preserved for future use.
Users can select predefined content while creating posts, modify it if required, and publish or schedule their posts.
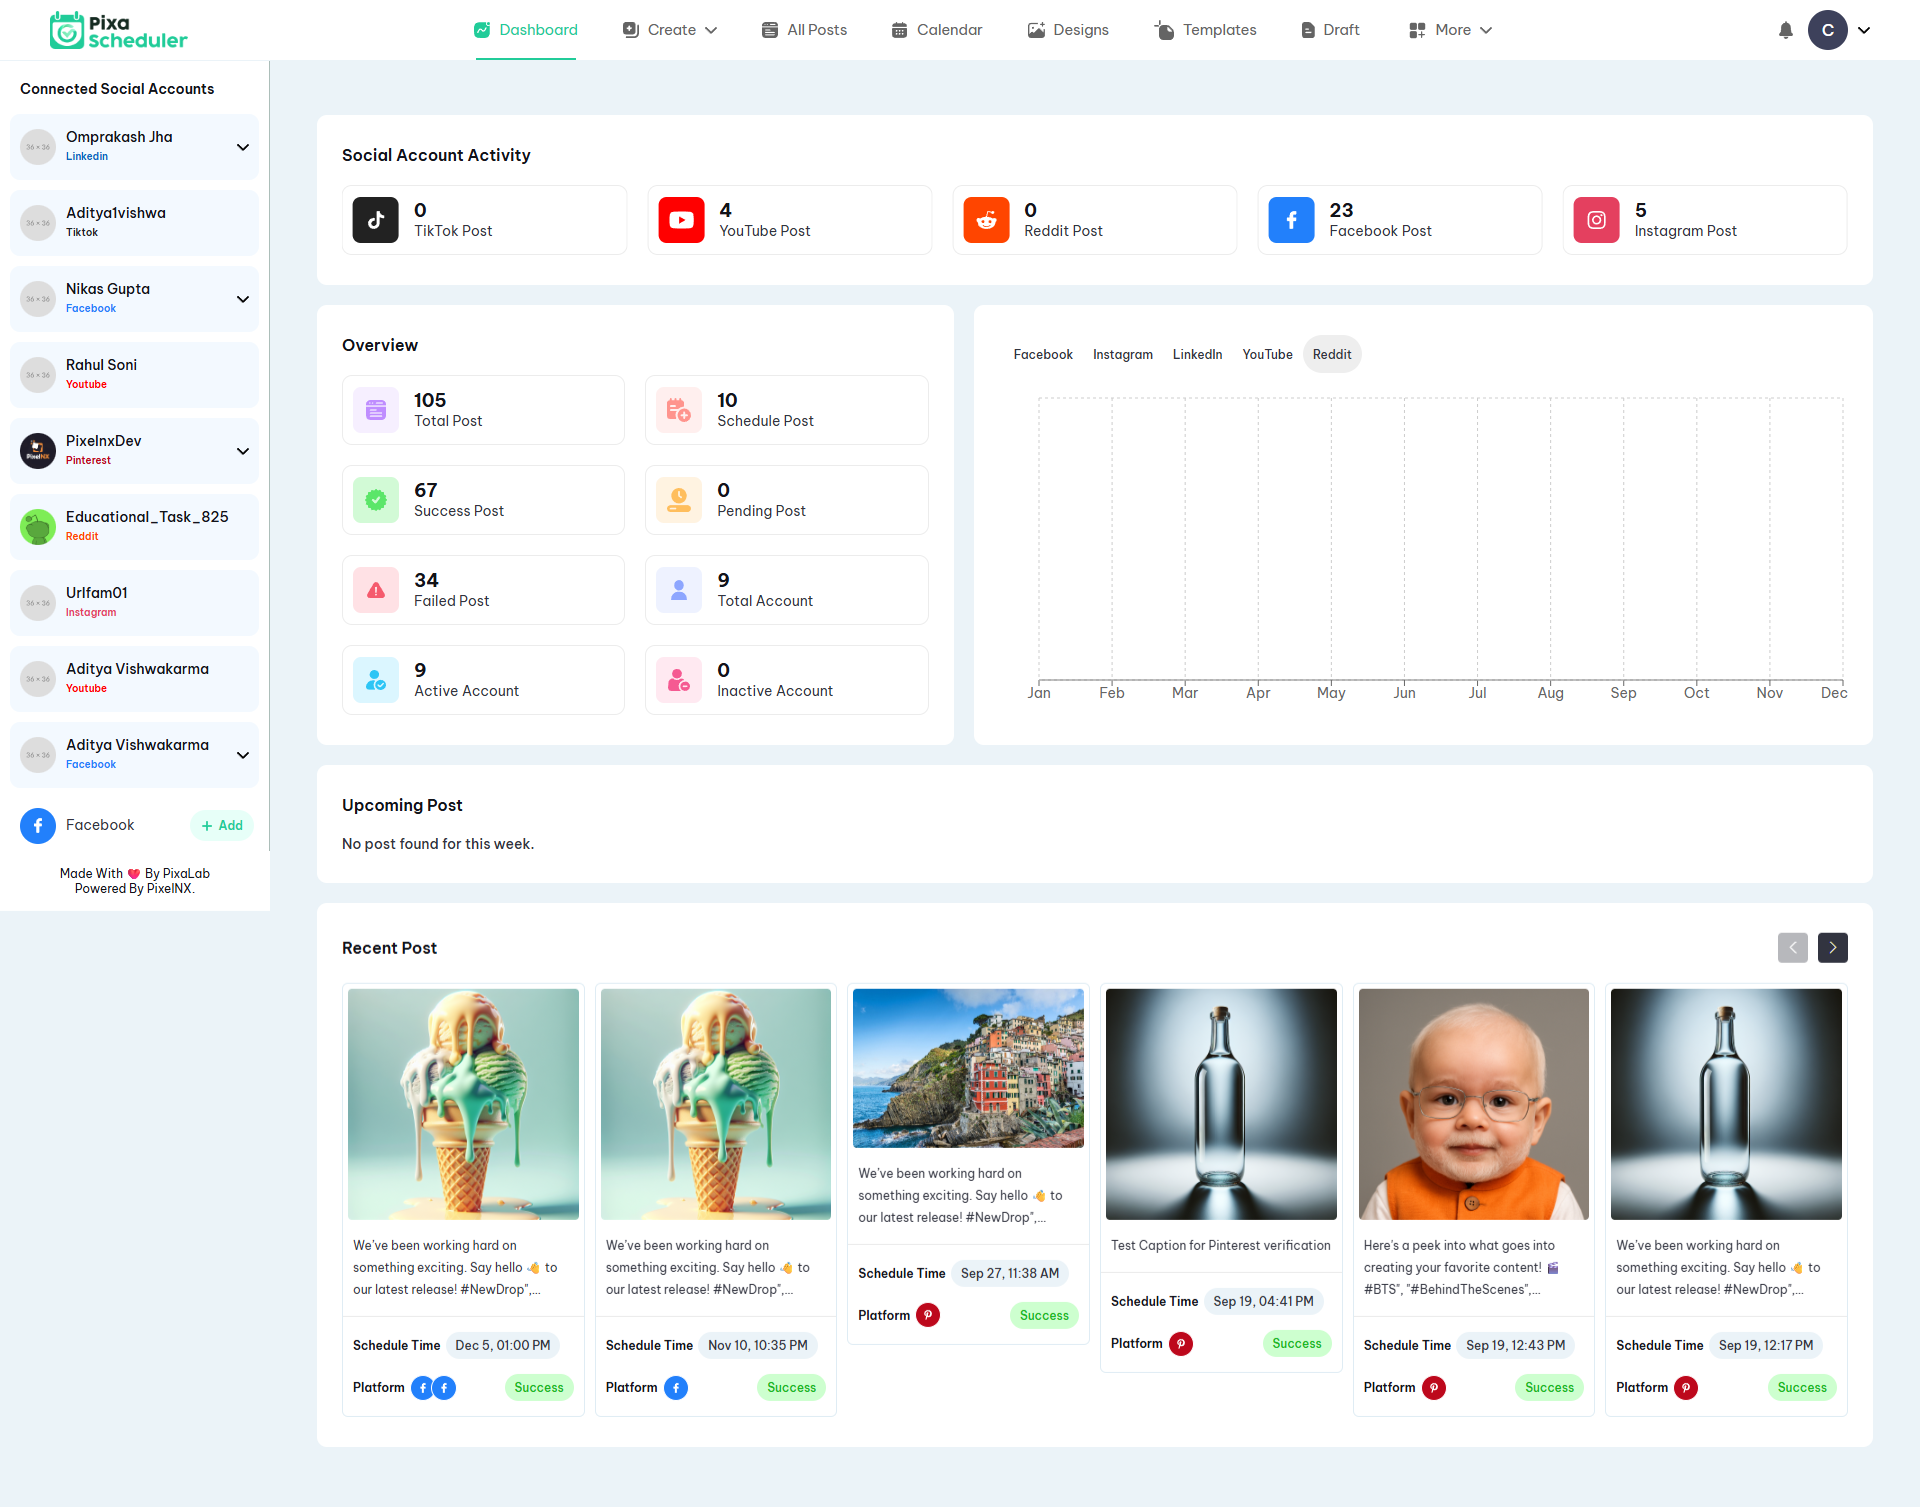
User Dashboard
Dashboard
Social Account Activity
This section shows the activity counts for each connected social media account. Users can track their posts on various platforms such as:
- Instagram: Number of posts made
- LinkedIn: Number of posts made
- Pinterest: Number of posts made
- TikTok: Number of posts made
- YouTube: Number of posts made
- Reddit: Number of posts made
- Facebook: Number of posts made
Overview
The Overview section summarizes the user’s overall activity and account status. It includes:
- Total Posts: Total number of posts across all platforms
- Scheduled Posts: Posts scheduled for future publishing
- Successful Posts: Posts successfully published
- Pending Posts: Posts pending publication
- Failed Posts: Posts that failed to publish
- Total Accounts: Number of social accounts connected
- Active Accounts: Accounts currently active
- Inactive Accounts: Accounts currently inactive
Account Performance
This section shows analytics for connected social accounts over time. Users can track how many posts have been published on each platform. The chart displays:
- Number of posts published per month (January to December)
- Platform-wise post distribution (Facebook, Instagram, LinkedIn, YouTube, Reddit)
The chart provides a visual representation of your activity, making it easy to analyze trends and performance across platforms.
Upcoming Posts
Shows posts scheduled for the current week. If no posts are scheduled, it will indicate “No post found for this week.” Users can quickly check their weekly content plan here.
Recent Posts
This section lists recently published or drafted posts. Users can view, edit, or delete posts from here. It helps track the latest activity on the dashboard.
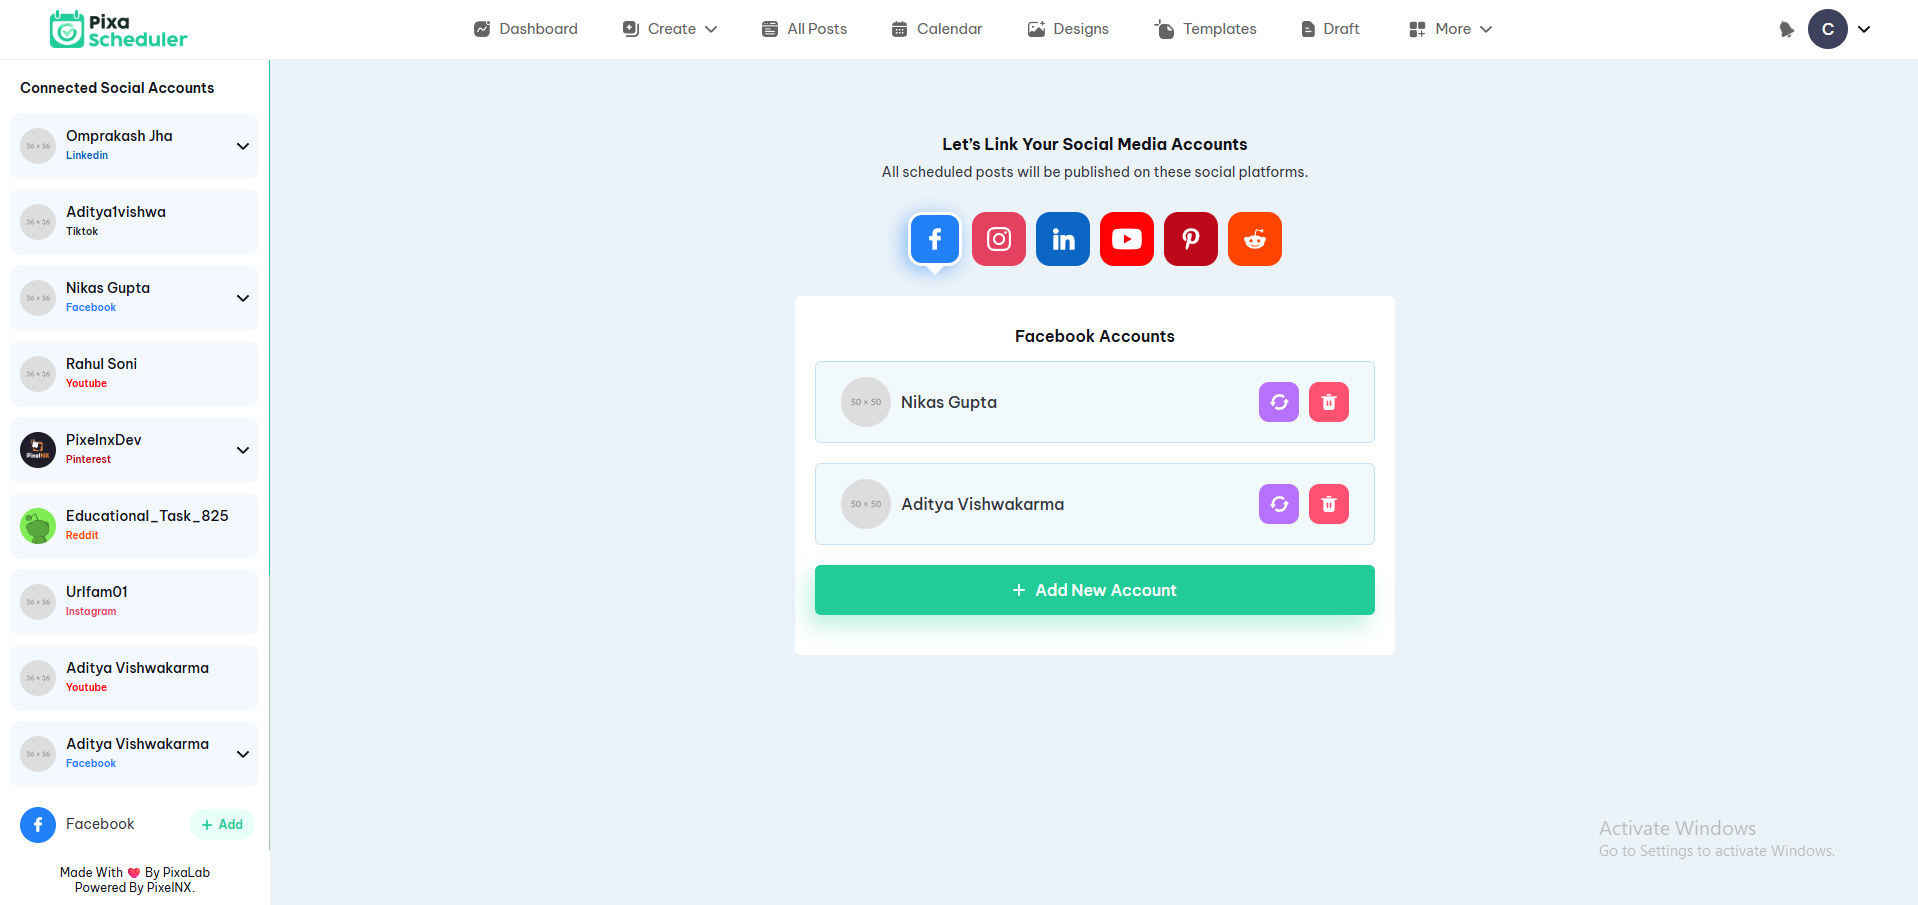
Integrations
Users can access integrations by navigating to Header > More > Integrations. Here, users can connect their social media accounts to the platform for scheduling posts, tracking performance, and publishing content directly.
Available Integrations
- YouTube
Once connected, these accounts will appear in your User Dashboard and can be selected while creating posts, scheduling content, or tracking analytics.
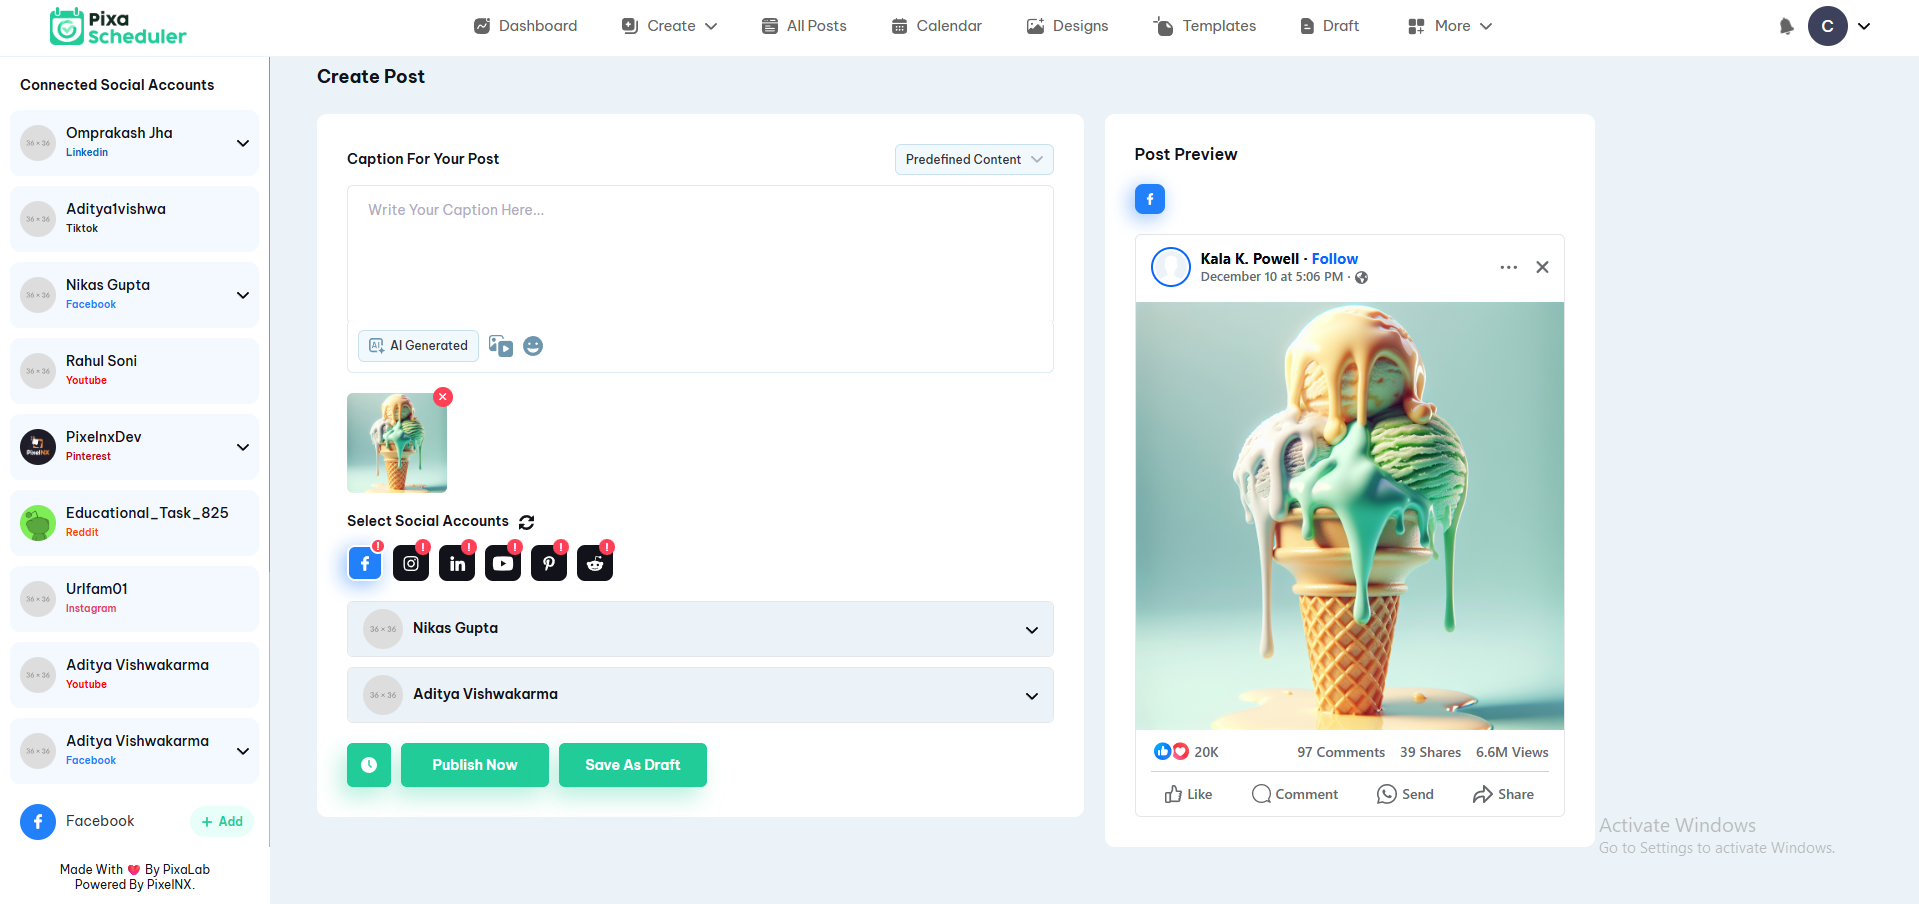
Create Post
Users can create single or multiple posts at a time by navigating to Header > Create > Single or Bulk Post. The post creation interface is designed to streamline content publishing across multiple social media platforms.
Caption/Content
Write your post content or choose from Predefined Content templates for faster posting.
Live Post Preview
View a real-time preview of your post to see how it will appear on the selected platform(s). This ensures that formatting and media display correctly.
Select Social Accounts
Choose one or multiple social accounts to publish your post simultaneously across platforms such as Facebook, Instagram, LinkedIn, YouTube, Pinterest, and Reddit.
Platform Compatibility
The editor visually indicates which platforms the post is compatible with, helping avoid unsupported formats or media.
Actions
After composing the post, users can:
- Publish Now: Immediately post to selected platforms.
- Save as Draft: Save your work to continue later.
- Schedule: Set a specific date and time for the post to go live.
Post Validity & Platform Indicators
The editor clearly indicates for which social platforms the post is valid, helping users ensure their content meets each platform's requirements before publishing.
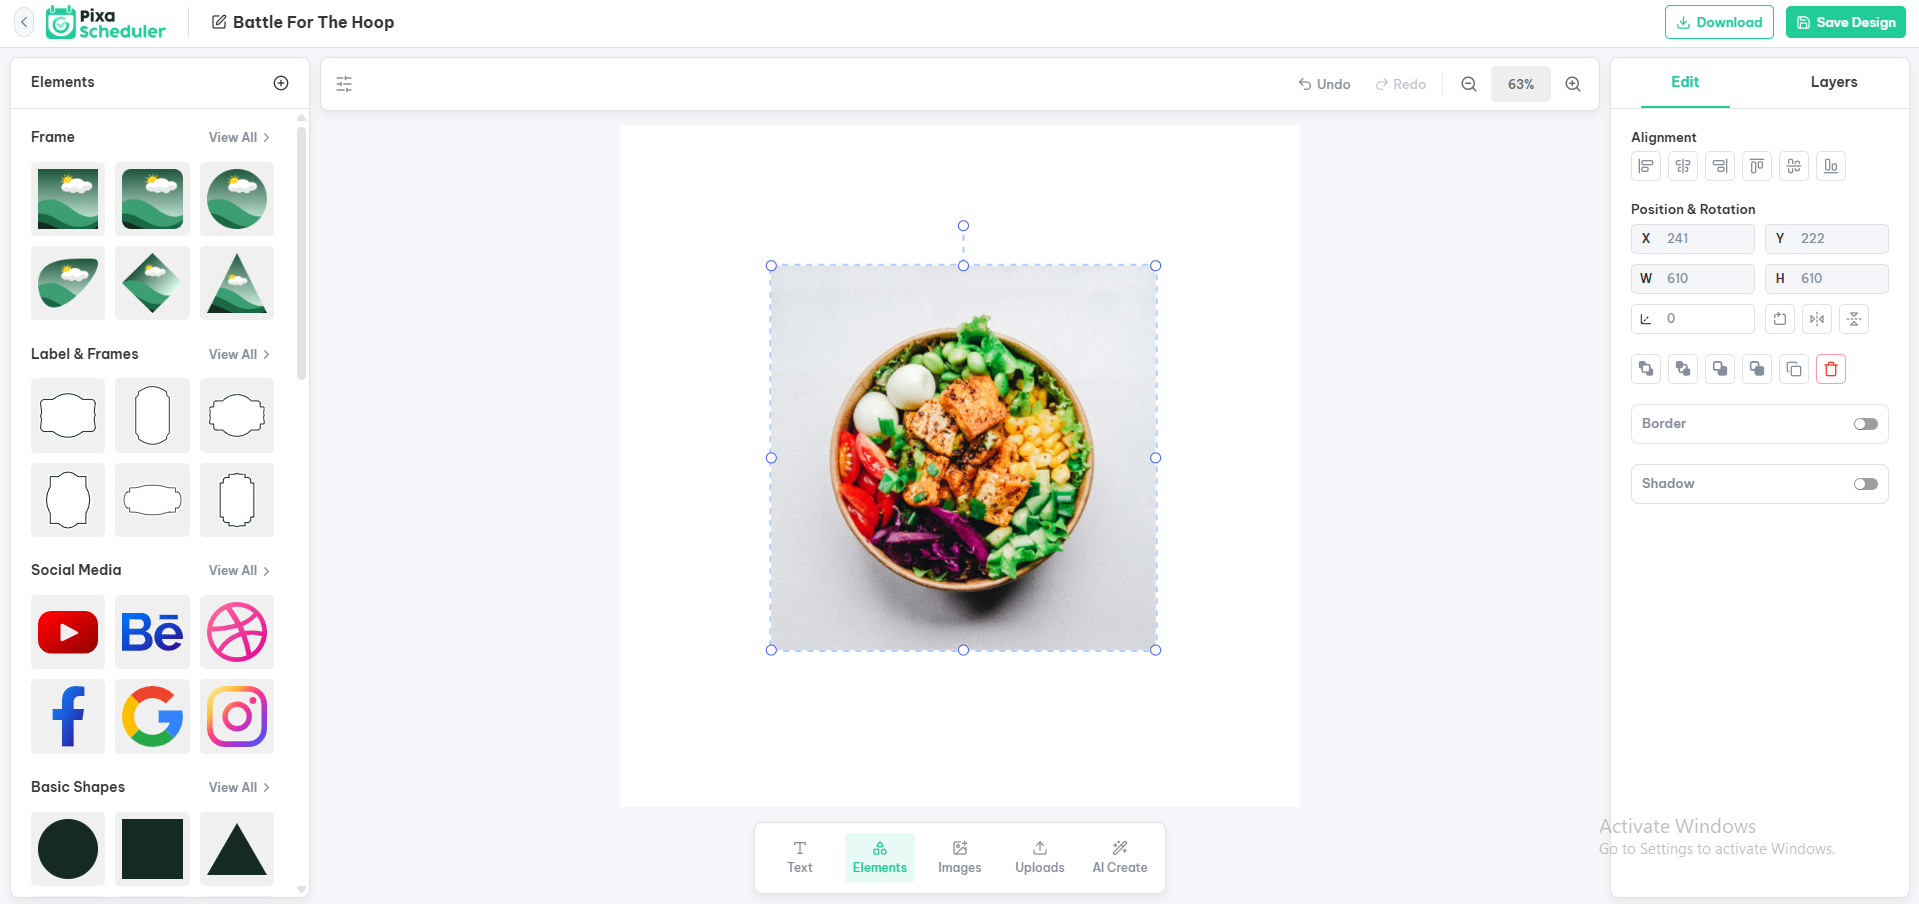
Visual Reference
Below is an example of the Create Post editor interface:
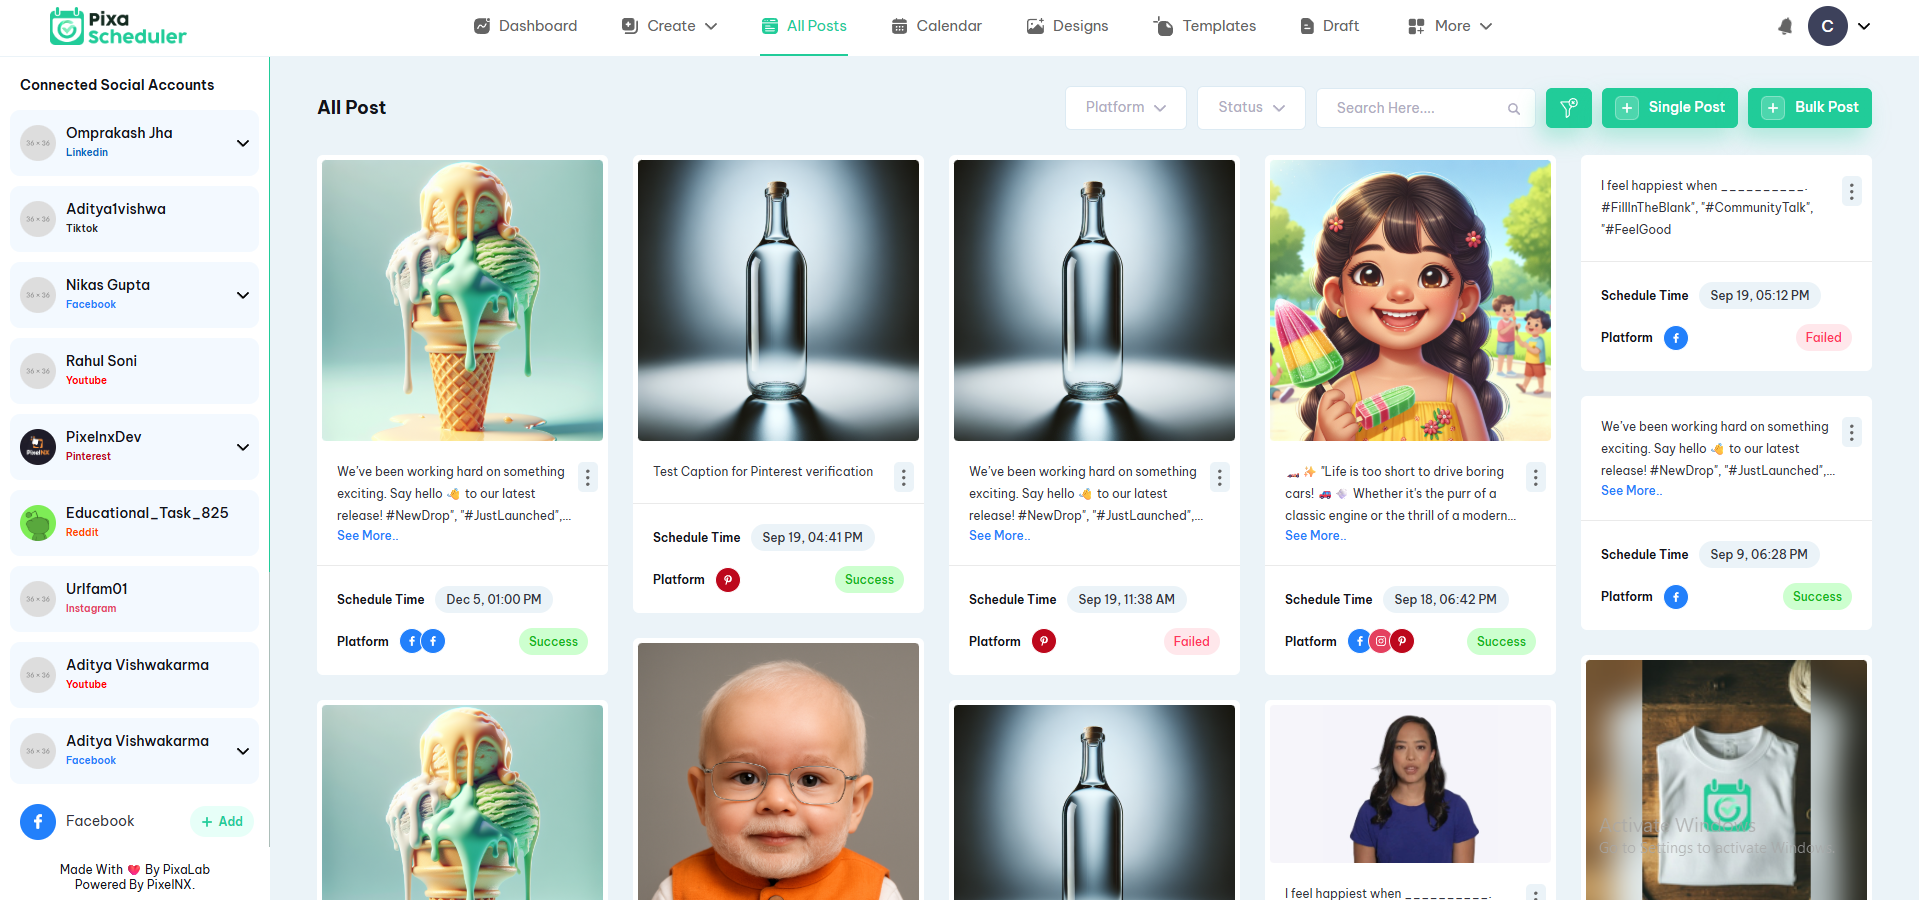
All Posts
The All Posts section allows users to view and manage all posts created and scheduled through the platform. It provides a comprehensive overview of content across multiple social media accounts.
Connected Social Accounts
On the left-hand side, users can see all connected social media accounts. Clicking on an account allows you to filter posts for that specific platform.
Post Cards
Each post is displayed in a card format showing:
- Content Preview: A snippet or image of the post to quickly identify it.
- Schedule Time: The date and time the post is scheduled to be published.
- Platform: Icons indicating the platforms where the post will be published.
- Status: Shows whether the post was Successful or Failed.
Search & Filter
Users can search for posts using keywords or filter by platform and status to quickly locate specific content.
Post Actions
Each post card has a three-dot menu that allows users to:
- View full content or caption
- Edit or update scheduled posts
- Delete posts if necessary
Add New Post
Users can create a Single Post or Bulk Post using the buttons on the top-right corner.
Visual Reference
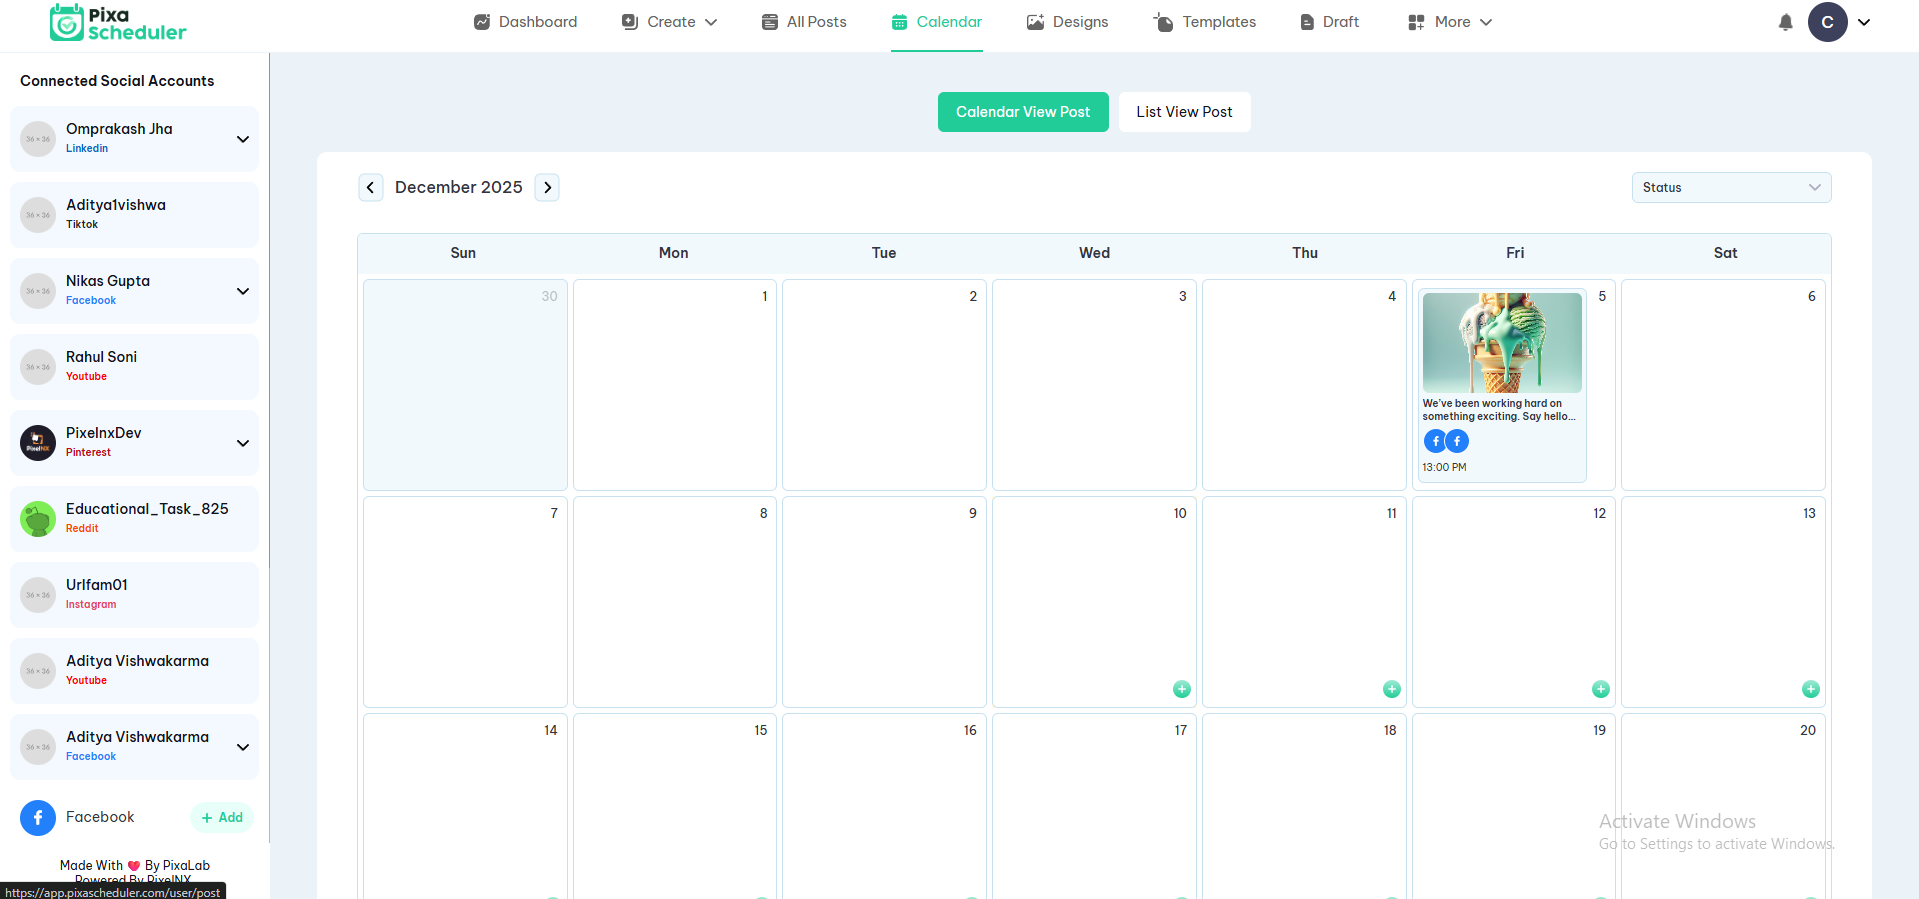
Calendar
Users can access the calendar by navigating to Header > Calendar. The calendar interface allows users to manage all their scheduled and posted content across multiple social media platforms in a single view.
View Scheduled Posts
The calendar displays all upcoming and published posts, categorized by date and platform. Users can quickly see which posts are scheduled and for which accounts.
Create Post from Calendar
Click on any date in the calendar to directly create a post for that day. This provides a fast and convenient way to schedule content without navigating away from the calendar.
Edit or Reschedule Posts
Users can click on any scheduled post to edit its content, change scheduled time, or reschedule to another date. This helps in maintaining a dynamic and flexible posting schedule.
Filter by Platform
Filter calendar posts by selected social media accounts such as Facebook, Instagram, LinkedIn, YouTube, Pinterest, or Reddit. This helps users focus on specific platforms as needed.
Visual Reference
Below is an example of the Calendar interface where users can view, create, and manage posts:
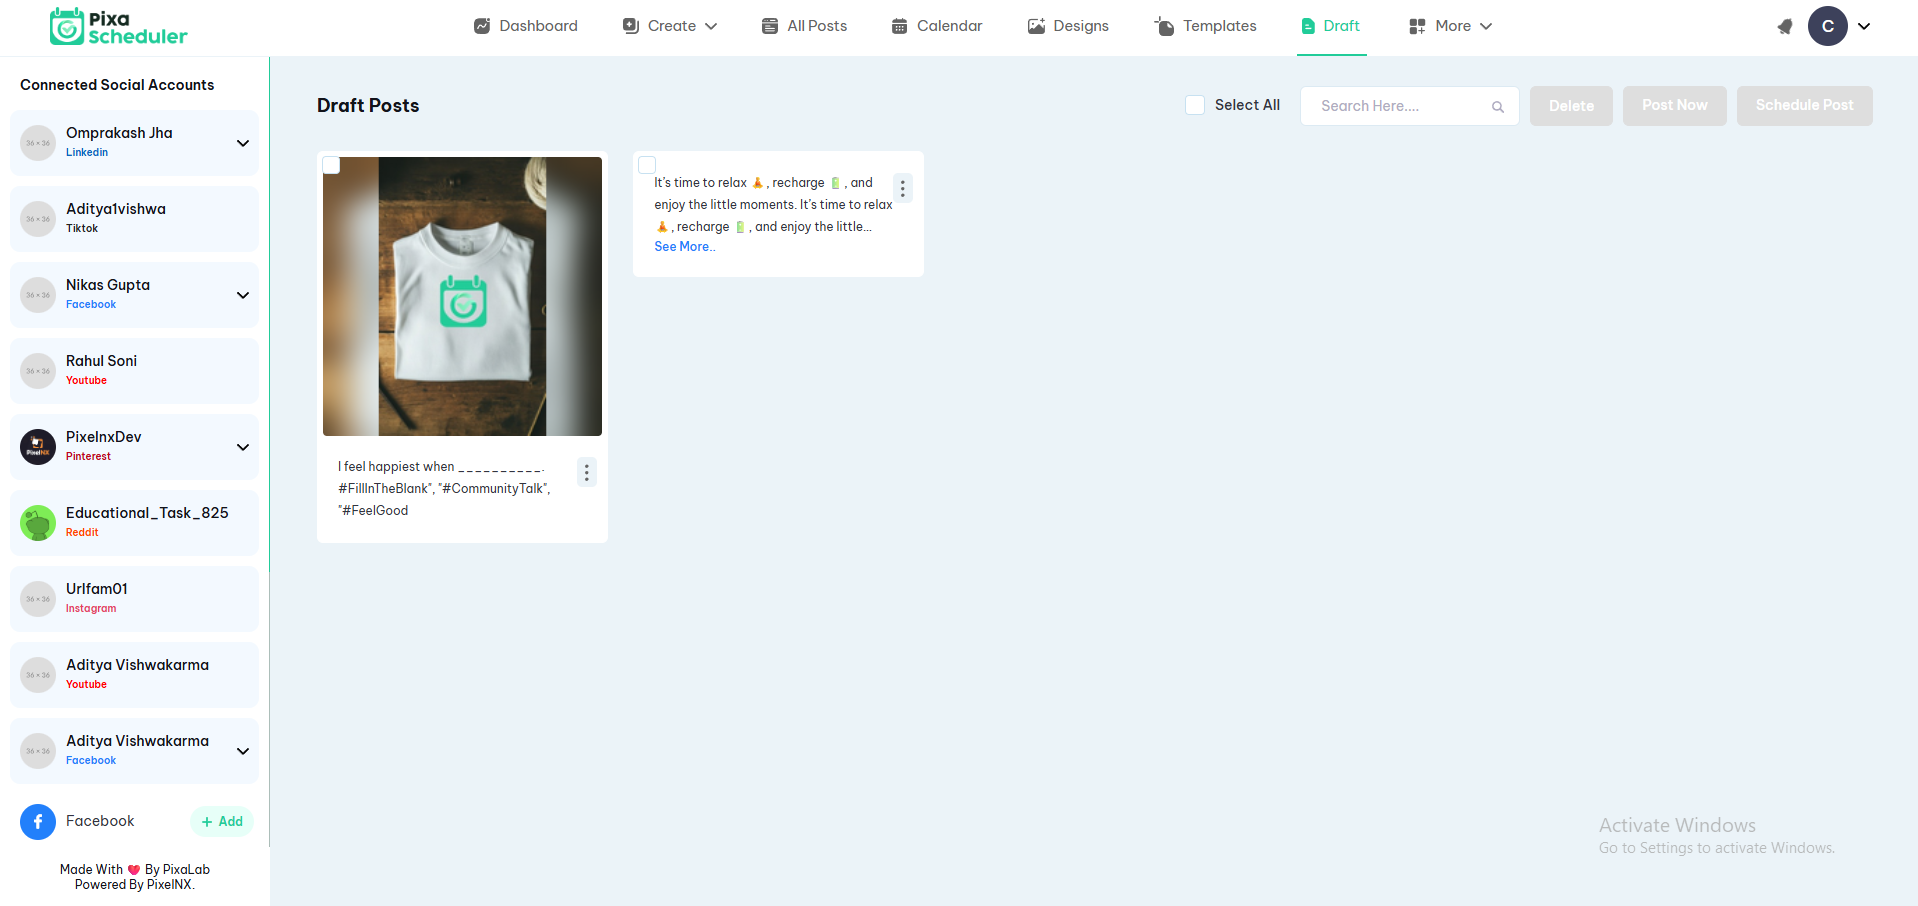
Drafts
The Drafts section allows users to manage posts that were saved but not yet published. Users can access their drafts to edit, post immediately, or schedule for a future date.
View and Edit Drafts
All saved drafts are displayed in a list or grid view. Users can click on any draft to open and edit the post content, update media, or modify other settings before publishing.
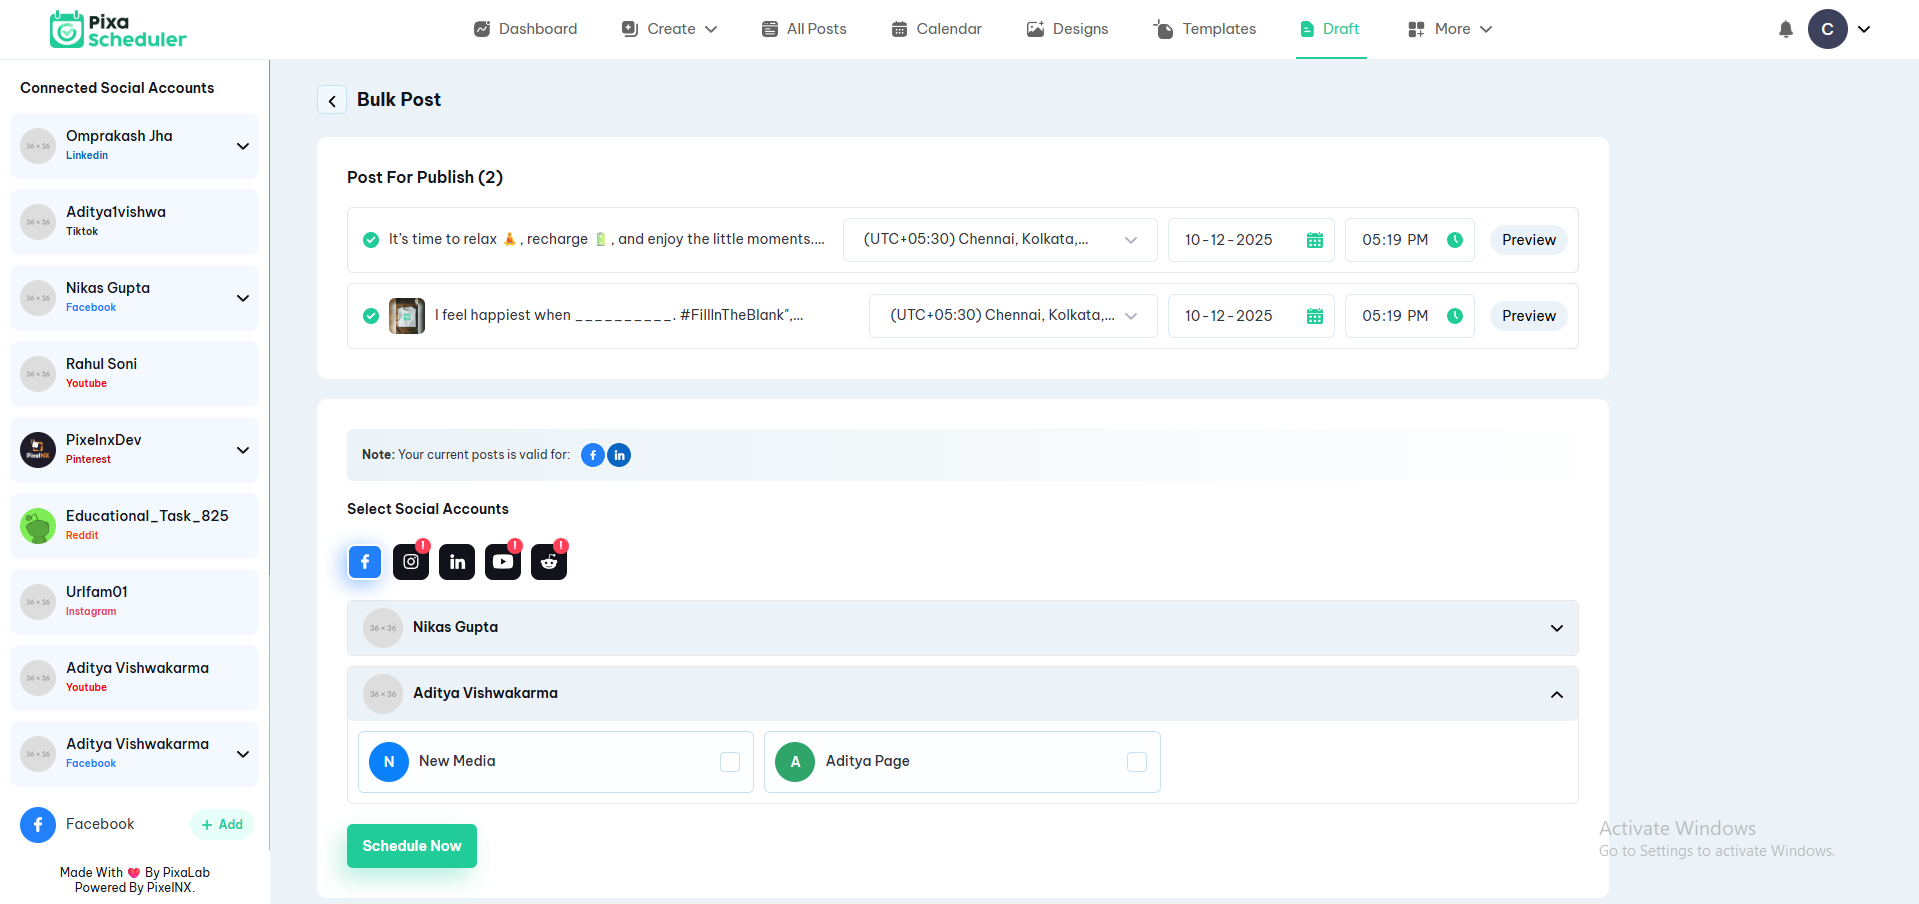
Select Single or Multiple Drafts
Users can select one or multiple drafts at a time to perform bulk actions such as posting immediately or scheduling. This saves time when handling multiple posts across platforms.
Choose Social Platforms
Once drafts are selected, users can choose which social media accounts to post to. A selection panel opens where multiple platforms can be selected, enabling simultaneous posting across Facebook, Instagram, LinkedIn, YouTube, Pinterest, and Reddit.
Post Actions
After selecting drafts and platforms, users can:
- Post Now: Immediately publish selected drafts to chosen platforms.
- Schedule: Set a specific date and time for each draft to go live.
- Edit: Open drafts individually to make further changes before posting.
Visual Reference
Below is an example of the Drafts interface, showing draft posts, selection options, and the social platform panel for bulk posting:
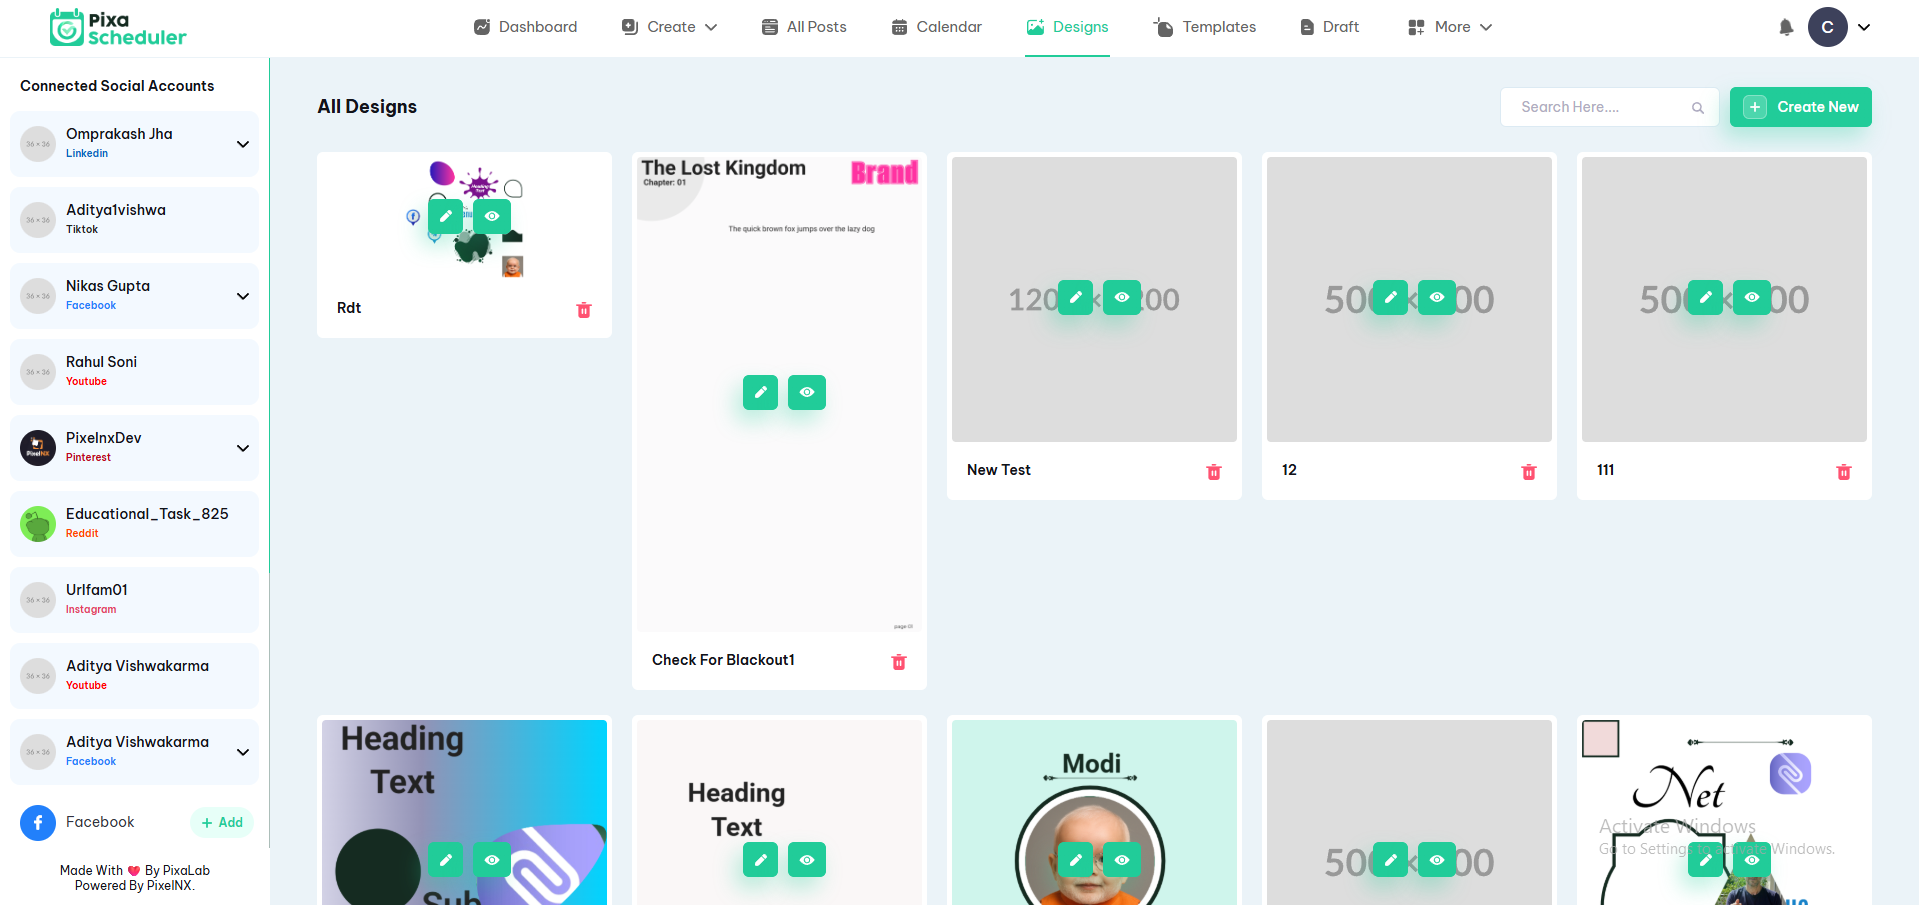
Design & Template
Users can access the design and template functionality via Header > Design or Header > Template. This section allows users to create new designs or select existing templates for their posts, stories, or social media content.
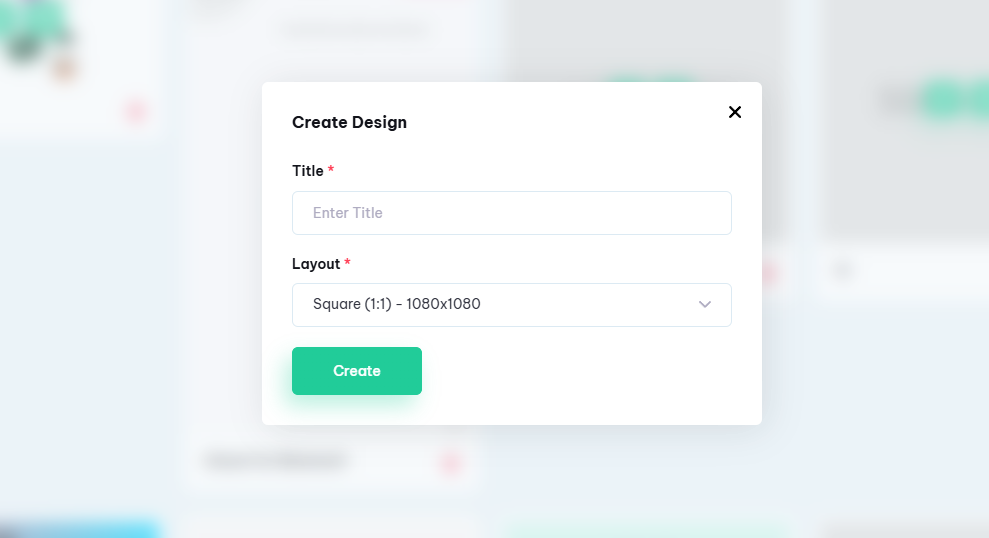
Create New Design
Users can start a new design from scratch using the editor. The editor provides tools for:
- Adding and customizing text, images, and shapes
- Adjusting colors, fonts, and styles
- Using layers, grouping, and alignment features
- Previewing the design before saving or publishing
Select Template
Users can browse and select pre-made templates from the Template section. Templates are categorized by content type, style, or social platform, helping users quickly create professional-looking posts without starting from scratch.
Edit Selected Template
After selecting a template, users can modify it in the editor just like a new design: updating text, images, and other elements to fit their needs before posting or saving.
Save and Use Designs
Once a design or template is ready, users can:
- Save: Store it in their library for future use.
- Post: Use it immediately in a new post or schedule it via the Create Post or Calendar sections.
- Duplicate: Make a copy to modify for different campaigns or platforms.
Visual Reference
Below is an example of the Design & Template interface, showing the design page and template selection options:
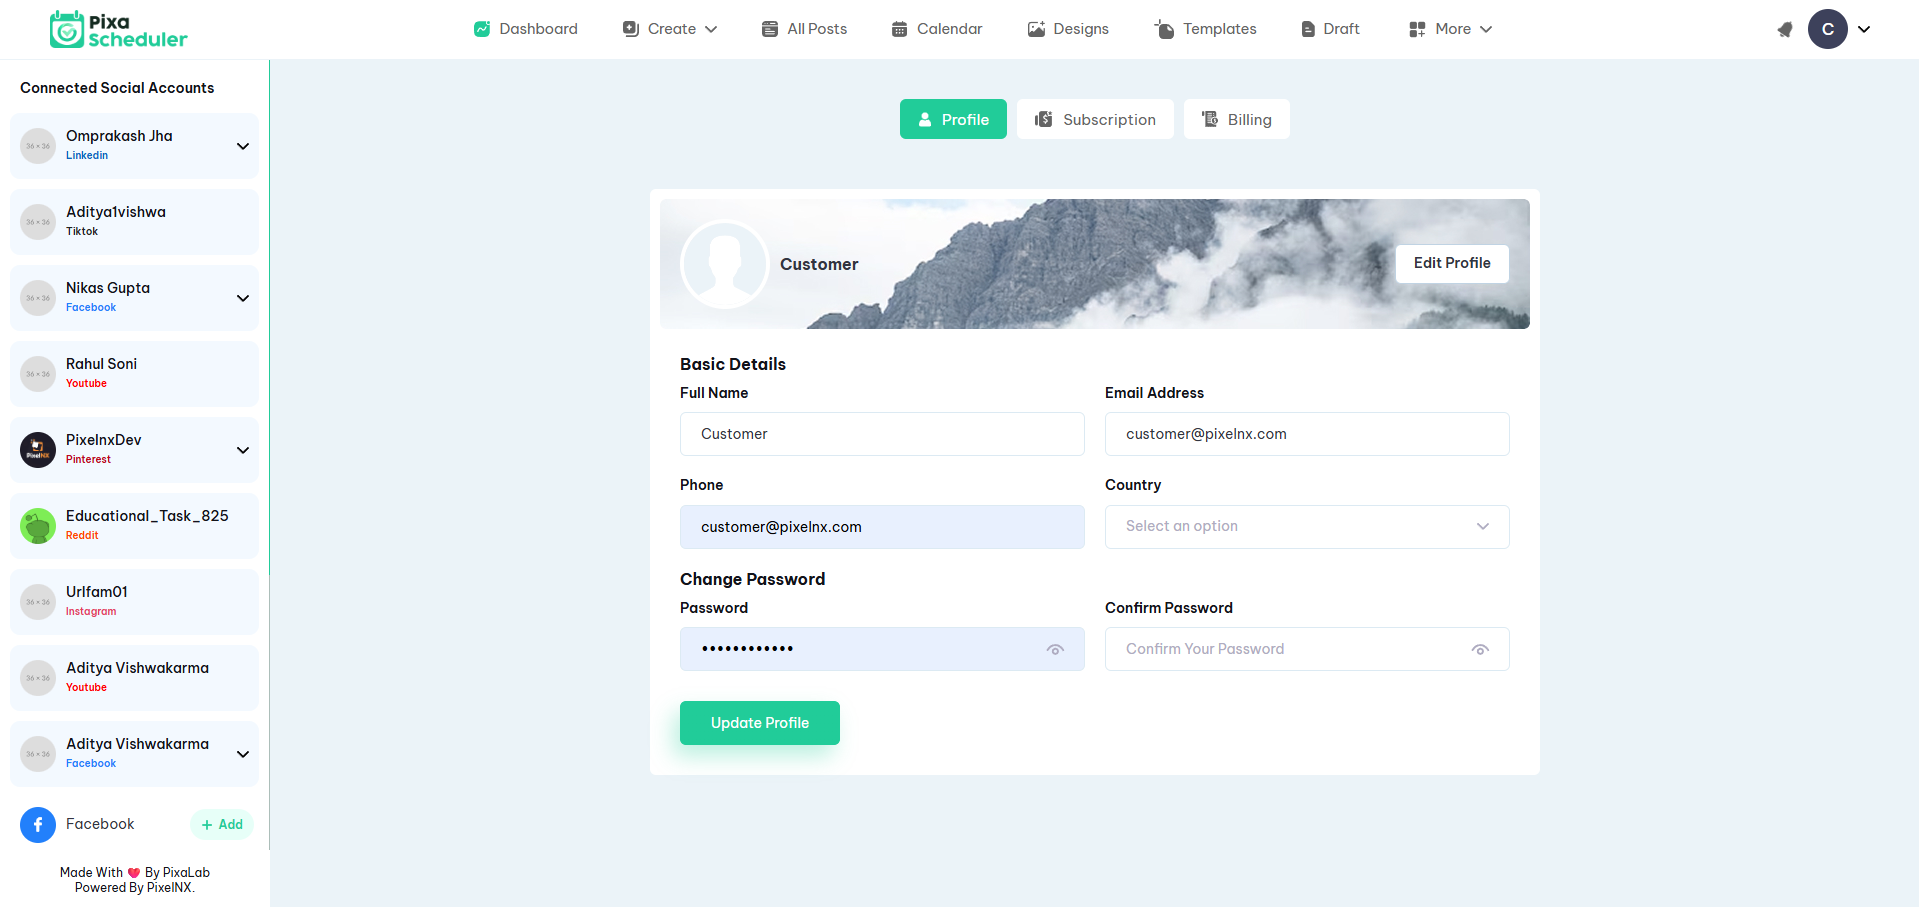
User Profile
The User Profile section allows users to manage their personal information, subscription plans, and billing details from a centralized location. This section is accessible directly from the header profile menu.
Profile Overview
The profile page is divided into multiple sections to simplify account management and improve user experience:
- Profile – Manage personal details such as name, email, and password
- Subscription – View current plan details and manage plan upgrades
- Billing – Review payment history, invoices, and billing information
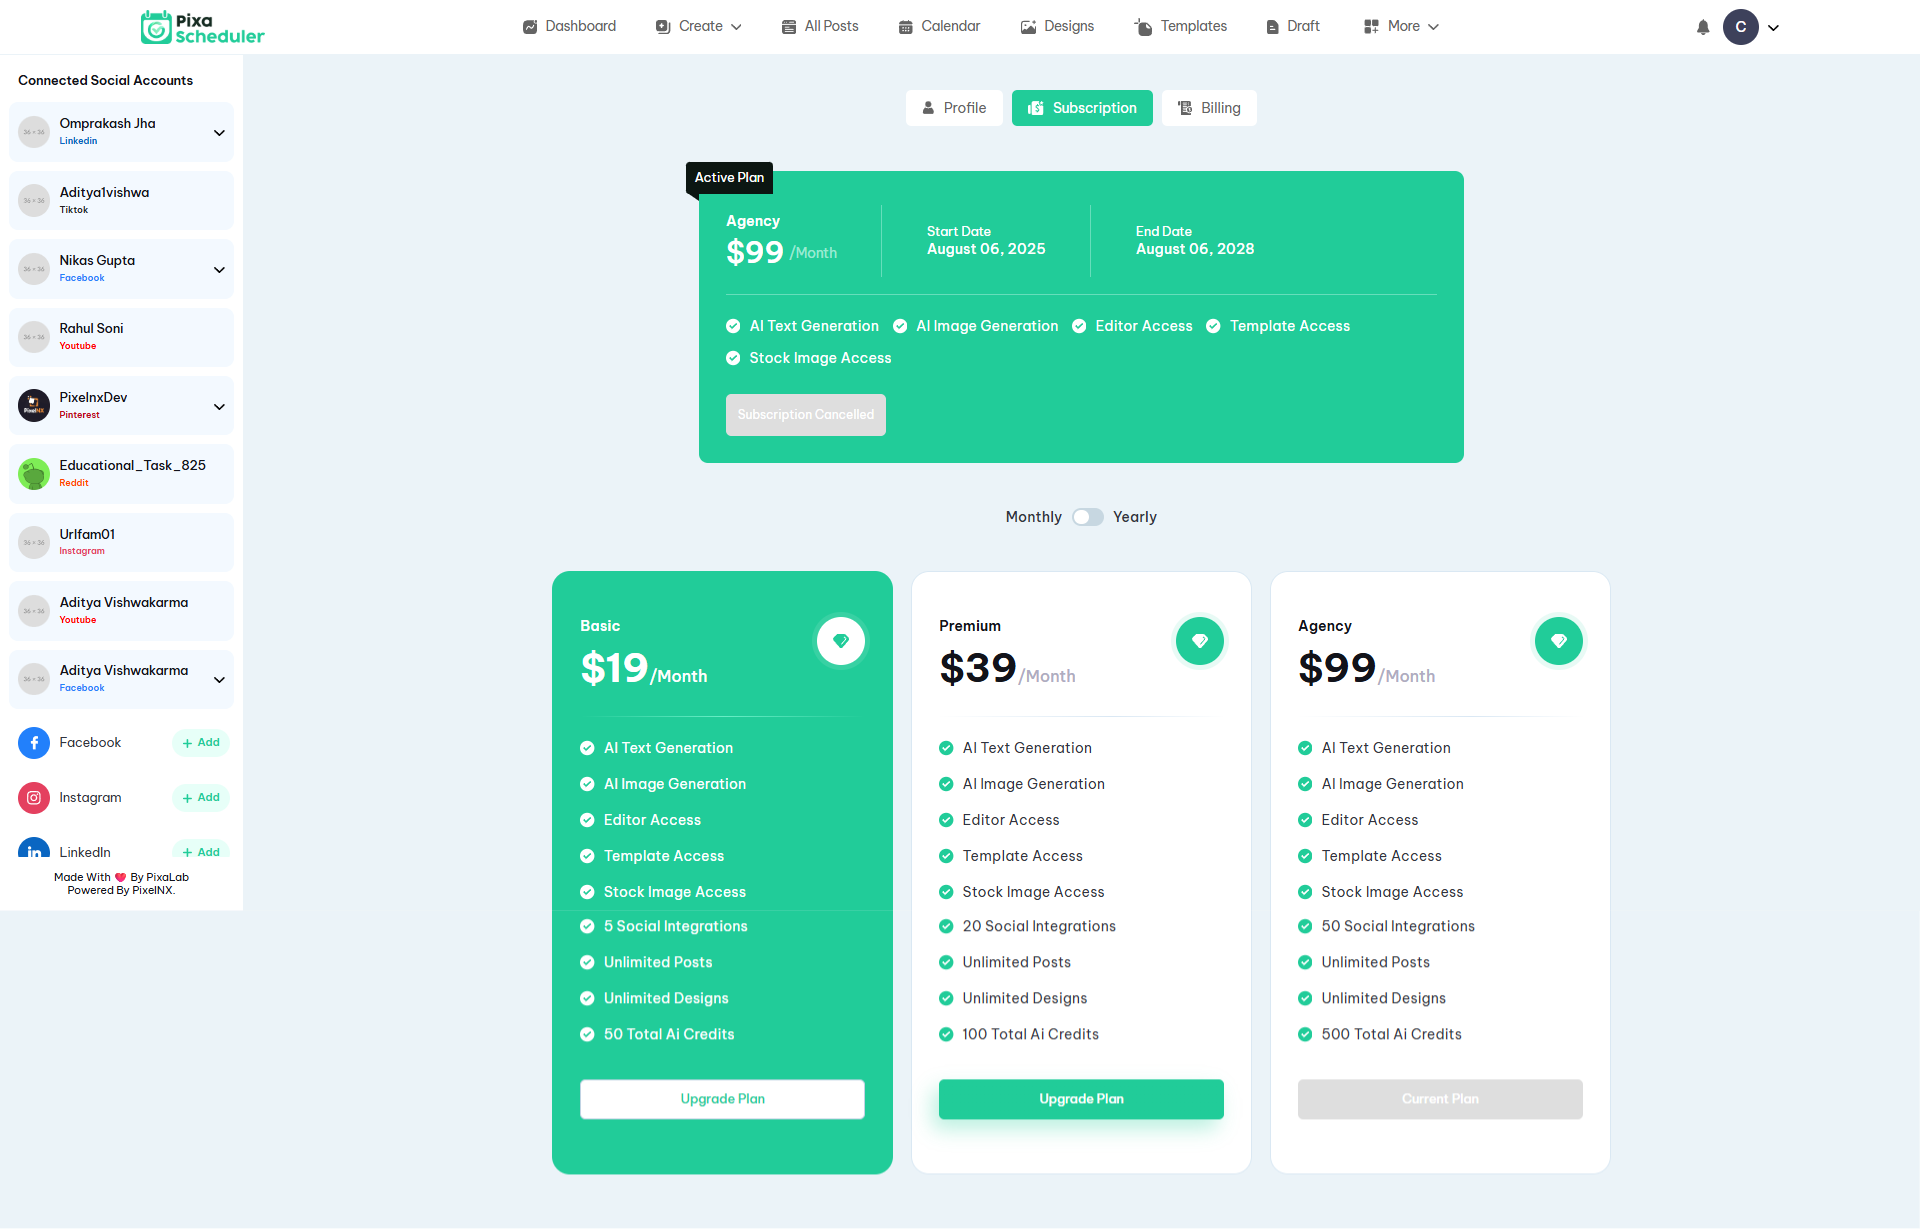
Subscription Section
The Subscription section provides users with a clear view of their current plan status and available upgrade options.
Users can see detailed information about their active subscription:
- Current Plan – Displays the active subscription plan
- Plan Status – Shows whether the plan is active, expired, or canceled
- Billing Cycle – Monthly or yearly subscription type
- Next Billing Date – Date of the next renewal or plan expiration
Users can upgrade their subscription at any time. If an upgrade is requested while a plan is still active, the new plan can be applied:
- Immediately, with price adjustments if applicable
- After the current subscription period ends
Downgrades or plan changes are scheduled to take effect after the current billing cycle to ensure uninterrupted service.
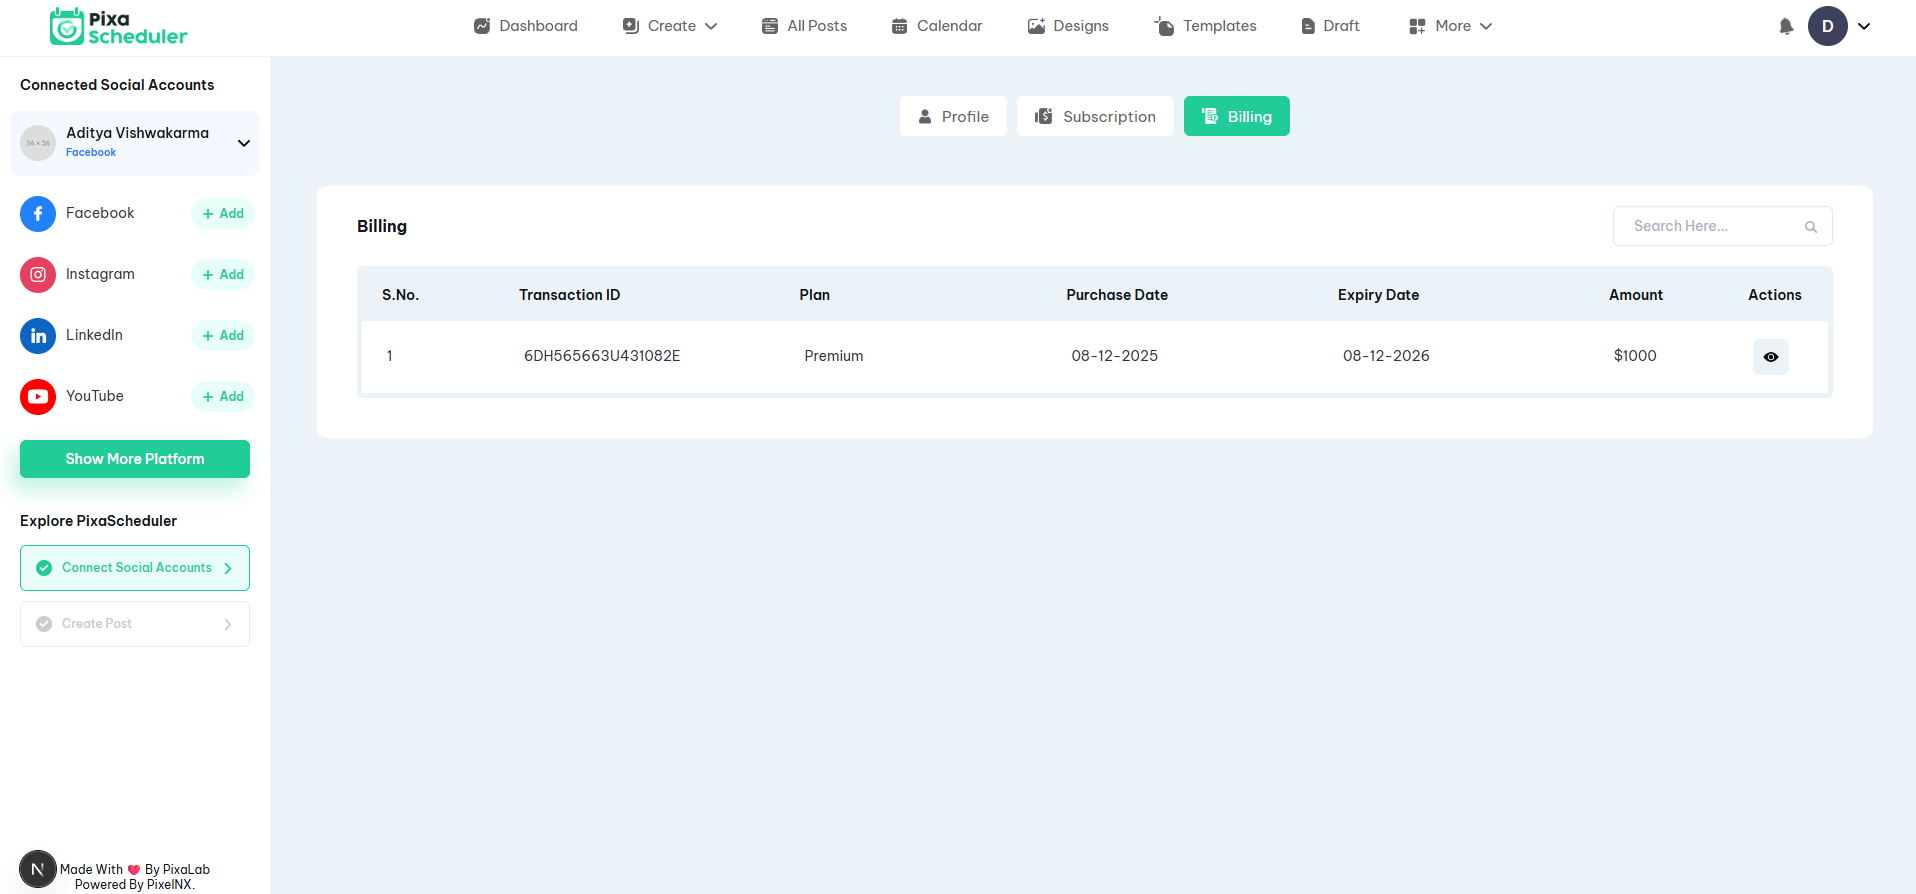
Billing Section
The Billing section allows users to review all payment-related activity associated with their account.
This section includes a complete history of previous transactions and invoices:
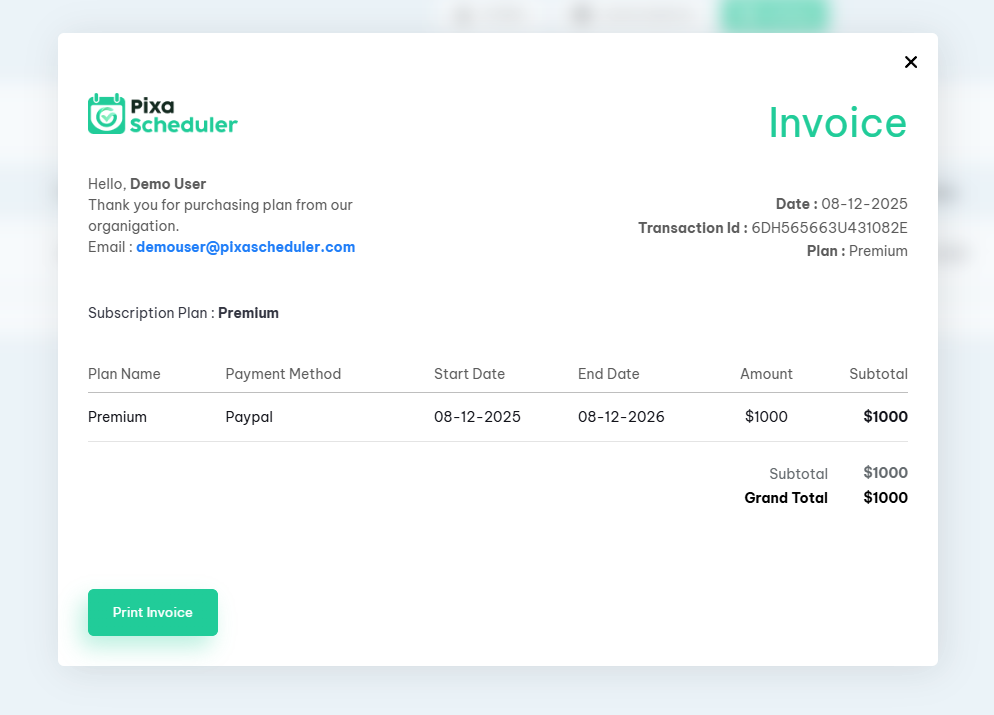
- Invoice History – List of all past subscriptions and payments
- Payment Status – Shows successful, pending, or failed transactions
- Invoice Download – Users can download invoices in PDF format
Billing records help users track expenses and maintain transparency for accounting and compliance purposes.
Help And Support
In order to receive a technical support assistance, you need to have a valid purchase code. To get the code, please navigate to your Codecanyon "Downloads" page and click on the plugin download link.
After getting the Purchase code, please follow the steps mentioned on the link click Here to get your product verified. And then share your Purchase code and token ID with the support team.
If you have any questions that are beyond the reach of this help file, feel free to contact us. We will respond as soon as possible (within 24 – 48 hours, usually faster). We are open from 9:30am to 6:30pm (IST), from Monday till Friday.
NOTE: As authors of this script we do provide support only for the script-related features.
Outro
Thank you for your purchase. If you have any questions that are beyond the scope of this help file, please contact us through support@pixelnx.com
Once again, thank you so much for purchasing this script. As I said at the beginning, I'd be glad to help you if you have any questions relating to this script. No guarantees, but I'll do my best to assist. If you have a more general question relating to the script, you might consider visiting the forums and asking your question in the "Item Discussion" section.